For many years Amazon Web Services (AWS) has been guiding users in the deployment of powerful NVIDIA GPU-backed workstations for graphics-intensive workloads. With the recent expansion of our G-series Amazon Elastic Compute Cloud (Amazon EC2) graphics-based instances, we’re excited to introduce new instance families that deliver enhanced performance and capabilities. We’re also refreshing our comprehensive guidance on choosing and configuring these powerful virtual workstations.
This is the first in a five-part series providing detailed guidance on instance types, and deployment instructions for building Windows and Linux based NVIDIA GPU powered workstation on GPU accelerated EC2 instances. In this initial post, we explore the instance types, and outline essential AWS configurations for account preparation, security, policies, and other prerequisites. Subsequent posts cover Linux deployment (Part 2), Windows deployment (Part 3), optimizations and infrastructure for standardizing workstations deployment at scale (Part 4), and security considerations (Part 5).
G instance families
The Amazon EC2 G-series instances come in multiple families, with various types and fractionalization of GPUs, memory-to-CPU ratios, and sizes of vCPU and RAM. The g6 and gr6 instances, equipped with NVIDIA L4 GPUs, deliver up to 200 percent performance improvement in graphics-intensive workloads compared to the widely-adopted g4dn family, while offering enhanced performance and cost efficiency over their g5 predecessors. The g6f and gr6f options introduce more GPU partitioning capabilities with the NVIDIA L4, so you can provision fractional GPU allocations. This supports more cost-effective scaling for workloads that do not need a full GPU, with options for half, quarter, and one-eighth GPU. Fractional instances are ideal for remote workstation applications for staff that need only partial GPU usage, as well as other tasks such as lightweight machine learning (ML) research.
The g6e instances, featuring the NVIDIA L40S GPU, go further with double the GPU memory, 2.9x faster GPU memory bandwidth, and up to 2.5 times overall performance improvement compared to g5 instances. All three families offer flexible configurations with 1, 4, or 8 GPUs, providing specialized cores optimized for GPU processing, ray tracing, and machine learning workloads, as shown in the following figure.
The latest 7th generation instances, the g7 and g7e offer greater performance in GPU speed and memory with the latest NVIDIA RTX PRO 4500 and 6000 respectively. These instances are well suited for high-end 3D and 2D workloads and artificial intelligence (AI) workloads, delivering 4.6 times the AI inference performance of previous g6 instances. With up to 700 Gbps EFA-enabled network bandwidth, g7 instances help you run graphics and data workloads more efficiently.
| NVIDIA L4 | NVIDIA L40S | NVIDIA RTX PRO 4500 | NVIDIA RTX PRO 6000 | |
| Architecture | Ada Lovelace | Ada Lovelace | Blackwell | Blackwell |
| Memory | 24 GB GDDR6 | 48 GB GDDR6 | 32 GB GDDR7 | 96 GB GDDR7 |
| Memory Bandwith | 300 GB/s | 864 GB/s | 896 GB/s | 1790 GB/s |
| Cuda Cores | 7680 | 18176 | 10496 | 24064 |
| Tensor Cores | 240 | 568 | 328 | 752 |
| Ray Tracing Cores | 60 | 140 | 82 | 188 |
Figure 1: The list of GPU architecture statistics for the L4, L40S, RTX PRO 4500, and RTX PRO 6000 NVIDIA GPUs
The 6th and 7th generation of G instances are available in multiple configurations to accommodate diverse GPU, CPU, memory, and networking requirements. The g6, g6f, and g7 instances maintain the traditional 1:4 ratio of vCPUs to memory (GiB) established by previous generations such as g4dn and g5. The gr6 and gr6f families introduce an enhanced 1:8 ratio option, while the g6e and g7e instances natively possess the expanded 1:8 ratio. These higher allocations suit memory-intensive 2D and 3D workloads that frequently encounter memory constraints, providing support for demanding visual computing applications.
For the non-fractional g6 and gr6 instances, the configurations of sizes are as follows:
| Instance type | NVIDIA L4 GPU count | vCPUs | Memory (GiB) | EBS Bandwidth (Gbps) | Network Bandwidth (Gbps) | |
| Single GPU | g6.xlarge | 1 | 4 | 16 | Up to 5 | Up to 10 |
| g6.2xlarge | 1 | 8 | 32 | Up to 5 | Up to 10 | |
| g6.4xlarge | 1 | 16 | 64 | 8 | Up to 25 | |
| g6.8xlarge | 1 | 32 | 128 | 16 | 25 | |
| g6.16xlarge | 1 | 64 | 256 | 20 | 25 | |
| Single GPU / Memory Biased | gr6.4xlarge | 1 | 16 | 128 | 8 | Up to 25 |
| gr6.8xlarge | 1 | 32 | 256 | 16 | 25 | |
| Multi GPU | g6.12xlarge | 4 | 48 | 192 | 20 | 40 |
| g6.24xlarge | 4 | 96 | 384 | 30 | 50 | |
| g6.48xlarge | 8 | 192 | 768 | 60 | 100 |
Figure 2: The list of g6 and gr6 instance types with corresponding GPU amounts, vCPUs, network, and bandwidth data
The fractional g6f and gr6f configurations are:
| Memory (GiB) to vCPU ratio | Instance type | NVIDIA L4 GPU count | NVIDIA L4 GPU RAM (GiB) | vCPUs | Memory (GiB) | EBS Bandwidth (Gbps) | Network Bandwidth (Gbps) |
| 4-to-1 | g6f.large | 1/8 | 3 | 2 | 8 | Up to 5 | Up to 10 |
| g6f.xlarge | 1/8 | 3 | 4 | 16 | Up to 5 | Up to 10 | |
| g6f.2xlarge | 1/4 | 6 | 8 | 32 | Up to 5 | Up to 10 | |
| g6f.4xlarge | 1/2 | 12 | 16 | 64 | 6 | Up to 25 | |
| 8-to-1 | gr6f.4xlarge | 1/2 | 12 | 16 | 128 | 8 | Up to 25 |
Figure 3: The list of g6f and gr6f instance types with corresponding fractional GPU amounts, vCPUs, network, and bandwidth data
For the g7 instances, the configurations of sizes are as follows:
| Instance type | NVIDIA RTX PRO 4500 GPU count | vCPUs | Memory (GiB) | EBS Bandwidth (Gbps) | Network Bandwidth (Gbps) | |
| Single GPU | g7.2xlarge | 1 | 8 | 32 | Up to 8 | Up to 60 |
| g7.4xlarge | 1 | 16 | 64 | 8 | Up to 100 | |
| g7.8xlarge | 1 | 32 | 128 | 16 | 100 | |
| Multi GPU | g7.12xlarge | 2 | 48 | 192 | 20 | 175 |
| g7.24xlarge | 4 | 96 | 384 | 40 | 350 | |
| g7.48xlarge | 8 | 192 | 768 | 80 | 700 | |
| g7.metal* | 8 | 192 | 768 | 80 | 700 |
Figure 4: The list of g7 instance types with corresponding GPU amounts, vCPUs, network, and bandwidth data
For the enhanced g6e the following instance size configurations are:
| Instance type | NVIDIA L40S GPU count | vCPUs | Memory (GiB) | EBS Bandwidth (Gbps) | Network Bandwidth (Gbps) | |
| Single GPU | g6e.xlarge | 1 | 4 | 32 | Up to 5 | Up to 20 |
| g6e.2xlarge | 1 | 8 | 64 | Up to 5 | Up to 20 | |
| g6e.4xlarge | 1 | 16 | 128 | 8 | 20 | |
| g6e.8xlarge | 1 | 32 | 256 | 16 | 25 | |
| g6e.16xlarge | 1 | 64 | 512 | 20 | 35 | |
| Multi GPU | g6e.12xlarge | 4 | 48 | 384 | 20 | 100 |
| g6e.24xlarge | 4 | 96 | 768 | 30 | 200 | |
| g6e.48xlarge | 8 | 192 | 1536 | 60 | 400 |
Figure 5: The list of g6e instance types with corresponding GPU amounts, vCPUs, network, and bandwidth data
Moreover, the g7e has the following instance size configurations:
| Instance type | NVIDIA L40S GPU count | vCPUs | Memory (GiB) | EBS Bandwidth (Gbps) | Network Bandwidth (Gbps) | |
| Single GPU | g7e.2xlarge | 1 | 8 | 64 | Up to 5 | 50 |
| g7e.4xlarge | 1 | 16 | 128 | 8 | 50 | |
| g7e.8xlarge | 1 | 32 | 256 | 16 | 100 | |
| Multi GPU | g7e.12xlarge | 2 | 48 | 512 | 25 | 400 |
| g7e.24xlarge | 4 | 96 | 1024 | 50 | 800 | |
| g7e.48xlarge | 8 | 192 | 2048 | 100 | 1600 |
Figure 6: The list of g7e instance types with corresponding GPU amounts, vCPUs, network, and bandwidth data
EC2 instances mount one (or more) Amazon Elastic Block Store (Amazon EBS) volumes for durable, block-level storage. These can be detached from the instance and retained independently from the lifecycle of that instance, allowing modifications of the instance itself (such as changing the size and type) without the loss of storage.
Ephemeral NVMe storage on each instance is also provided by Instance Stores, aligned for temporary scratch data that benefits from performant local I/O access, which can be used by 2D/3D applications (for example Foundry Nuke’s cache directory). In the follow-up posts we discuss setting up and configuring these instance stores to maximize efficiency. The 6th and 7th generation EC2 instances automatically have instance stores allocated, dependent on their sizes, as shown in the following figure:
| Instance Type | Instance store volumes |
| g6f.large, g6f.xlarge | 1 x 100GB |
| g6f.2xlarge | 1 x 200 GB |
| g6.xlarge, g6e.xlarge | 1 x 250 GB |
| g6.2xlarge, g6e.2xlarge, g6f.4xlarge, gr6f.4xlarge | 1 x 450 GB |
| g6.4xlarge, g6e.4xlarge, gr6.4xlarge, g7.2xlarge, g7.4xlarge | 1 x 600 GB |
| g6.8xlarge, g6e.8xlarge, gr6.8xlarge | 2 x 450 GB |
| g6.12xlarge, g6e.12xlarge | 4 x 940 GB |
| g6.16xlarge, g6e.16xlarge | 2 x 940 GB |
| g6.24xlarge, g6e.24xlarge | 4 x 940 GB |
| g6.48xlarge, g6e.48xlarge | 8 x 940 GB |
| g7.8xlarge | 1 x 950 GB |
| g7.12xlarge, g7e.2xlarge, g7e.4xlarge, g7e.8xlarge | 1 x 1.9 TB |
| g7.24xlarge, g7e.12xlarge | 1 x 3.8 TB |
| g7.48xlarge, g7.metal*, g7e.24xlarge | 2 x 3.8 TB |
| g7e.48xlarge | 4 x 3.8 TB |
Figure 7: The configuration of instance stores on the 6th and 7th generation EC2 instances
The 6th and 7th generation G instances represent our latest offering in GPU-powered workstations capable servers, but we still offer previous generations, notably the g5 and g4dn, giving many choices in machine types to match performance and cost needs.
You can find specifications of all our instances types, on our Amazon EC2 webpage (G instances are classed as Accelerated Computing types).
Desktop streaming with Amazon DCV
Typically, cost-effective Mini PCs or laptops are used to connect to the Amazon EC2 workstation through a desktop streaming protocol. AWS offers a high-end desktop experience through Amazon DCV. This is a performant remote display protocol capable of streaming 4k UHD resolution images over multiple monitors (up to 4), 60 frames per second, QUIC UDP support for high performance image streaming, 4:4:4 8-bit chroma sub-sampling, and stylus/touch device support for M&E workloads. Our posts show how to set up both the server and client for Amazon DCV on Windows and Linux.
The recent addition of Wacom Bridge with Amazon DCV has optimized stylus operations further (on Windows at the time of writing, Linux in beta currently). This is both in terms of real-time user feedback on the local device, mitigating the effect of any potential latency delay, but also dedicated channel support for hardware communications to provide even lower latency performance, as well as the synchronization of settings.
Workstation connectivity
When establishing connectivity between your on-premises workstation and your EC2 instance, you have three primary options, each offering different levels of security, performance, and complexity.
Internet connectivity (used in this post)
For this post, we use the most basic connection method: direct internet connectivity. This approach connects your local workstation to your Amazon EC2 instance over the public internet, with security groups (virtual firewalls) configured to restrict access to your specific IP address and only the necessary ports.
This method uses application-layer security to provide built-in encryption for all Amazon DCV streaming sessions, which helps keep your visual data protected during transmission. Security groups operate at the network and transport layers to control which IP addresses and ports can reach your instances. Together, these layers provide complementary security properties:
- Confidentiality in transit: DCV session traffic is encrypted, which helps prevent an intermediary who intercepts the traffic from reading its contents.
- Access control at the instance boundary: Security groups accept connections only from IP addresses on your approved list, reducing the instance’s exposure to unsolicited inbound connection attempts.
- Reduced attack surface: Only the specific ports required for DCV are exposed, which limits how much of the instance is reachable from the network.
This method provides a straightforward setup suitable for individual users or small teams, combining quick configuration with secure encrypted streaming. We discuss the security group configuration in detail later in this post.
The following diagram illustrates this internet-based connectivity architecture. It shows how an artist’s local workstation connects across the public internet to a GPU-backed EC2 instance in AWS, with Amazon DCV carrying the session between them.
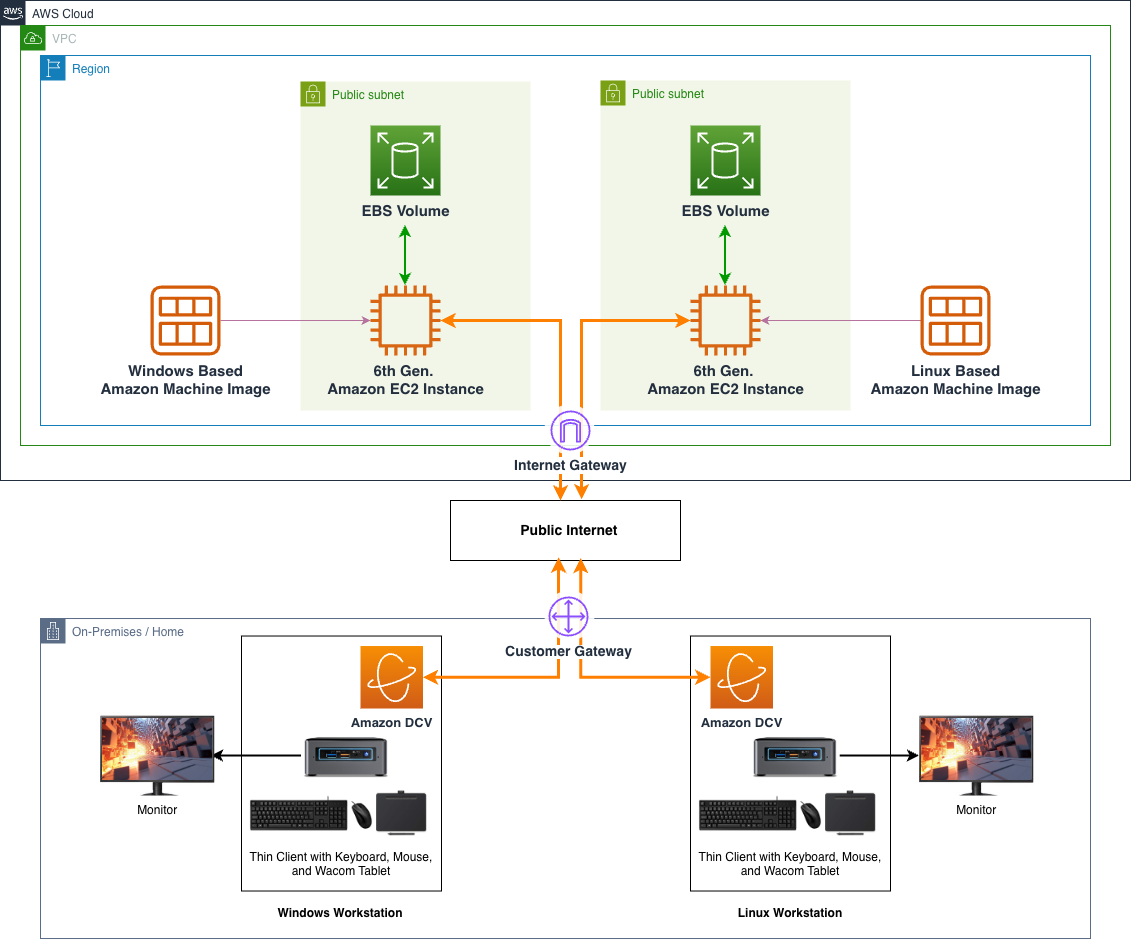
Figure 8: A streamlined architectural diagram showing on-premises and home workstations integrating with Amazon EC2 instances, using Amazon Machine Images and EBS storage, connecting through the internet
VPN connectivity
For organizations requiring additional security beyond basic internet connectivity, AWS Site-to-Site VPN provides encrypted tunnels that use the internet securely. This method creates a secure connection between your on-premises location and your AWS resources, allowing you to access EC2 workstations through encrypted channels while maintaining the high-performance capabilities needed for graphics-intensive work.
AWS Site-to-Site VPN adds network-layer encryption on top of the application-layer protection provided by Amazon DCV. The VPN establishes encrypted IPsec tunnels between your on-premises network and AWS, so traffic is protected at the network layer before it reaches the application. In practice this means your DCV session traffic travels inside an additional encrypted tunnel alongside the rest of your network connection.
Choosing Site-to-Site VPN over direct internet connectivity comes down to a few practical factors:
- Security posture: VPN extends your existing corporate network controls and policies into AWS, so the same governance you apply on-premises continues to apply to traffic reaching your instances. This is useful if your organization requires network-layer encryption or treats AWS as an extension of the internal network.
- Operational complexity: VPN requires configuring and maintaining the tunnel, a customer gateway, and routing on both sides. This is more involved than direct connectivity, which needs only a security group.
- Cost: Site-to-Site VPN carries an hourly connection charge plus data transfer.
VPN connectivity is a good fit when you need to extend your corporate network into AWS and maintain consistent security policies across both environments, and when the added setup and cost are justified by that requirement.
The following diagram shows the VPN-based connectivity architecture. The key difference from the direct-internet setup is that the EC2 instances now sit in a private subnet with no public internet access. The Site-to-Site VPN carries all traffic between your on-premises network and AWS instead.
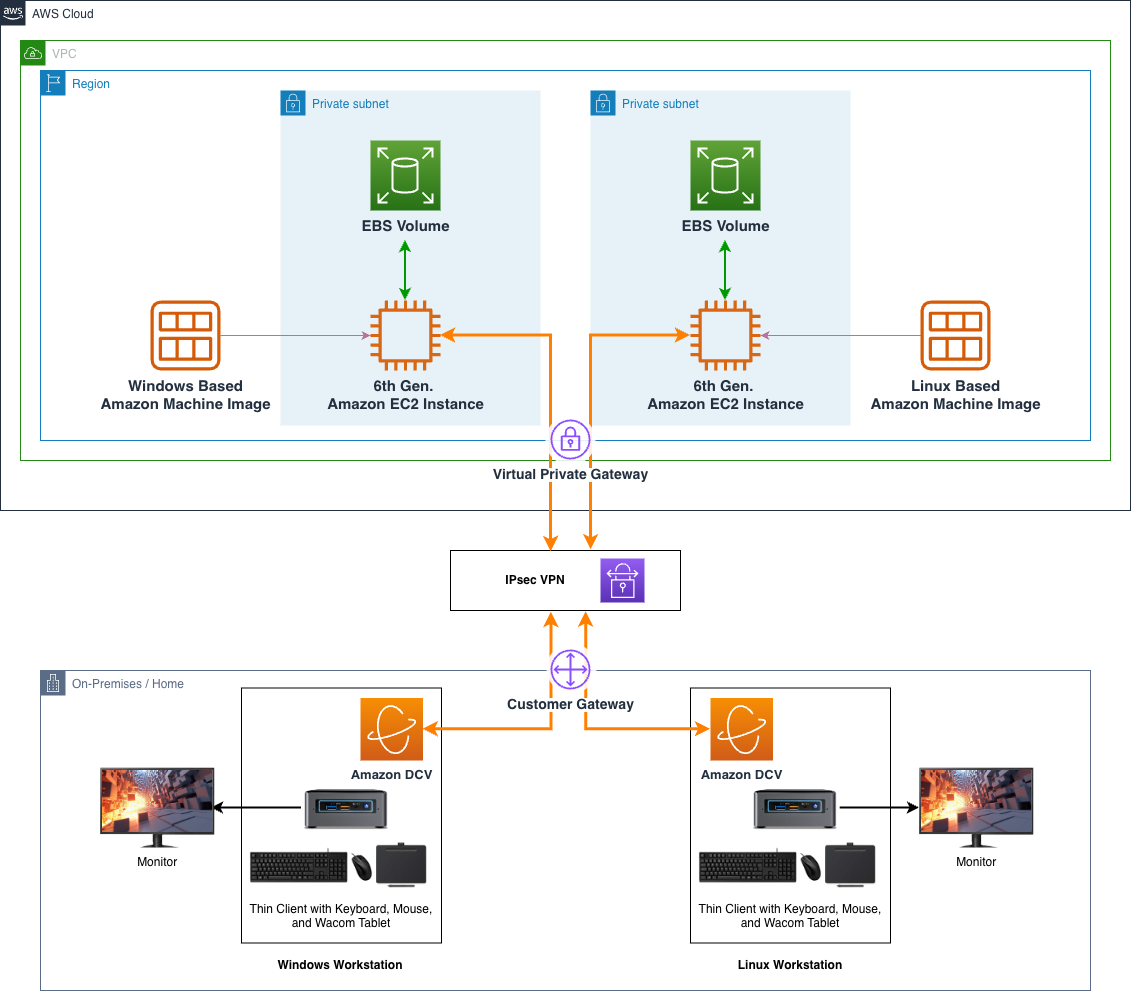
Figure 9: A streamlined architectural diagram showing on-premises and home workstations integrating with Amazon EC2 instances, using Amazon Machine Images and EBS storage, connecting through a Site-to-Site VPN
AWS Direct Connect
For workloads that need consistent network performance and a connection that doesn’t traverse the public internet, AWS Direct Connect establishes a dedicated physical connection between your on-premises location and AWS. Through your chosen network provider, it creates a private link from your premises to the AWS Region containing your Amazon EC2 G instances, which can offer more predictable latency and bandwidth than an internet-based connection.
AWS Direct Connect provides additional isolation at the physical and data link layers by using a dedicated connection that doesn’t traverse the public internet. Your traffic travels over private network infrastructure between your location and AWS, which keeps it off shared internet paths and gives you more consistent, predictable network behavior than an internet-based connection. Because the connection is private and dedicated, it isn’t exposed to the general internet in the way a public connection is.
AWS Direct Connect is ideal for organizations requiring consistent network performance, enhanced security, and reduced data transfer costs when working with graphics workstations in the cloud. Combined with the application-layer encryption of Amazon DCV, this provides defense-in-depth across the entire network stack, from the physical cables through to the application data itself. This approach provides the most predictable latency and bandwidth for demanding creative workflows.
The following diagram depicts the Direct Connect connectivity architecture. As with the VPN option, the EC2 instances sit in private subnets with no need for public internet access, but here the connection runs over a dedicated Direct Connect link between your on-premises location and AWS.
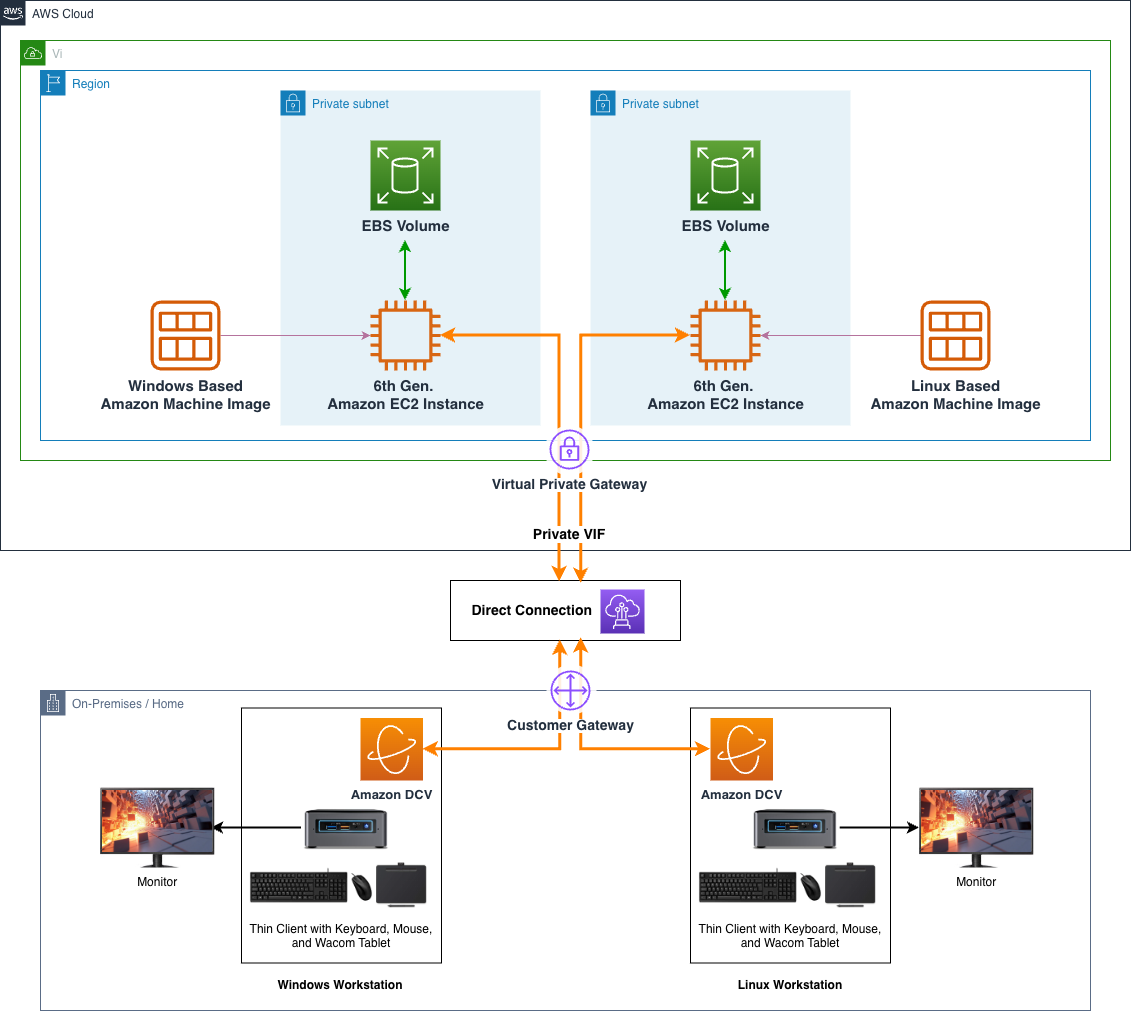
Figure 10: A streamlined architectural diagram showing on-premises and home workstations integrating with Amazon EC2 instances, using Amazon Machine Images and EBS storage, connecting through a Direct Connect link
Consult the documentation for further details and options around VPN offerings, as well as Direct Connect, to inform your security decisions. For further information, and additional firewall and protection services that can enhance protection against exploits such as ransomware and DDoS, please see Security, Identity and Compliance on AWS.
Latency
A superior virtual workstation experience relies on low-latency and high-bandwidth connectivity from your local client to your EC2 instance. Bandwidth requirements vary based on several factors such as the number of monitors, screen resolution, frame rate, and visual quality settings. For creative professionals using Wacom tablets or similar input devices, we recommend a latency round trip of 50 ms or less when using Amazon DCV. To evaluate your connection’s suitability, there are a number of third-party websites that you can use to test latency between your location and the nearest Region, such as https://aws-latency-test.com/ or https://www.cloudping.info/.
“Our collaboration with the AWS Visual Computing team and the use of EC2 instances as virtual workstations, has exceeded our expectations, delivering exceptional result.”
— John Coyne, Senior Technical Manager, Sky TV
Workstation build overview
For the purposes of this post, we focus on deploying a g6 family instance.
The following overview outlines the complete build across the whole series. Part 1 covers the prerequisites and base image selection. The remaining phases such as the instance configuration, creating Amazon Machine Images, and setting up launch templates are covered in later parts.
- Prerequisites.
- Account setup and GPU instance quotas.
- Security configurations (access, firewalls, permissions).
- Base image selection.
- Linux and Windows options.
- Customization for VFX needs.
- Instance configuration.
- Linux and Windows set up.
- GPU and system tools installation.
- Creating Amazon Machine Images (AMIs) to capture the resultant machine image.
- Setting up EC2 Launch Templates to encapsulate all boot requirements.
- Standardizing deployment parameters.
- Streamlining future workstation launches.
- GPU optimization tips and resources.
Cost consideration
In these posts we use different AWS services, with each service having a cost associated with its usage. EC2 instances are charged by the second, so you must make sure that you shut down or terminate the instances when you are finished to avoid unwanted costs.
Accessing AWS services through the AWS Command Line Interface
AWS has many API/SDK entry points for creating and manipulating services. In this post we use the AWS Command Line Interface (AWS CLI), a convenient utility that you can use to query and set AWS service properties through the command line. In both the Windows and Linux deployment posts we set up the CLI for later convenience.
For more information about how to configure the credentials for usage with the CLI, as well as the range of functionality that you can use with it, go to the AWS CLI User Guide.
Workstation prerequisites Part 1: account setup and service quotas
The following steps are used to set up a secure Amazon Virtual Private Cloud (Amazon VPC) network platform for your instances, providing security and permissions for accessing and configuring your instance:
- Create an AWS account.
- Open and configure the AWS Management Console to gain access to AWS.
- Go to the Console.
Setting the AWS Region
At the time of writing, AWS has 39 geographic Regions, each composed of multiple AWS Availability Zones (AZs) to make sure of service availability and durability, and over 35 AWS Local Zones (which are infrastructure deployments that place compute, storage, and other select AWS services closer to large population and industry centers). For more information, see the AWS Documentation on Global Infrastructure. As we previously mentioned, latency can be critical for optimal virtual workstation experiences. Therefore, we recommend building your workstations in a Region that offers the best latency experience. This is configured on the console itself:
- Choose your AWS Region that best suits your needs (a drop down of AWS Regions is available at the top right of the Console).
AWS services can vary across AWS Regions, so before proceeding you must confirm that g6 instances are available in your AWS Region of choice. This can be done through the Amazon EC2 service page, as shown in the following figure:
- Open the Amazon EC2 service page, the central service page for deploying EC2 instances.
- Search for “EC2” in the Service search bar (top left), or choose Services -> Compute -> EC2.
- Choose Instance Types in the left pane.
- Enter “g6” into the Instance Types search bar and confirm that the various g6 instance types are listed as available in that AWS Region. The following image shows a filtered response from the Instance Types pane.
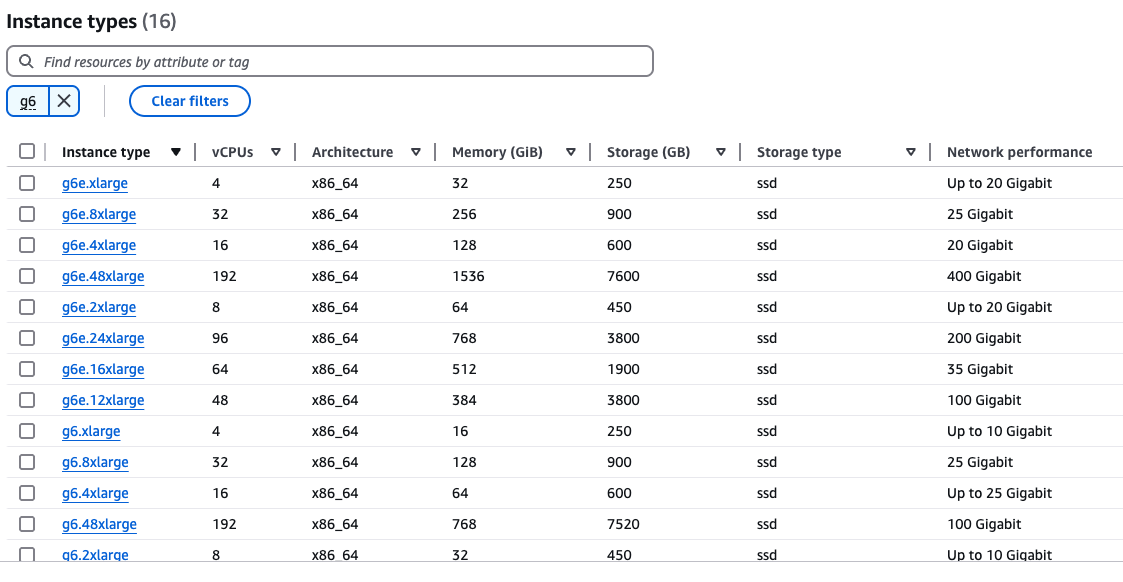
Figure 11: A screen capture of the Instance Types page, reporting g6 Amazon EC2 availability in a Region
Service limits
Limits exist around many AWS services. They act as guard rails for new users and prevent misuse of AWS services. New AWS accounts start with low limits to prevent unintentional spend, so you need to check the account limits to make sure that there is enough GPU vCPU quota to launch your workstation. You can check and request limit changes through the Service Quotas service page:
- Navigate to the Service Quotas page by searching for its name in the Services search bar (top left of the Console window). Or alternatively choose Services -> Management and Governance -> Service Quotas.
You can choose the star icon next to each service to bookmark it for access later at the top of the Console.
- Under Manage quotas (top right), enter EC2 in the search field, choose Amazon Elastic Compute Cloud (Amazon EC2), and choose View quotas.
- In the Service quotas search field that appears, enter On-Demand G and the list of quotas should reduce to just Running On-Demand G and VT instances, the quota controlling your access to G instance machines, as shown in the following figure.
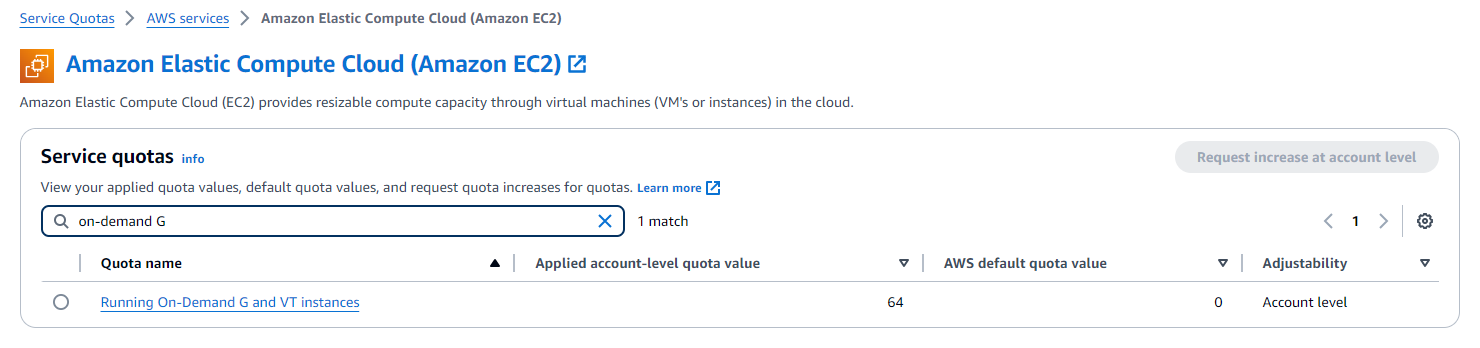
Figure 12: A screen capture of the Service Quotas page, requesting an increase to the GPU limit
You can see the current Applied account-level quota value, which is your limit on how many vCPUs you can use at any given time in this Region. This is not the number of instances (a common misconception)! We recommend making sure that you have at least a quota of 32, because this is enough to run two g6.4xlarge instances, a common size that suits basic 2D and 3D workflows. If the value in the applied account-level quota is below this, then you must submit a request to increase it:
- Choose Request Increase at account level.
- Enter “32” in the Increase quota value field.
- Choose Request.
When you receive an email confirmation of the increase, check the quota limit again for a value of 32 and you are safe to proceed with the rest of the post.
Workstation prerequisites Part 2: networking and security
When you have received your Service Quota increase, you can continue back in the AWS Management Console to start setting up some auxiliary components needed for workstations, for example security keys, firewall groups, and so on.
- Open the Amazon EC2 service page, the central service page for deploying EC2 instances.
- Search for “EC2” in the Service search bar (top left) or choose Services -> Compute -> EC2.
Amazon EC2 key pair security
Amazon EC2 key pairs are security credentials that validate your identity when accessing EC2 instances.
To set up an Amazon EC2 key pair:
- Under Network and Security on the left side of the panel, choose Key Pairs.
- Choose Create key pair in the top right.
- Give your new key pair a name, for example
ec2_test_keypair. - Leave the key pair as an RSA type, with a .pem extension, and choose Create key pair.
- Store the automatically downloaded
.pemfile in a safe place, because you need it later.
You should restrict the permissions on the .pem file so that only you can read it.
On a Mac or Linux machine you can change the permission in a terminal:
On Windows, open the context menu for the file, choose Properties, then the Security tab, choose Advanced, choose Disable inheritance, and remove access to all users except the current user. For more information surrounding the best use of key pairs, go to the relevant section in the Amazon EC2 User Guide.
Virtual firewalls
Security groups act as virtual firewalls, restricting incoming and outgoing traffic to your G instances. You should set up a security group working on the principle of least privilege, which means you must be very specific about which ports and which IP addresses can access it:
- Under Network and Security on the left pane, choose Security groups.
- Choose Create Security Group in the top left.
- Give your security group a name, for example
ec2_test_sg. - Give your security group a meaningful description, for example
SG for basic EC2 interaction. - Leave the VPC as-is. This automatically presents the ‘default’ VPC in your account and AWS Region.
- The following Inbound rules ports must be added to the security group to allow access to that machine from a specific client’s source IP address: in this case your local machine. Under Inbound rules, use the Add rule feature multiple times to add the definitions defined in the following figure, using the My IP drop-down under Source to automatically determine and use your current IP address, appending the /32 CIDR to limit the connectivity to that single address.The following table contains a list of TCP and UDP ports to add to your security group.
| Type | Protocol | Port Range | Source | Description |
| SSH | TCP | 22 | <YOUR “CUSTOM” CLIENT SOURCE IP> | SSH for Linux platform. |
| Custom TCP Rule | TCP | 443 | <YOUR “CUSTOM” CLIENT SOURCE IP> | HTTPS for both platforms. |
| Custom TCP Rule | TCP | 8443 | <YOUR “CUSTOM” CLIENT SOURCE IP> | Amazon DCV for both platforms. |
| Custom UDP Rule | UDP | 8443 | <YOUR “CUSTOM” CLIENT SOURCE IP> | Amazon DCV for both platforms. |
| RDP | TCP | 3389 | <YOUR “CUSTOM” CLIENT SOURCE IP> | RDP for Windows platform. |
Figure 13: The list of inbound ports that need to be opened to allow user access to the EC2 instance for the purpose of this post
| For the purposes of this post, we’re making a single security group that encompasses both Linux and Windows. If you’re only focusing on a specific operating system, then a security consideration would be to remove the unneeded ports. |
- For Outbound rules, the default allows all outbound traffic. This is enough for the instance to download packages and reach AWS service endpoints during setup, and because inbound access is already restricted to your IP, it doesn’t open an inbound path. Open outbound traffic is, however, the route that data exfiltration or a compromised host’s callbacks would use. Once your instance is running and you know which destinations it genuinely needs (for example, HTTPS 443 to AWS and your package repositories), restrict outbound rules to those destinations rather than leaving them fully open.
- Choose Create security group to finish making the security group.
Identity and Access Management
AWS advocates a policy of least permissions, establishing a strong base security standpoint, which necessitates that you add the permissions needed for access to services. To allow your Amazon EC2 workstation instance to access services such as Amazon Simple Storage Service (Amazon S3) (for graphics drivers), you must create a role to encompass these permissions for your instance. You should set up an AWS Identity and Access Management (IAM) profile to allow the instance access to the necessary services.
- Navigate to the IAM service page by entering “IAM” into the Service search field (top left), or choose Security, Identity & Compliance > IAM.
- Choose Roles (in the left side pane).
- Choose Create role, in the top right.
- Leave the Trusted entity type as AWS service.
You must use AWS approved NVIDIA GPU drivers, issued through Amazon S3, not only for optimal compatibility and performance, but also to make sure that the necessary professional GRID drivers are automatically provisioned. Therefore, you need a role that can read from Amazon S3. You should use a very generic Amazon S3 read-only policy to allow read access to public S3 buckets (such as the bucket on which AWS shares GPU drivers).
- Under Use case, enter “S3” and then choose Next (bottom right).
- Search for
AmazonS3ReadOnlyAccessand choose the box to the left of the policy to add it to the role. Then, choose Next. - Give your new role a name, for example
basic_workstation_role. - Choose Create role.
| If later on you want to add more service features to your workstation role (for example to enable write permissions from the workstation to one of your own storage buckets), then you can use the same process to add pre-defined permissions or create your own in JSON. |
You now have an account, and the resources needed to launch EC2 instances, which are covered in our next posts.
Conclusion
In this post we have discussed the different generation Amazon EC2 instance families: their memory, network, storage, and GPU options. We have outlined the steps needed not only to prepare an AWS account for running GPU workstations but also to build key infrastructure that is needed to deploy them.
We recommend that you continue to Part 2 of our series, Building a GPU workstation for visual effects on Amazon EC2: Part 2 – Linux, where you can learn how to create a Linux-backed workstation. You can also read Part 3 of our series, Building a GPU workstation for visual effects with Amazon EC2: Part 3 – Windows, to learn how to create a Windows-backed workstation.
For more information contact us at aws-visual-compute-interest@amazon.com.
Further reading
If you want to augment a VFX workstation environment with a dedicated render farm, then consider the managed service AWS Deadline Cloud.
EC2 instance metrics, such as CPU and memory usage, are sent to Amazon CloudWatch, where you can access this data through the AWS Management Console and AWS CLI. This information can be pertinent to discern if an EC2 instance is being over or under provisioned for the work at hand. In other words, it has excessive CPU, memory, and networking resources for the current tasks, and it could be optimized for price, or the alternative where it has not been allocated enough resources to cope. For more information, go to the Amazon EC2 User Guide.
More advanced examples of using Amazon DCV can be found in this “aws-samples” GitHub repo. This includes methods to broker multiple users and instances. Furthermore, DCV Connection Gateway provides a single-entry point for users to connect to multiple DCV sessions across different instances, streamlining access management and improving security through centralized authentication.
Commercial options also exist to perform artist/instance brokering, using Amazon DCV and Amazon EC2 Launch templates. An example of such an offering is Leostream.
For reference, examples of setting up Amazon DCV capable instances, and using AWS CloudFormation templates as a method of deployment, can be found in this GitHub repo.
A greater depth of analysis of bit rates, and latency, surrounding Amazon DCV connections can be found in this AWS HPC post.