Many teams that build applications self-host their identity provider (IdP), such as Keycloak or PingFederate, inside a private network. These IdPs usually present a TLS server certificate from a private certificate authority (CA). With private CA support in AgentCore Identity, a capability of Amazon Bedrock AgentCore, your agents can now connect to these IdPs while trusting the private CA that your organization already uses.
AgentCore Identity now supports private CA certificates for private identity providers. You store the PEM-encoded CA certificate in AWS Secrets Manager or Amazon Simple Storage Service (Amazon S3) and reference it from your credential provider. The CA certificate contains only the public certificate, not its private key. AgentCore Identity uses it to validate the server certificate presented by your IdP’s discovery, JSON Web Key Set (JWKS), and token endpoints. The CA certificate must be a root or intermediate CA certificate.
In this post, we show you how to issue an IdP certificate with AWS Private Certificate Authority. We then configure an AgentCore Identity credential provider to trust it and rotate the CA while minimizing downtime. We also show how to protect the CA certificate so that only your IdP team can change it. Although AgentCore Identity supports any private CA, including enterprise, third-party, and self-signed root CAs, the walkthrough in this post uses AWS Private CA and Keycloak as the IdP.
Solution overview
Consider an agent that needs to call an internal wiki API protected by your Keycloak IdP. The agent runs on AgentCore Runtime, a capability of Amazon Bedrock AgentCore, which hosts your agent code. To get an OAuth 2.0 access token from Keycloak, the agent uses an AgentCore Identity credential provider, which holds the IdP connection details and client credentials.
The following diagram shows this setup. Keycloak runs in your virtual private cloud (VPC) behind an internal Application Load Balancer. The load balancer presents an AWS Certificate Manager (ACM) private certificate signed by AWS Private CA. The CA certificate that AgentCore Identity trusts is stored in Secrets Manager or Amazon S3.
AgentCore Identity reaches the IdP privately through Amazon VPC Lattice, which connects to your VPC through a resource gateway, an entry point for VPC Lattice traffic into your VPC. VPC Lattice is required for private CA support. If you choose the managed option, AgentCore Identity creates and manages the VPC Lattice resources for you.
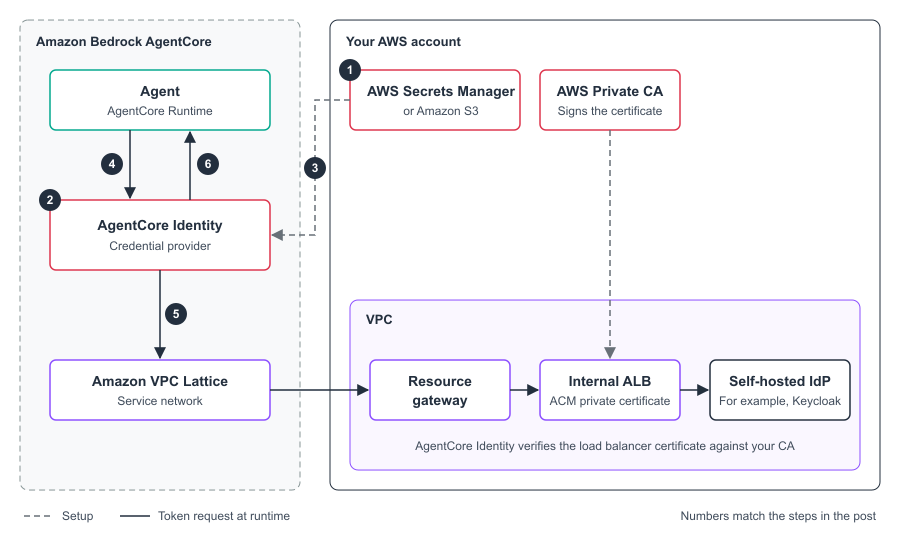
Figure 1: Connecting AgentCore Identity to a self-hosted IdP that uses a private CA
The flow works as follows:
- You store the CA certificate in Secrets Manager or Amazon S3.
- You create a credential provider that points to your IdP and to the CA certificate.
- AgentCore Identity reads the CA certificate and checks that it’s a valid CA certificate.
- Your agent requests an access token from AgentCore Identity.
- AgentCore Identity connects to the IdP through VPC Lattice and checks the load balancer certificate against your CA.
- The IdP issues the token and AgentCore Identity returns it to your agent.
Agents that use machine-to-machine, on-behalf-of, and user-delegated flows can also use the private CA without changing their code.
Prerequisites
To follow this walkthrough, you need:
- An AWS account with access to the AgentCore console, in a supported AWS Region where AgentCore Identity supports private IdPs.
- A self-hosted, OpenID Connect (OIDC) compliant IdP that runs in your VPC, with an OAuth client registered for your agent. The networking requirements, including subnets, security groups, and a private hosted zone for the IdP hostname, are described in Connect to private identity providers.
- The latest version of the AWS Command Line Interface (AWS CLI) and OpenSSL.
- Permission to create credential providers, plus read access to the CA certificate. AgentCore Identity reads the certificate with the credentials of the principal that calls
CreateOauth2CredentialProvider, so that principal needssecretsmanager:GetSecretValueon the secret ors3:GetObjecton the object. If the secret or object is encrypted with a customer managed AWS Key Management Service (AWS KMS) key, the principal also needskms:Decrypton that key.
Considerations
Keep the following in mind when you plan your deployment:
- Private IdPs only: A credential provider or authorizer must have a
privateEndpointto use a private CA. Otherwise, the request fails with the messageThe private certificate authority feature can only be used with private IdP. - CA certificates in PEM format: The file must be PEM-encoded and no larger than 16 KB. It must contain only root or intermediate CA certificates that are within their validity period.
- One certificate source per provider: Each credential provider references one secret or one S3 object. To trust more than one CA, put the certificates in the same PEM file.
- Storage location: The secret or S3 object must be in the same AWS Region as the credential provider. Secrets Manager secrets must also be in the same account as the credential provider. S3 objects can be in another account when you provide
bucketOwnerAccountIdand the bucket policy grants access. - Regions: Private CA support depends on VPC Lattice and is available in the AWS Regions where AgentCore Identity supports private IdPs.
Walkthrough
The walkthrough has four steps. If your IdP already presents a certificate from your enterprise CA, skip to Step 2.
Step 1: Issue a server certificate for your IdP
Start by creating a root CA in AWS Private CA. For instructions, see Create a private CA and Install the CA certificate. Choose general-purpose mode, because short-lived certificate mode issues certificates that are valid for 7 days or less. When you create the CA, authorize ACM to renew certificates, so that ACM can renew the IdP’s server certificate before it expires.
Next, request the server certificate. AgentCore Identity checks that the certificate matches the IdP hostname, so include each hostname that appears in your IdP’s discovery document as a subject alternative name (SAN). In most Keycloak deployments, the discovery, JWKS, and token endpoints share one hostname. For example, if your discovery URL is https://keycloak.example.local/realms/agents/.well-known/openid-configuration, add keycloak.example.local as a SAN.
To request a private certificate for the IdP (console)
- Open the ACM console and choose Request.
- Choose Request a private certificate and then choose Next.
- For Certificate authority, choose the CA that you created.
- For Fully qualified domain name, enter the IdP hostname, for example
keycloak.example.local. - Choose Request.
- Attach the certificate to the HTTPS listener of the internal load balancer in front of your IdP. For instructions, see Update an HTTPS listener.
Step 2: Store the CA certificate
AgentCore Identity needs to trust the CA certificate to validate the IdP’s server certificate. Because it trusts the CA rather than the server certificate itself, you don’t need to update the credential provider each time the server certificate renews.
Export the CA certificate from AWS Private CA in PEM format:
Before you upload the file, check it against the requirements. The file must be PEM-encoded and meet size requirements, containing only CA certificates that are within their validity period. The following commands show the CA flag, expiry date, and file size. The last command confirms that the IdP’s certificate chains to this CA. Run it from a host that can reach the IdP. It returns Verify return code: 0 (ok) when the chain is valid.
The output looks similar to the following:
Store the file in Secrets Manager or Amazon S3. A Secrets Manager secret must be a string secret in the same account as the credential provider. An S3 object can be in another account, which suits organizations that run the IdP in a central account.
Give write access to the secret or object only to the team that operates your IdP. For an example policy, see Protect the CA certificate later in this post.
Step 3: Create the credential provider
You can create the credential provider in the AgentCore console or with the AWS CLI. The private CA settings appear on the console only after you connect the OAuth client to a VPC, because private CA support applies only to private IdPs.
To create a credential provider that trusts your private CA (console)
- Open the AgentCore console and in the navigation pane under Connections, choose Outbound Auth. Then choose Add OAuth client.
- For Provider, choose Customized provider. For Configuration type, choose Discovery URL and enter your IdP’s discovery URL, for example
https://keycloak.example.local/realms/agents/.well-known/openid-configuration. Then enter the client ID and client secret. - Expand Additional configurations. Under VPC security, choose Managed and select the VPC, subnets, and security groups that can reach the IdP. If you manage your own VPC Lattice resources, choose Self-managed and select the resource configuration instead.
- Under Root certificate authority, choose Add root certificate.
- In the Add root certificate panel, for Certificate source, choose AWS Secrets Manager and select the secret that you created in Step 2. To use Amazon S3, choose Amazon S3 and enter the S3 URI. For an object in another account, also enter the Bucket owner account ID.
- Choose Apply.
- Choose Add OAuth client.
The Root certificate authority field accepts either a root or an intermediate CA certificate.
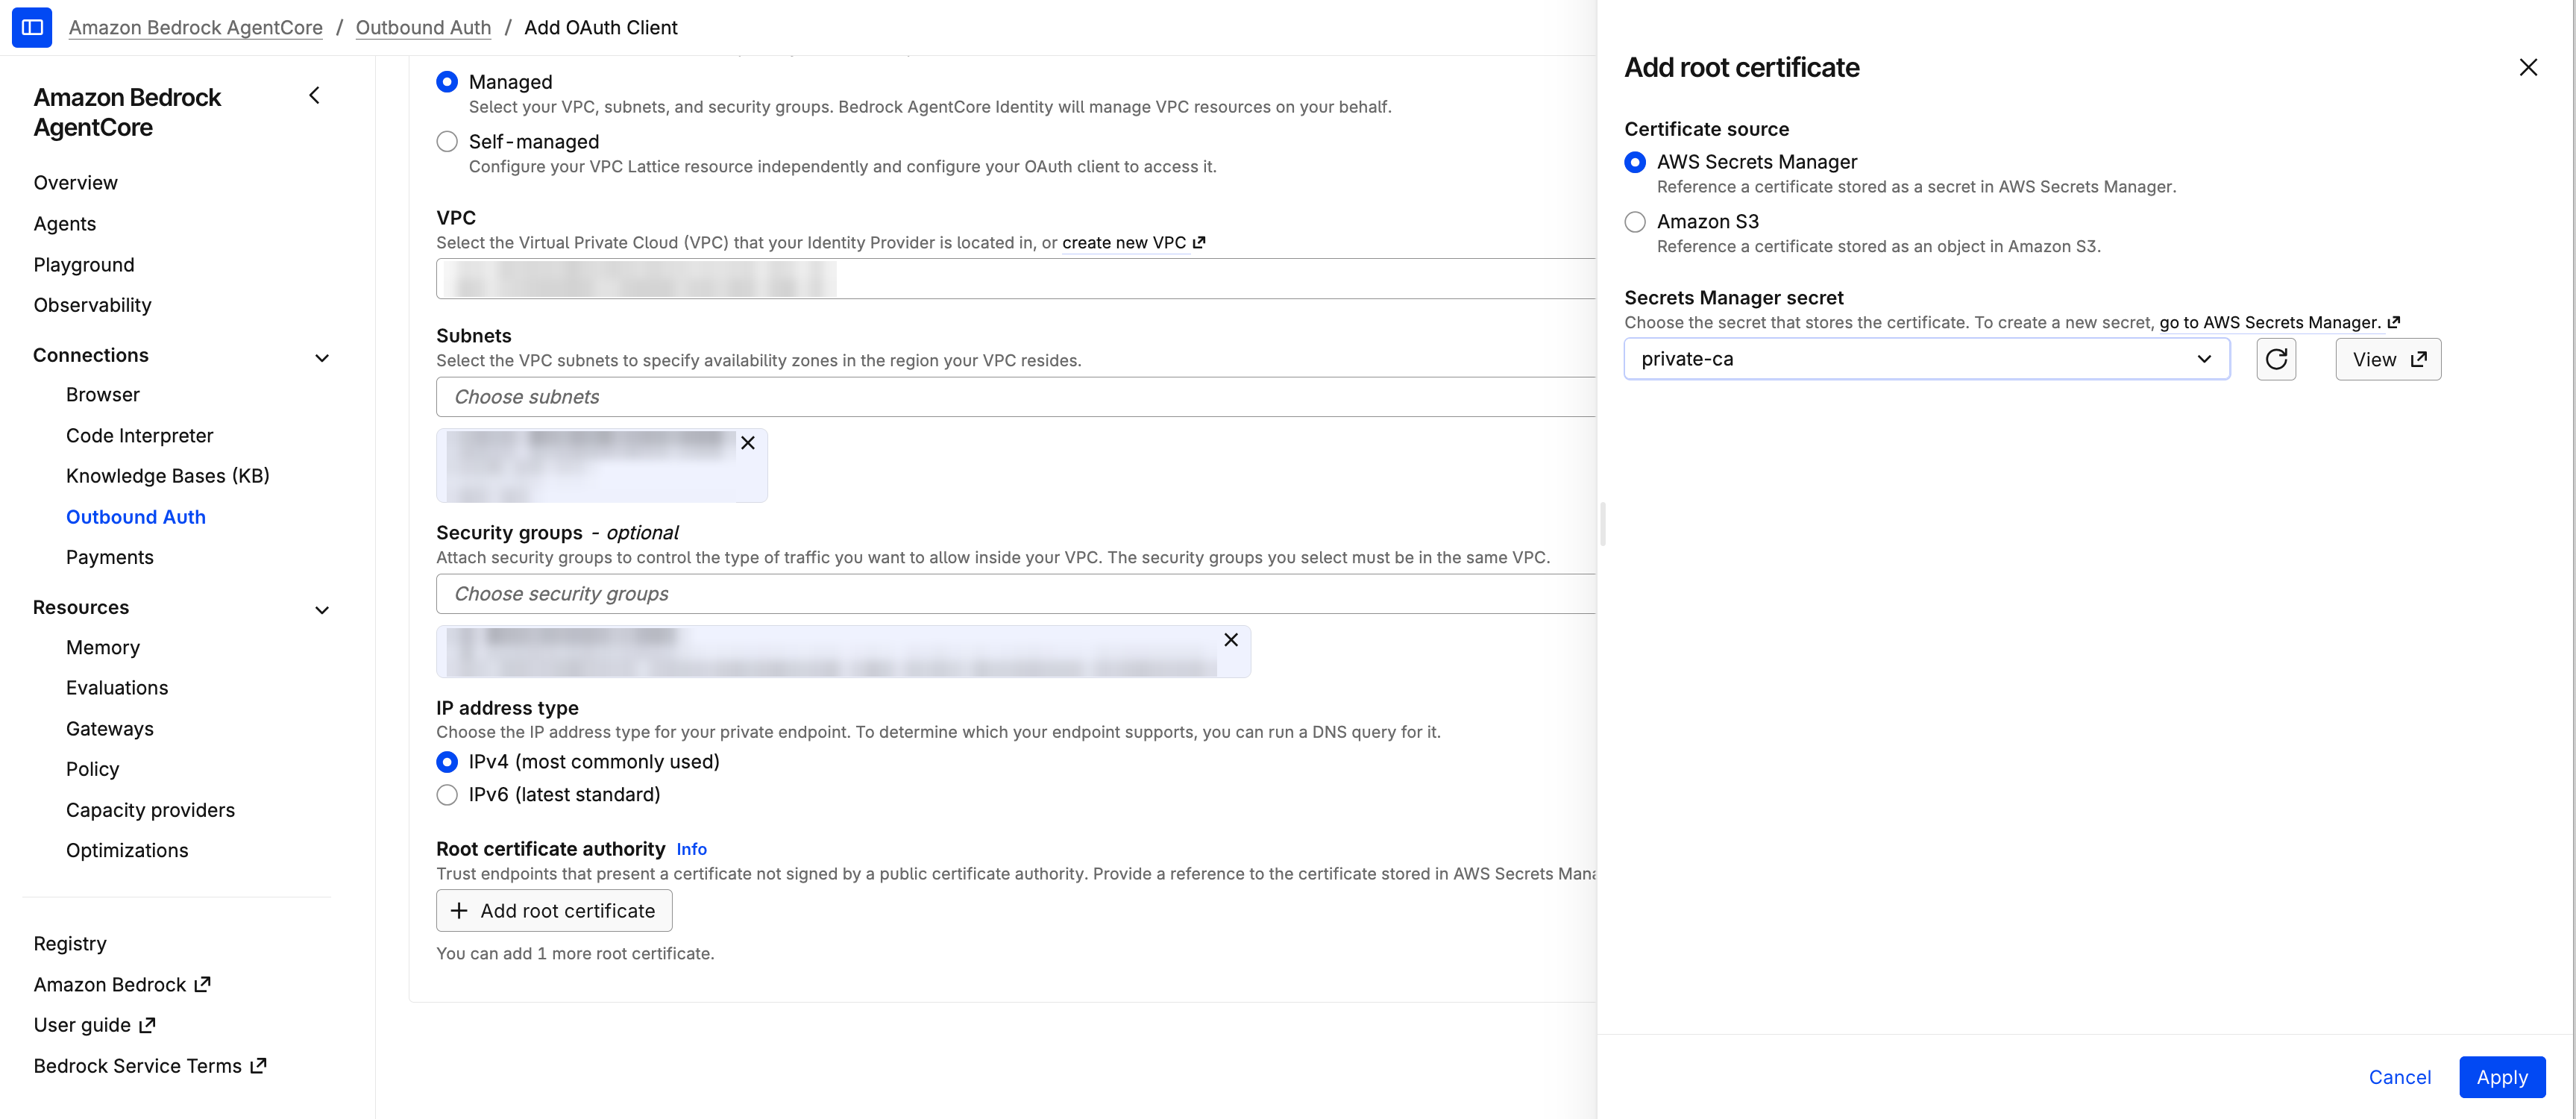
Figure 2: Adding a root certificate from AWS Secrets Manager
To create the same credential provider with the AWS CLI, add certificateConfigurations to the custom OAuth 2.0 provider configuration:
To use Amazon S3 instead, replace the certificateConfigurations entry with {"s3": {"uri": "s3://amzn-s3-demo-bucket/trust-anchors/keycloak-root-ca.pem", "bucketOwnerAccountId": "444455556666"}}. If you leave out bucketOwnerAccountId, AgentCore Identity expects the bucket to be in your own account. To keep the client secret out of your shell history, you can reference a client secret that you store in Secrets Manager.
Step 4: Verify the credential provider
AgentCore Identity validates the certificate and sets up private connectivity in the background, so a new credential provider starts in the CREATING status. Check the status after a few minutes:
On the console, the credential provider’s details page shows the configured certificate under Root certificates. When the status is READY, your agents can request tokens from the IdP. If the status is CREATE_FAILED, the failureReason field explains why. For example, Leaf certificates are not allowed, must provide CA certificates only means that you uploaded the server certificate instead of the CA certificate. If you see Unable to access S3 object or Secrets Manager can't find the specified secret, check that the URI or Amazon Resource Name (ARN) is correct. Also confirm that your identity can read the object or secret. If the provider is READY but token requests fail, confirm that the IdP’s server certificate was issued by the configured CA and has a SAN that matches the IdP hostname.
Monitor and rotate the CA certificate
After you verify that the credential provider trusts the private CA, monitor the CA certificate’s expiration and rotate it before it expires to prevent token request failures. AgentCore Identity publishes the EarliestCertificateDaysToExpiry metric to Amazon CloudWatch in the AWS/Bedrock-AgentCore namespace when your agents request tokens through a credential provider that uses a private CA. The metric reports the days remaining until the earliest certificate in your PEM file expires. It has ProviderName, ProviderArn, and TokenVault dimensions. When you create an alarm, specify all three. We recommend a CloudWatch alarm that notifies you well before the value reaches zero, because token requests to the IdP stop working when the CA certificate expires.
NOTE: AgentCore Identity reads the certificate only when you create or update the credential provider. If you change the secret or S3 object, call
UpdateOauth2CredentialProviderafterward so that AgentCore Identity reads the new content. IncludecertificateConfigurationsin the update request. If you leave it out, the credential provider stops trusting your private CA.
A PEM file can contain more than one CA certificate and AgentCore Identity trusts each of them. You can use this to rotate to a new CA while minimizing downtime:
- Combine the current and new CA certificates in one file, for example with
cat current-ca.pem new-ca.pem > rotation.pem. Upload the file to your secret or S3 object. - Call
UpdateOauth2CredentialProviderand wait for the status to return toREADY. - Replace the IdP’s server certificate with one issued by the new CA.
- After token requests succeed, upload a file that contains only the new CA certificate and call
UpdateOauth2CredentialProvideragain.
AgentCore Identity doesn’t check certificate revocation lists (CRLs) or use the Online Certificate Status Protocol (OCSP). This means that if an unauthorized party obtains the private key for an IdP server certificate, AgentCore Identity continues to trust that certificate. This trust lasts until the certificate expires or until you stop trusting the CA that issued it. To stop trusting a CA, remove it from the PEM file and update the credential provider.
Protect the CA certificate
A CA certificate contains no private key and is public by design, because you hand it to every client that has to trust your IdP. What you need to protect is the data integrity of the trust store, meaning the secret or S3 object that holds the certificate. If someone replaces the certificate or adds another CA certificate to the trust store, the next update could let an unauthorized party who can redirect traffic impersonate your IdP.
We recommend that you scope permissions around writes rather than reads. Give write access, such as s3:PutObject or secretsmanager:PutSecretValue, only to the team or pipeline that operates the IdP. Give read access to the principals that call CreateOauth2CredentialProvider or UpdateOauth2CredentialProvider. During these operations, AgentCore Identity reads the CA certificate using the caller’s IAM permissions. The following bucket policy for a central identity account (444455556666) lets only the role that manages credential providers in a workload account (111122223333) read the CA certificates. It also requires that role to belong to your organization in AWS Organizations, and it denies writes from principals other than the IdP administrator role:
The principal in the workload account also needs s3:GetObject in its own IAM policy. For Secrets Manager, which must be in the same account, use a resource-based policy on the secret to restrict writes to the IdP administrator role.
Because the secret is in the same account, IAM policies can grant read access, so the resource policy only needs to deny changes:
Turn on S3 Versioning to recover an overwritten file and AWS CloudTrail data events to record each change. Because the CA certificate isn’t confidential, SSE-S3 encryption is sufficient and avoids the cross-account AWS KMS permissions that a customer managed key requires.
Keep the trust scope of each credential provider narrow. Upload only the CA that issues your IdP’s server certificate, rather than your organization’s full trust bundle. If your IdPs use different CAs, store each CA certificate in its own secret or S3 object so that each credential provider trusts only the CA that it needs.
Use a private CA for inbound authorization
You can also use a private CA for inbound authorization. When AgentCore Runtime or AgentCore Gateway, a capability of Amazon Bedrock AgentCore, validates JSON Web Tokens (JWTs) issued by a private IdP, it fetches the IdP’s discovery document and its signing keys from the JWKS endpoint. AgentCore Gateway validates the discovery URL when you create the gateway. If the CA certificate is missing or doesn’t match the IdP’s certificate chain, the gateway status changes to FAILED with the reason Failed to validate discovery url. To trust a private CA for that connection, add certificateConfigurations to the customJWTAuthorizer configuration, next to the existing privateEndpoint:
Clean up
To avoid ongoing charges, delete the resources that you created:
- Delete the credential provider in the AgentCore console, or run
aws bedrock-agentcore-control delete-oauth2-credential-provider --name keycloak-private-ca. - Delete the secret in Secrets Manager or the object in Amazon S3.
- Remove the certificate from the load balancer listener and then delete it in ACM.
- Disable and then delete the private CA in the AWS Private CA console. AWS Private CA charges a monthly fee for each CA until you delete it. For details, see AWS Private CA pricing.
Conclusion
In this post, we showed how to connect AgentCore Identity to a self-hosted IdP that uses a certificate from your own CA. You issued a server certificate with AWS Private CA, stored the CA certificate in Secrets Manager or Amazon S3 and referenced it from a credential provider. You also saw how to rotate the CA with a combined PEM file and how to limit who can change the certificate that your agents trust.
To learn more, see Connect to private identity providers in the Amazon Bedrock AgentCore Developer Guide. For examples using Keycloak, see the Amazon Bedrock AgentCore samples repository on GitHub. If you have questions or feedback, leave a comment on this post.