SQL Server AlwaysOn Availability Groups (AGs) are the standard high-availability solution for enterprise workloads running on Amazon Elastic Compute Cloud (Amazon EC2). Configured correctly, they provide automatic failover, readable secondaries, and near-zero data loss, which is why many teams migrating SQL Server to AWS rely on them.
Secondaries can fall out of sync for several operational reasons: routine patching, network blips between Availability Zones, storage maintenance, or configuration changes on the replica. When that happens, a secondary replica might end up in SUSPENDED or NOT SYNCHRONIZING state. The traditional fix is to manually back up the primary, ship backups to the secondary, restore with NORECOVERY, and rejoin. This works, but it is slow, manual, and error-prone for large databases. Automatic seeding removes the manual steps but streams data over the wire, adding load to the primary during recovery.
In this post, we walk you through how to use AWS Backup to capture an application-consistent snapshot of the secondary replica and restore it directly to a failed or replacement secondary, then rejoin the AG. This approach reduces the time and manual effort needed to resynchronize a secondary compared to traditional backup-and-restore or automatic seeding methods.
Note: Although AWS Backup uses the Windows Volume Shadow Copy Service (VSS) to create application-consistent snapshots, the VSS-based restore automation (AWSEC2-RestoreSqlServerDatabaseWithVss) can’t be used to restore a secondary replica. We explain this limitation in detail later in the post.
Solution overview
The solution uses AWS Backup to capture an application-consistent (VSS-enabled) snapshot of the secondary replica’s EC2 instance and restore it as a replacement node. After the restored instance is online and reconfigured with the correct network settings, it rejoins the Availability Group and resynchronizes from the primary’s transaction log.
This approach avoids streaming data over the network (as automatic seeding would) and the manual backup-ship-restore cycle entirely.
The following diagram illustrates the end-to-end workflow:
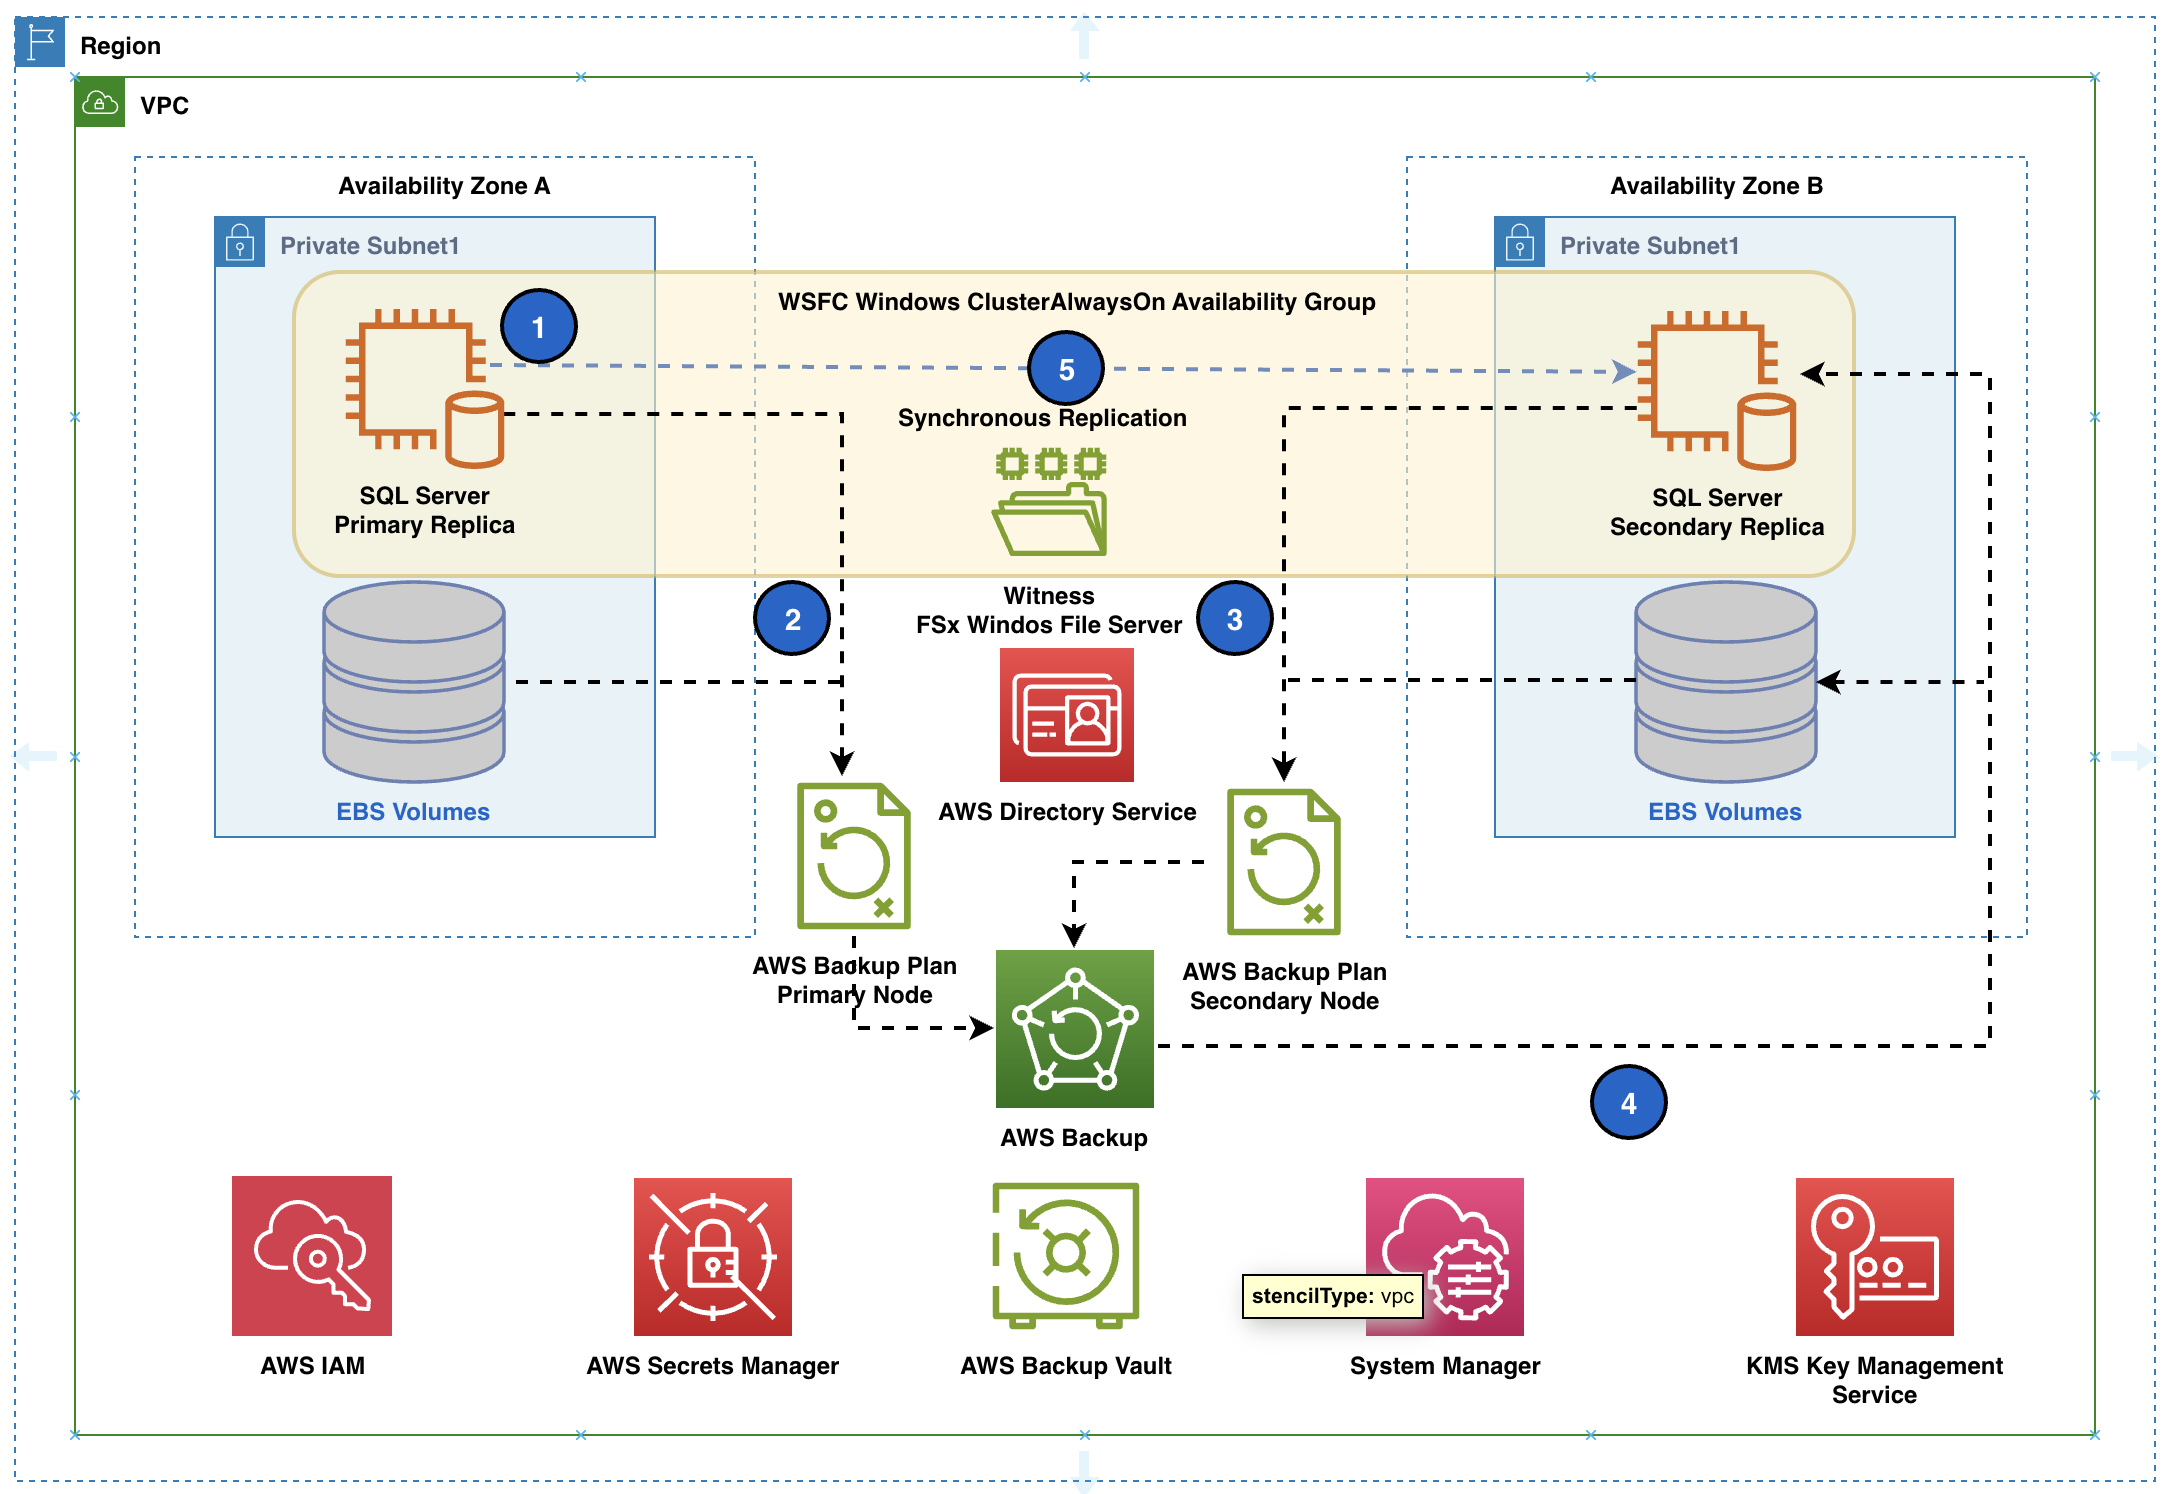
Figure 1: End-to-end workflow for resynchronizing an AG secondary with AWS Backup
The numbered labels in the diagram correspond to the following steps:
- The AG runs on EC2 instances with SQL Server (primary and secondary replicas).
- AWS Backup performs a full backup from the primary replica.
- AWS Backup performs a full backup from the secondary replica.
- AWS Backup restores the EC2 instance for the secondary replica.
- The restored node rejoins the AlwaysOn Availability Group.
Prerequisites
This walkthrough assumes you already have a SQL Server AlwaysOn Availability Group running on Amazon EC2 and are managing backups of your AG replicas with AWS Backup (including VSS-enabled snapshots). If you need to set these up first, refer to Best practices for SQL Server clustering on Amazon EC2 and Creating application-consistent VSS backups for SQL Server on EC2. Make sure the following components are in place before proceeding:
- SQL Server 2016+: Supported on SQL Server Developer / Standard / Enterprise Edition.
- Proper AWS permissions: The EC2 instances running your AG replicas must have an IAM instance profile with the AWSBackupServiceRolePolicyForBackup and AWSBackupServiceRolePolicyForRestores managed policies attached. Additionally, the AWS Backup service role must also have these policies to perform backup and restore operations on your behalf. For details on configuring these roles, see IAM service roles for AWS Backup.
- AG with at least two replicas: Primary and one or more secondaries configured for synchronous or asynchronous commit.
- AWS Backup: Backup plan configured with SQL Server-compatible settings, including VSS-enabled snapshots and appropriate backup frequency for your AG replicas.
- AWS Backup vault: A vault in the same region as your EC2 instances, with appropriate retention settings and the AWSBackupServiceRole attached.
- Recent backup of the secondary: The fresher the snapshot, the less transaction log delta needs to be applied during resync.
- Amazon Elastic Block Store (Amazon EBS) volume configurations documented: Know your secondary’s EBS volume settings (type, IOPS, throughput) before starting. You need to match or exceed them on the restored instance.
How AG replicas fall out of sync
An AG secondary stays healthy as long as redo threads can apply log records fast enough to keep up with the primary. Several interruptions cause the replica to lag: a network partition, storage performance issue, hard crash, or misconfigured maintenance window.
If the gap grows too large or the replica goes offline, SQL Server marks it NOT SYNCHRONIZING or SUSPENDED.
In EC2 environments specifically, common culprits include:
- EBS volume failure or degraded I/O: Volume performance degradation causes I/O stalls on the secondary redo thread.
- Instance stop/start cycles: Right-sizing events, Savings Plans conversions, or patching reboots that lose the in-flight log stream.
- Security patching reboots: Secondary takes longer to come back than the primary expects, breaking the replication channel.
- Cross-AZ network latency spikes: Heavy commit workloads on the primary outrun what the secondary can acknowledge in time.
- Storage capacity exhaustion: Secondary data volume fills up, halting redo thread progress entirely.
Resynchronizing an AG node with AWS Backup
Note: The AWS VSS Provider limitation
Before going further, it is important to address one path that might seem obvious but doesn’t work for this use case. The AWS VSS Provider (used with the AWSEC2-RestoreSqlServerDatabaseWithVss automation runbook) looks like a natural fit, but it has a hard constraint documented in the AWS VSS restore prerequisites:
To restore a SQL Server database with the AWSEC2-RestoreSqlServerDatabaseWithVss automation runbook, the database must either be configured as a standalone deployment, or be the primary database in a Microsoft SQL Server Always On availability group.
This means VSS-based restore can’t be used to rebuild a secondary replica, precisely the scenario we need to solve. The approach described in this post (full EC2 restore with AWS Backup) sidesteps this limitation entirely by restoring at the EC2/EBS level rather than at the SQL Server database level.
AWS Backup captures application-consistent snapshots of the underlying EBS volumes through its integration with the Windows Volume Shadow Copy Service (VSS). Before taking the EBS snapshot, VSS coordinates with SQL Server to quiesce writes, flush in-flight transactions to disk, and freeze I/O, making sure the resulting snapshot represents a write-order-consistent point in time. The result is an EBS-level backup that SQL Server can recover cleanly without rollback of incomplete transactions.
The following walkthrough assumes your secondary replica is in a NOT SYNCHRONIZING or SUSPENDED state. It covers the full resynchronization process, from the initial EC2 restore through AG rejoin and validation, including the secondary IP reconfiguration step that teams often miss and a critical log sequence number (LSN) chain scenario that requires additional handling.
Step 1: Select and restore the AWS Backup recovery point
Note: Before starting the restore, shut down or terminate the failed EC2 instance. AWS Backup restores a new instance with the same hostname, and two machines with the same name on the network cause conflicts. Before terminating the failed node, note down any additional IP addresses (secondary IPs, cluster IPs, AG listener IPs) assigned to its network interfaces. You need to reassign them to the restored instance.
From the AWS Backup console, navigate to Protected Resources and select the secondary replica EC2 instance. The available recovery points for that instance appear.
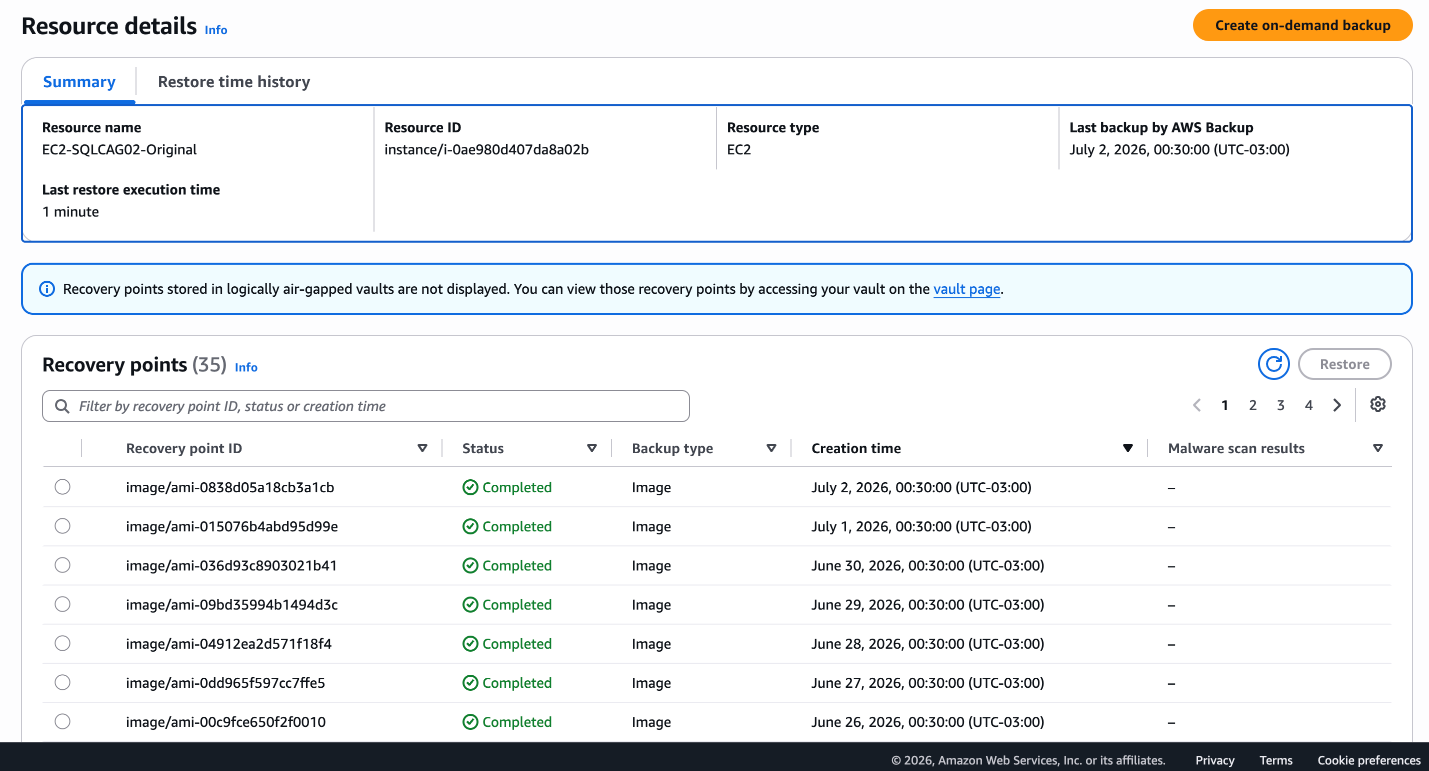
Figure 2: AWS Backup console showing available recovery points for EC2-SQLCAG02-Original
To initiate the restore:
- Select the recovery point for your secondary replica.
- Choose Restore (the button becomes active after selection).
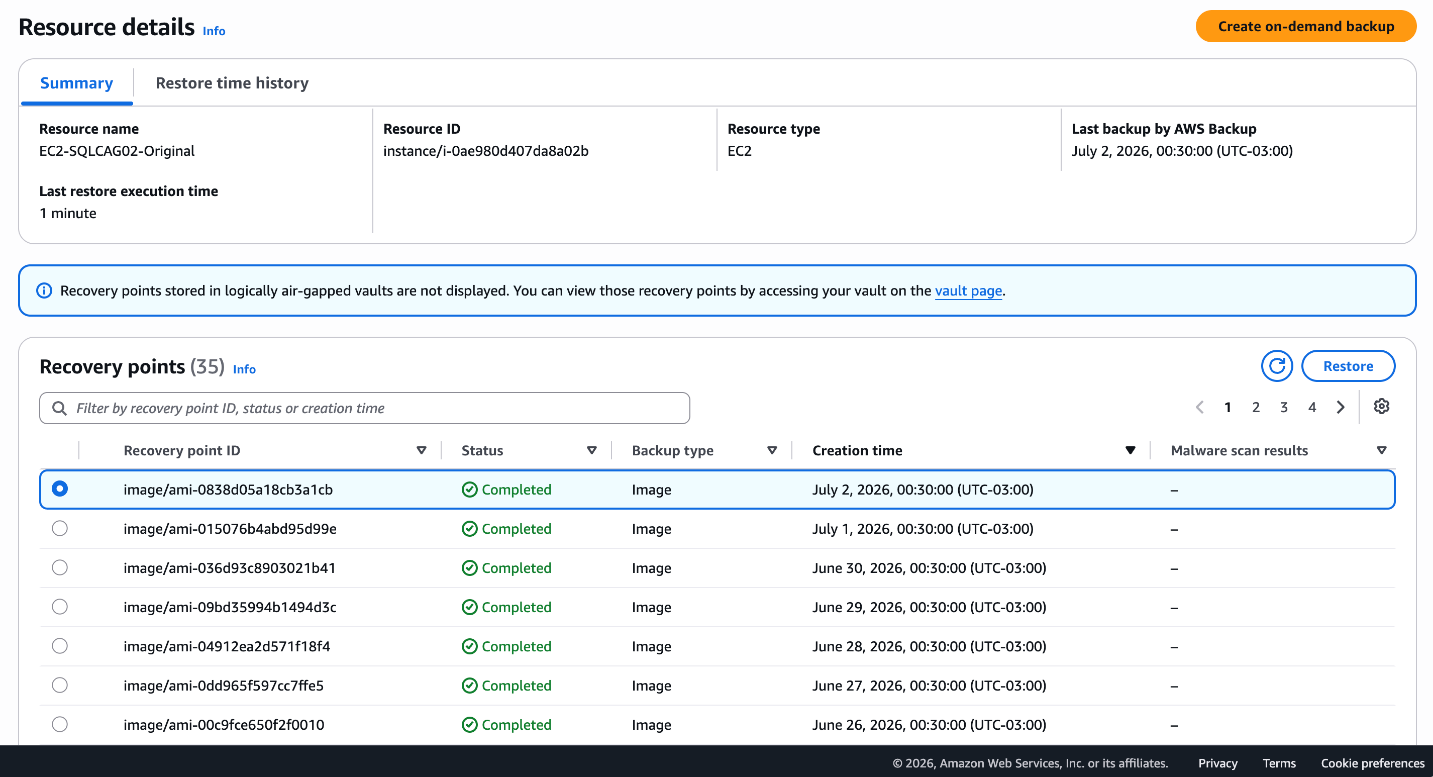
Figure 3: AWS Backup console showing the Restore button for a selected recovery point of EC2-SQLCAG02-Original
- Configure the instance type and network settings as needed.
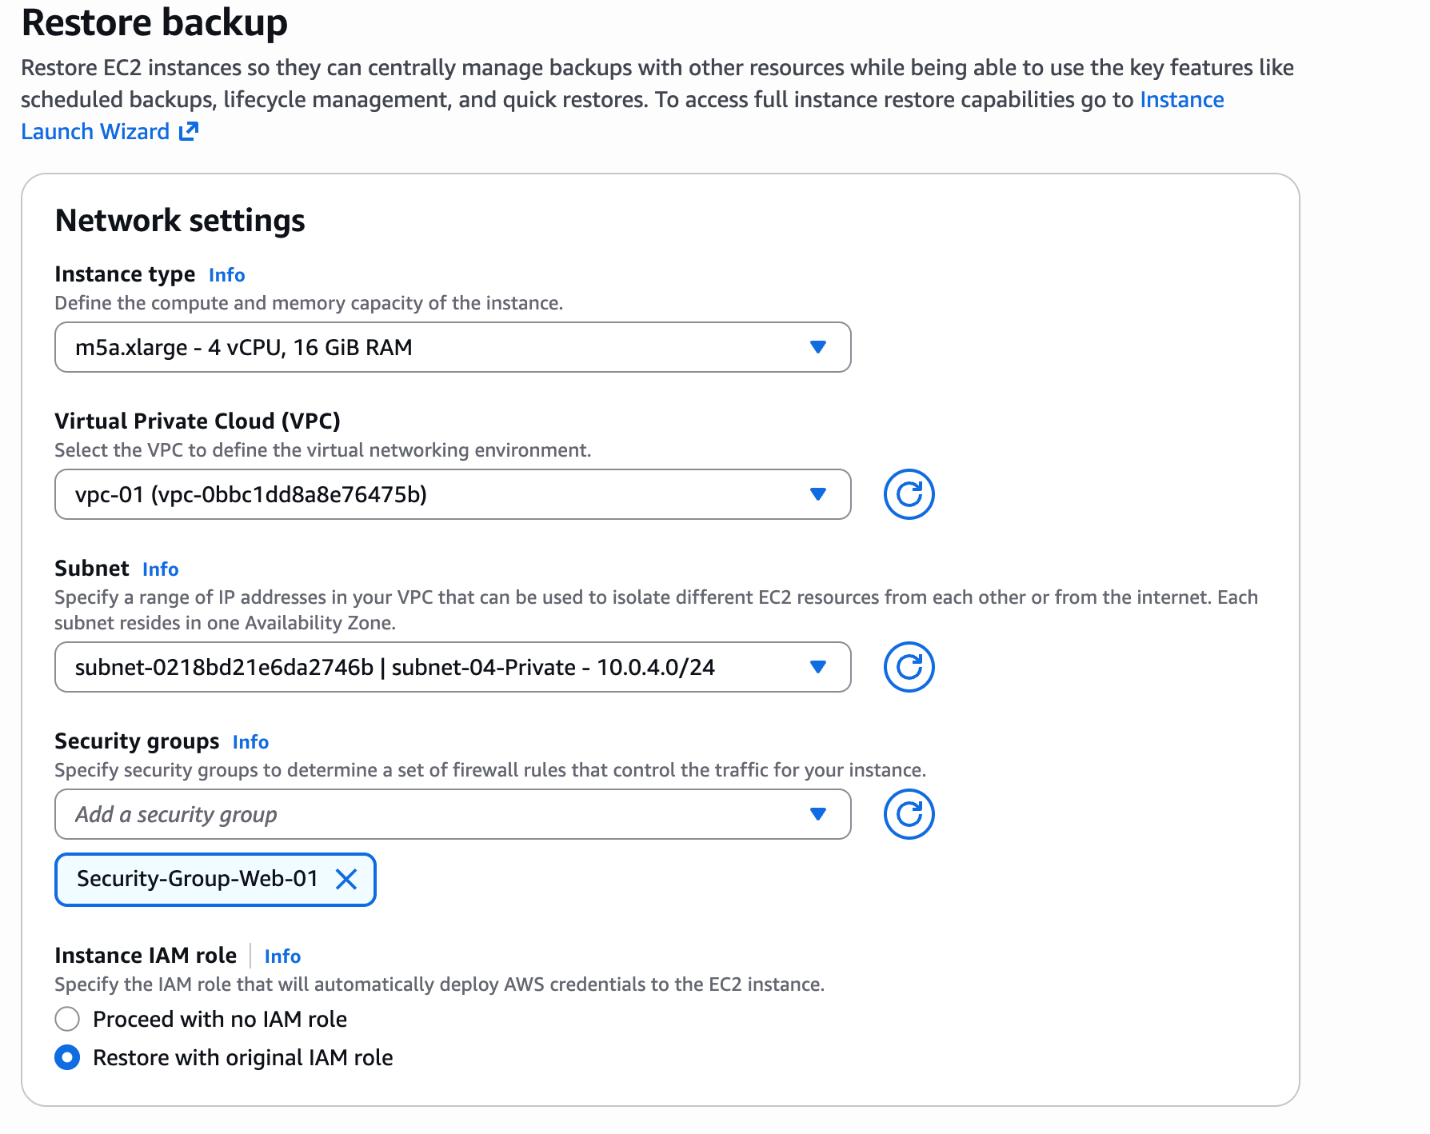
Figure 4: AWS Backup restore configuration for instance type and network settings
- Choose Restore backup to start the job.
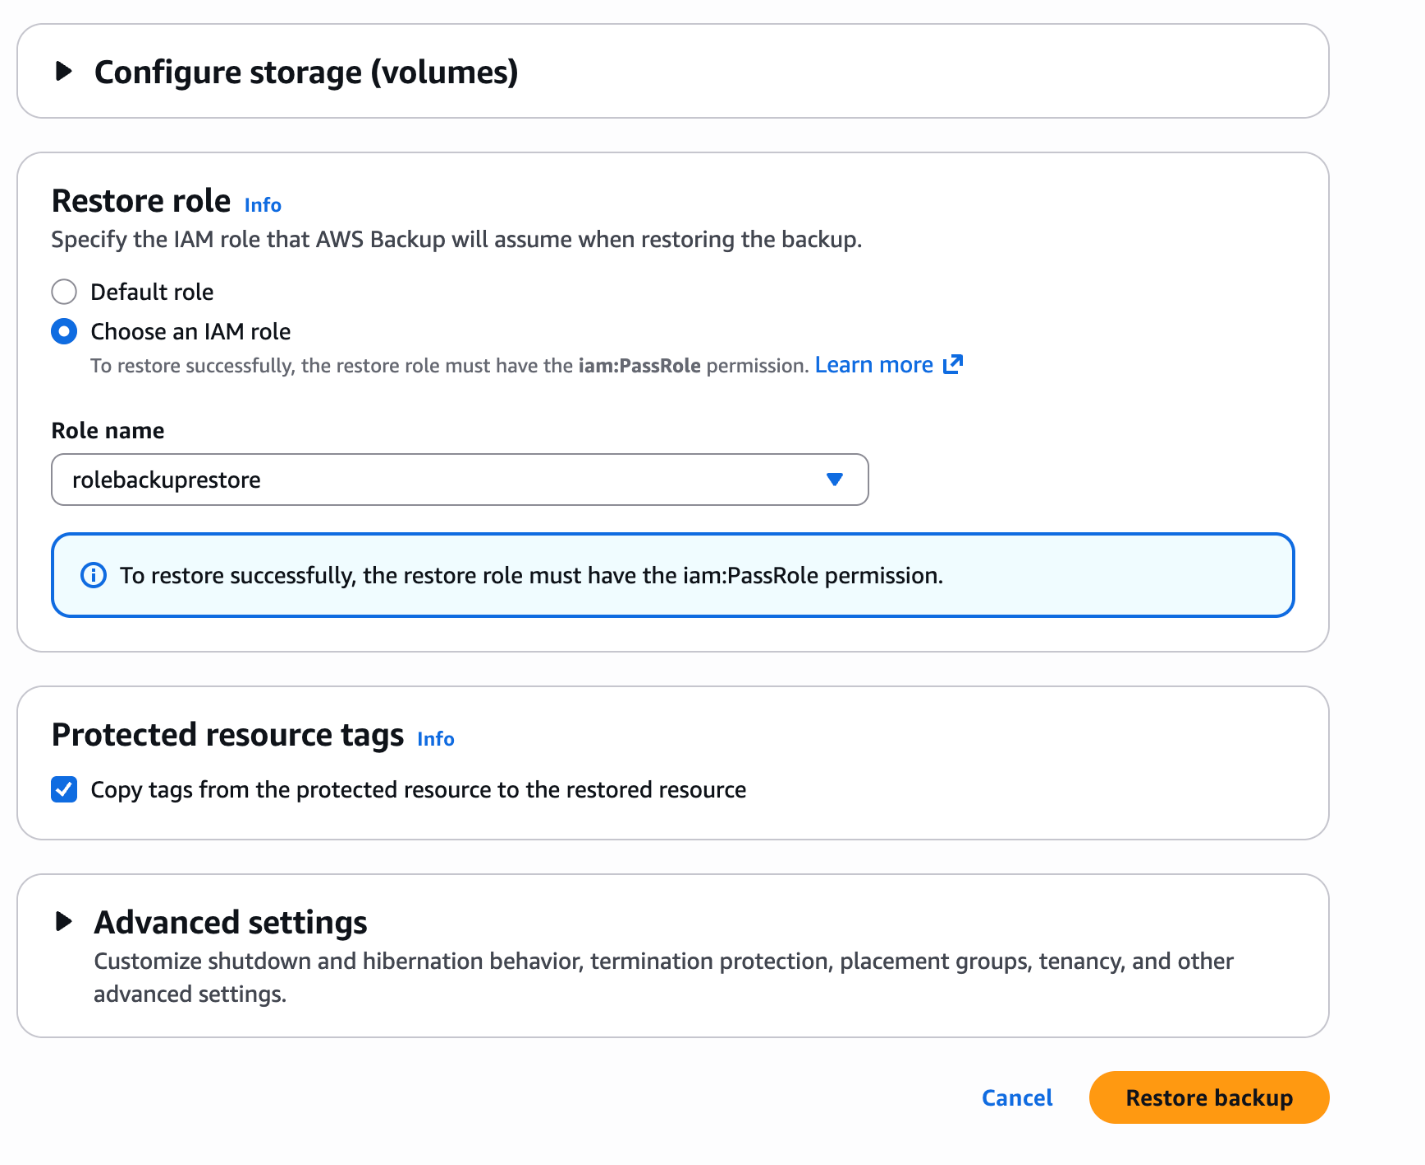
Figure 5: AWS Backup restore job settings review before submission
In our lab environment (a single m5a.xlarge instance with a 100 GB gp3 volume), the EC2 restore completed in approximately 10 minutes, including instance start. Your restore time varies depending primarily on the total EBS volume size and number of volumes attached to the instance. Use a test restore in your own environment to establish your maintenance window baseline.
Step 1 using the AWS CLI
Step 2: Reconfigure secondary IP addresses
When AWS Backup restores an EC2 instance, secondary IP addresses assigned to the original instance are not carried over to the restored instance. For a SQL Server AG cluster node, these secondary IPs are typically used for the Windows Server Failover Cluster (WSFC) and AG listener endpoints.
Don’t skip this: secondary IPs are not restored
When AWS Backup restores an EC2 instance, secondary IP addresses assigned to the original instance aren’t carried over to the restored instance. For a SQL Server AG cluster node, these secondary IPs are typically used for the Windows Server Failover Cluster (WSFC) and AG listener endpoints.If you bring the restored instance online without reconfiguring the secondary IPs, the cluster won’t recognize it correctly and the AG rejoin will fail. You must manually add the same secondary IP addresses to the restored instance’s network interface before proceeding.
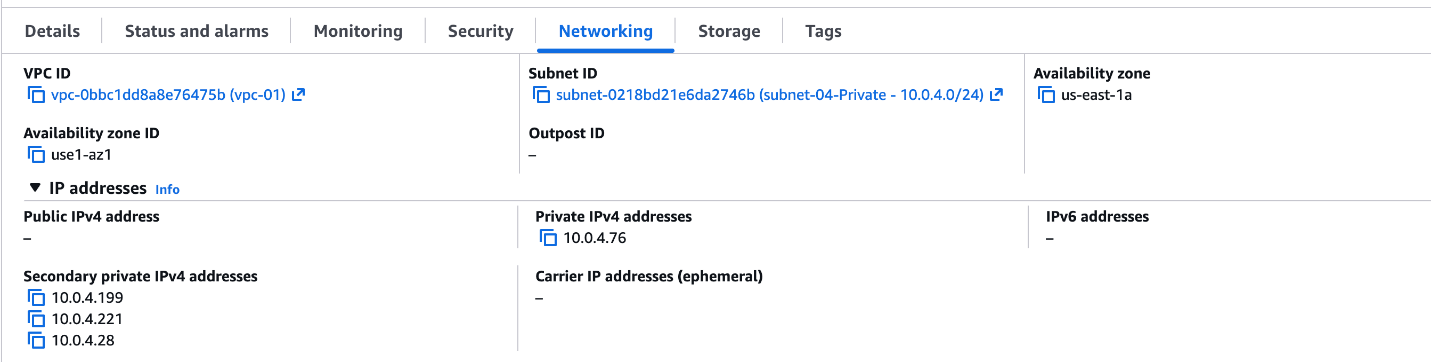
Figure 6: Secondary IP addresses that must be reconfigured on the restored EC2-SQLCAG02-Original instance
To reconfigure secondary IPs on the restored instance:
- In the EC2 console, select the restored instance and navigate to Actions > Networking > Manage IP addresses.
- Add the same secondary IP addresses that were assigned to the original node (document these before restore operations as standard runbook practice).
- Confirm the IPs are assigned before proceeding to cluster configuration.
Step 3: Rejoin the restored node to the Availability Group
After the restored instance is up with secondary IPs configured and SQL Server is running, you need to update the AG configuration.
Important: If your environment meets the VSS requirements described in the prerequisites (the AwsVssComponents package installed and the correct IAM role attached to the instance), the restored instance comes back with the same hostname and automatically rejoins the Windows Failover Cluster. This is one of the main benefits of using VSS-enabled backups for clustered SQL Server, and you can skip straight to the AG rejoin commands that follow.
If the VSS prerequisites aren’t in place, the restored instance will likely cause a cluster split-brain error (status 5925). Before you can rejoin the AG, you must resolve the split-brain first: force quorum on the primary node and re-add the restored node to the Windows Failover Cluster. Only after the cluster shows a healthy quorum should you continue.
In both cases, after the node has rejoined the Windows Failover Cluster, verify the database mirroring endpoint is listening on the restored node, then proceed with the AG rejoin:
- Connect to the Primary replica and run the following command:
- Now, on the Secondary replica, run the following command:
After executing the commands to rejoin the restored node to the Availability Group, your AG dashboard should look similar to the following:
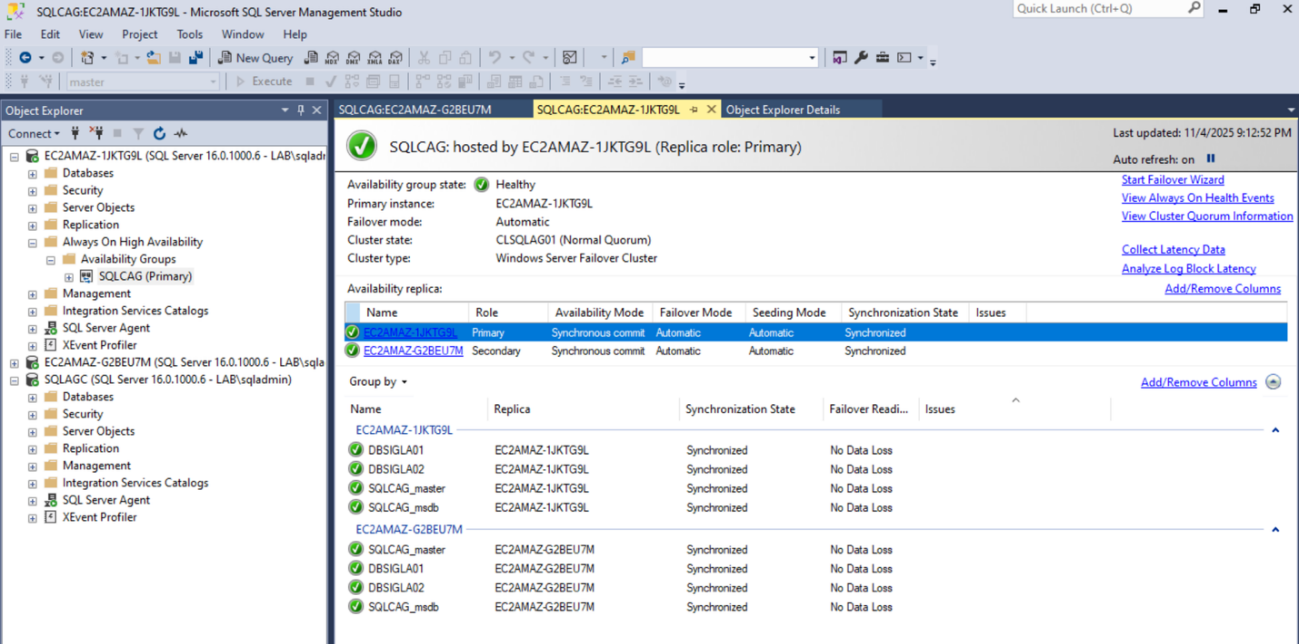
Figure 7: SQLCAG availability group status in the cluster after restoring and rejoining
Step 4: Handle the LSN chain across four tested scenarios
Not all restoration paths are equal. This lab test covered four distinct scenarios, each representing a different type of node loss event. Understanding which scenario you’re in determines how much manual work remains after the EC2 restore.
| A | B | C | D | |
| 1 | Scenario | Description | Steps required | Recovery time |
| 2 | 1 and 2 | Replica node loss – with or without open transactions at time of failure | EC2 restore → AG auto-sync | Proportional to EC2 instance restore time (10 min in this lab – varies by EBS volume size and count) |
| 3 | 3 | Replica node loss – committed transactions on primary only (not yet replicated) | EC2 restore → AG auto-sync (delta applied automatically) | EC2 restore time + AG sync delta (10 min + sync in this lab) |
| 4 | 4 | Replica node loss + subsequent transaction log backup on primary (LSN chain broken) | EC2 restore → Manual differential + log backup/restore → AG rejoin per DB | EC2 restore time + file copy time + per-database restore (in this lab: ~10 min + 6 min copy + 5-16 min per DB, depending on database size) |
Scenario 4: The broken LSN chain
Scenario 4 is the most operationally complex case and the one most likely to catch teams off guard. Here’s what happens: the node goes down, and while it’s offline, the database administrator (DBA) runs a transaction log backup on the primary (standard maintenance). That log backup truncates the log, removing LSN records that the secondary hasn’t yet processed. After the restored node comes back online, SQL Server can’t bridge the LSN gap automatically. The databases in the AG show as “Not Synchronizing.”
Why this happens: AWS Backup snapshots the EC2 instance at a point in time. If a log backup runs on the primary after that snapshot but before the restore completes, the LSN sequence on the primary has advanced beyond what the restored secondary holds. The AG can’t replay log records that no longer exist in the log stream.
The fix: For each database showing “Not Synchronizing,” perform a differential backup on the primary, copy it to the secondary, restore it WITH NORECOVERY, then perform a log backup and restore it WITH NORECOVERY, and finally rejoin the database to the AG. In this lab testing, the file copy step took 6m13s for all backup files combined.
The following steps walk you through restoring the LSN chain for each database in a NOT SYNCHRONIZING state after the EC2 restore:
Scenario 4 step-by-step: Restoring the LSN chain
For each database in NOT SYNCHRONIZING state after the EC2 restore:
- (Only if you are running SQL Server 2022 with a Contained AG) Before restoring user databases, you must synchronize the contained
masterandmsdbdatabases first, in this order:
- Connect to the Primary replica and run the following command to take a differential backup:
- Copy backup files to restored secondary.
- Connect to the Secondary replica and run the following command to restore the differential backup:
- Connect to the Primary replica and run the following command to perform T-Log backup:
- Connect to the Secondary replica and run the following command to restore T-log backup and rejoin the database to the AG:
- If applicable to your environment, you can return the seeding to automatic and change the read-replica configuration for your secondary node:
Step 5: Validate synchronization and run failover/failback
After rejoining all databases, confirm synchronization state before declaring the restoration complete. This lab testing included explicit failover and failback validation after each restoration scenario to confirm the AG was fully operational.
Watch redo_queue_size trending toward zero as the secondary catches up. After synchronization_state_desc shows SYNCHRONIZED (synchronous replicas) or SYNCHRONIZING stabilizing (async replicas), the restoration is complete.
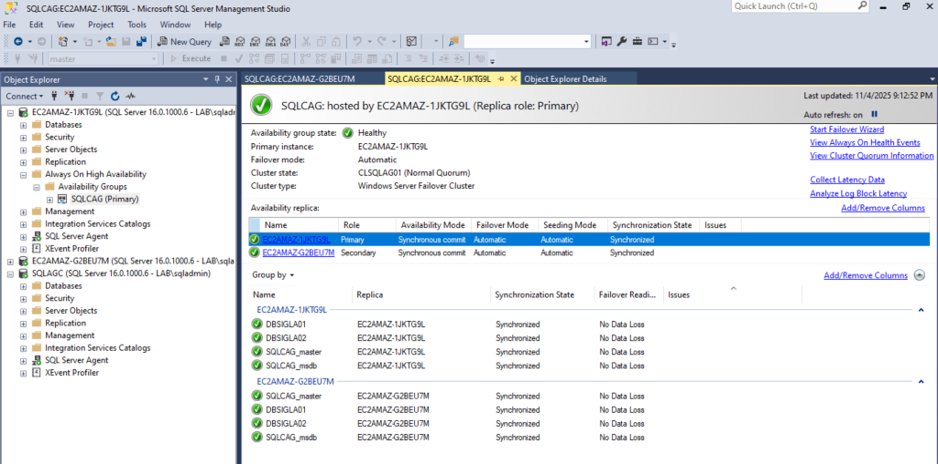
Figure 8: WSFC cluster view showing the three-node SQLAG topology during restore validation
Monitoring resynchronization progress
Don’t kick off the resync and walk away. Use these signals to track progress:
- SQLServer:Database Mirroring – Redo Bytes Remaining: The most direct indicator of how much log the secondary still needs to apply. This value should trend consistently toward zero.
- SQLServer:Database Mirroring – Log Send Queue: If this is growing rather than shrinking, there might be a network or I/O bottleneck on the secondary. Check EBS metrics.
- AG dashboard in SQL Server Management Studio (SSMS): Real-time view of synchronization lag across replicas and databases. The quickest visual confirmation.
- AWS Backup job status: Monitor in the AWS Backup console or set up Amazon EventBridge rules to notify on backup job completion or failure.
- Amazon CloudWatch metrics for EBS: VolumeReadOps, VolumeWriteOps, and VolumeQueueLength on the restore volume confirm whether the volume has finished warm-up initialization.
Clean up resources
If you’re running this procedure in a lab or temporary environment and don’t want to incur ongoing charges:
- Terminate EC2 instances: Delete any temporary instances created during the restore process.
- Delete unused EBS volumes: Remove unattached volumes created during restoration.
- Clean up backup recovery points: Delete test recovery points that are no longer needed.
- Review backup plans: Stop any temporary AWS Backup jobs created for testing.
- Remove test IAM resources: Delete temporary roles or policies if created.
Note: Only delete resources after confirming your AG resynchronization was successful. Keep production resources according to your retention policies.
Conclusion
In this post, we showed you that rebuilding a failed AG secondary with AWS Backup is faster and more reliable than the traditional manual backup/restore path, even in complex Scenario 4 cases involving a broken LSN chain.
EC2 restore time depends primarily on the total EBS volume size and number of attached volumes. For Scenario 4 (broken LSN chain), additional time is needed for file copy (proportional to backup file size and network throughput between instances) and per-database restore (proportional to database size and storage I/O performance). The only scenario requiring significant additional manual work is Scenario 4, and even there, the process is well-defined and repeatable.
Two findings stand out as operational guidance:
- Secondary IP addresses must be reconfigured manually after restoring: AWS Backup doesn’t carry these over. Add documenting secondary IP assignments to your pre-incident runbooks so this step doesn’t become a mystery during an outage.
- AWS VSS restore can’t rebuild secondary replicas: The AWSEC2-RestoreSqlServerDatabaseWithVss runbook only works for standalone instances or primary replicas. EC2-level restore with AWS Backup is the correct path for secondary node recovery.
Traditional approach compared to AWS Backup
| Traditional Approach | AWS Backup Approach (Validated in Lab) |
| Manual full backup of each database on primary | Single EC2 snapshot captures the databases simultaneously |
| Transfer .bak files to secondary (hours for large DBs) | EC2 restore directly to instance (time varies by EBS volume size and count) |
| Per-database RESTORE WITH NORECOVERY commands (error-prone) | File copy + per-database restore (time varies by backup file size and database size) |
| High manual effort – mistakes likely under pressure | Repeatable, IAM-controlled, auditable via AWS Backup vault |
| No centralized backup management | Centralized vault with retention policies and AWS Audit Manager compliance |
| VSS restore works for primary/standalone only | EC2-level restore works for nodes including secondaries |
Resynchronizing an AlwaysOn AG secondary doesn’t need to be a war story. With AWS Backup, a tested runbook, and the operational knowledge from this post, you can rebuild a failed secondary node in a fraction of the time it takes manually, and do it confidently even during an incident.