AWS Transform continuous modernization now supports Graviton readiness assessment and remediation for Java, generally available since October 29, 2026. Use it to move Java applications to AWS Graviton-based instances. A readiness assessment finds the Arm64 compatibility issues in a repository, and a remediation skill resolves them in code, which you then validate on Arm64 and deploy.
AWS Graviton-based instances deliver better price-performance than comparable x86 instances. Teams planning a migration therefore face two questions about their estate: which applications are ready to move, and what has to change in the ones that are not.
Answering that repository by repository does not scale. The Java code itself is rarely the obstacle. What decides readiness is an application’s dependencies, and whether each one supports Arm64. Establishing that manually across an estate is slow, repetitive, and prone to error.
In this post, you learn how to analyze a Java repository for AWS Graviton readiness, remediate the findings, validate the change on Arm64, and deploy and run the result on a Graviton-based instance.
Solution overview
AWS Transform continuous modernization connects to your source provider, discovers your repositories, analyzes them for technical debt, remediates what it finds, and opens a pull request with the result. Analysis can also run on a schedule, so once your applications are running on Graviton you can keep checking them as dependencies change.
Two skills cover the Graviton migration:
| Skill | What it does |
AWS/graviton-readiness-assessment | Scans a repository for native libraries, architecture-specific code, and Arm64-incompatible transitive dependencies. Read-only. It does not modify source or project files. |
AWS/java-x86-to-graviton | Resolves the findings the analysis returned: updates native libraries, upgrades blocking dependencies, adds aarch64 handling, updates Dockerfiles for multi-architecture builds, and applies Graviton JVM flags. |
The readiness assessment does not change your code. It produces findings, one for each Arm64 compatibility issue it identifies. Each finding carries a severity, a category, file references, and the transformation that resolves it, so you can triage a portfolio and drive remediation directly from the findings.
Continuous modernization runs in two places. Remotely, it uses infrastructure in your AWS account or infrastructure that AWS Transform manages. Locally, it runs on your own machine. For a Graviton migration, that choice decides what can be validated:
| AWS Transform-managed | Customer-managed (Amazon Elastic Compute Cloud (Amazon EC2) or AWS Batch) | Local | |
| Analysis | Supported, nothing to provision | Supported | Supported |
| Remediation | Not supported | Supported (x86 only) | Supported |
Note: Continuous modernization currently provisions remote infrastructure in your account on the x86 architecture. A remote remediation produces the Arm64 code changes, but it cannot build or test them on Arm64 — you do that in your own Arm64 pipeline before you merge. On an Arm64 host, a local run builds on the target architecture as part of the remediation and leaves the change on disk, which is why this post runs it locally.
Step 5 in the following diagram, deploying to a Graviton-based instance, is beyond the scope of AWS Transform, whose output is the validated change and the pull request. In your environment, Step 5 is your existing Arm64 pipeline or test environment.
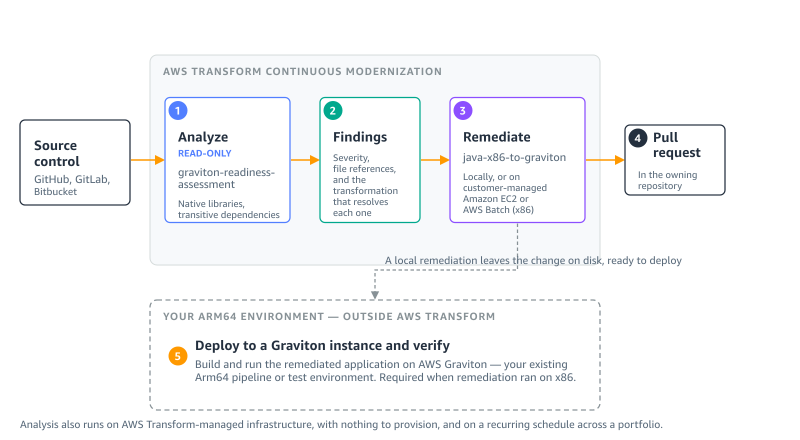
Figure 1: Where each step runs. Steps 1–4 are AWS Transform continuous modernization. Step 5 is your own Arm64 environment
The walkthrough covers these steps:
- Connect your source and discover repositories.
- Analyze the repository for Graviton readiness.
- Remediate the findings.
- Validate the build on Arm64.
- Deploy to a Graviton instance and verify.
- Scale across your portfolio.
For the full command surface, refer to Working with continuous modernization in the AWS Transform User Guide.
Prerequisites
To follow this walkthrough, you need:
- An AWS account with AWS Transform enabled for your user identity, which gives you access to the AWS Transform web application. For instructions, refer to Setting up AWS Transform.
- An AWS Region where AWS Transform is available. For the current list, refer to Supported Regions for AWS Transform.
- AWS credentials with permission to use AWS Transform.
- The AWS Transform CLI, installed with the setup script, and Node.js 20 or later. Install Node.js from the Node.js website, because some package managers ship an older version.
- Git, used for version control during the transformation.
- A source connection: a GitHub, GitLab, or Bitbucket personal access token with repository scope, or a local folder containing checkouts you already have. The readiness assessment is read-only, so it needs no write access to your code. Remediation needs write access only if you want it to open the pull request.
- For remediation, an Arm64 host, such as a Graviton-based Amazon EC2 instance. A local remediation builds its changes on the machine it runs on, so running it on Arm64 validates them on the target architecture. On x86, the remediation skill produces the code changes but cannot build or test them on Arm64.
- Java 8 or later. These capabilities do not change Java versions. If you also need a version upgrade, run the
AWS/java-version-upgradetransformation first. For more information, refer to the AWS Transform User Guide.
This post uses Amazon Corretto 21, Gradle 8.13, and a c7g.2xlarge instance running Amazon Linux 2023.
The sample application
This walkthrough uses TASSEL, an open source genetics toolkit. It is a Gradle project on Java 21 of about 245,000 lines of code, and it is a useful example because its dependency on x86 is typical rather than exotic.
TASSEL’s inner loop is matrix algebra, and it delegates that work to a native BLAS library through a Java Native Interface (JNI) bridge. It also reads and writes scientific data formats through libraries that ship compiled binaries inside their JAR files. Those binaries are built per architecture, and several of them have no Arm64 build — which is exactly what the readiness assessment is looking for.
If you do not have a sample application of your own, clone this one into the folder you will register as a source:
Connect your source and discover repositories
In this step, you register where your code lives and list the repositories that AWS Transform can see.
To connect a source and discover repositories
- Open a terminal and set the Region for the session with
export AWS_REGION=us-east-1. - Enter
atx ct statusto confirm the CLI reaches the service. It prints a summary of the sources, repositories, analyses, and findings in your account. - Register a hosted source with
atx ct source add --name graviton-demo --provider github --org my-org --token "$PAT", or a local folder withatx ct source add --name graviton-demo --provider local --path ~/code. - Enter
atx ct discovery scan --source graviton-demoto discover the repositories. - Enter
atx ct repository list --source graviton-demo --language javato confirm what was found.
Analyze the repository for Graviton readiness
In this step, you run the readiness assessment and review what it found.
To run the analysis
- Enter the following command:
- Enter
atx ct analysis get --id <analysis-id>to follow progress. - Enter
atx ct findings count --by severity --repo graviton-demo::tassel-renovateto see the severity breakdown. For this repository it returned seven findings: three high, three medium, and one low.
You can also run the analysis from the AWS Transform web application.
To run the analysis on the console
- On the Analyses tab, choose Run new analysis.
- For Analysis type, choose Graviton readiness.
- For Analysis name, enter a name for the run.
- For Connected source, select your source.
- Choose Next to select repositories and an infrastructure mode, then choose Run. To run it on a recurring cadence, choose Schedule.
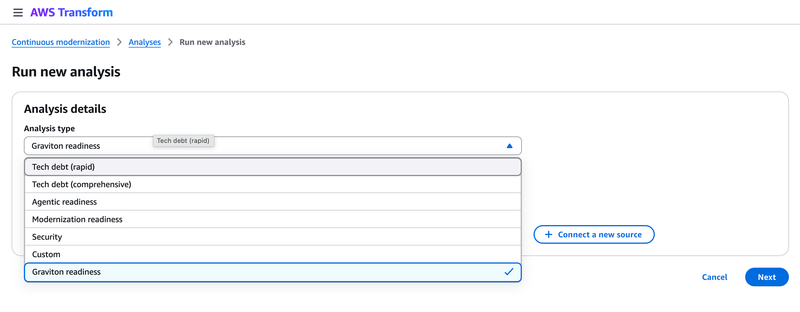
Figure 2: Graviton readiness in the Analysis type list
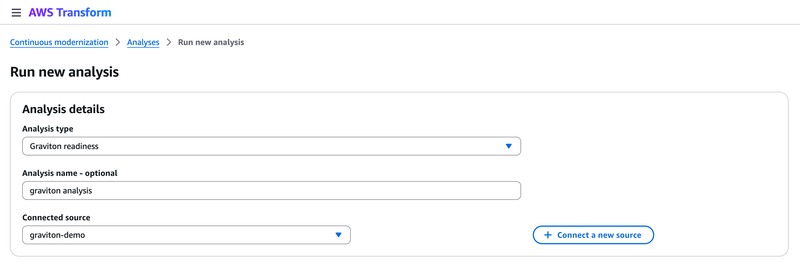
Figure 3: Configuring a Graviton readiness analysis against a connected source
What the analysis found
The analysis returned seven findings for this repository. The following examples are two of the seven, chosen because the difference between them is why this analysis is worth running. It also reported build configuration and JVM flag issues not shown here.
The application’s own code – TASSEL loads a native BLAS bridge with System.loadLibrary("TasselBlas") and declares six native methods. The JNI glue is in the repository as C source, with no compiled binary for Arm64.
Inside the dependency JAR files – This group is visible neither in your source nor in your dependency declarations. The assessment resolved the dependency tree and inspected the binaries inside each archive:
Note the second directory: it is 32-bit ARM, not aarch64. In a listing it reads as ARM support, but on Graviton the architecture-keyed loader finds no match, and no published release contains an aarch64-Linux directory. Two further dependencies arrived the same way: cisd:base:18.09.0 through jhdf5, and gov.nih.nlm.ncbi:ngs-java:2.9.0 through com.github.samtools:htsjdk:2.24.1, whose loader publishes linux-x86_64 only.
Remediate the findings
In this step, you hand the findings to the remediation skill and review the change it produces.
To remediate the findings
- Collect the finding IDs as the comma-separated list that
--idsexpects: - Pass that list to the remediation:
- Enter
atx ct remediation status --id <remediation-id>to follow it. - Review the branch it produced with
git logandgit diff --stat.
Note what you do not pass: neither the transformation nor the repository. Each finding already records the transformation that resolves it, so the remediation reads that from the findings and derives the target repositories from them. Pass --transformation-name only to pin or override that choice.
The run produced three atomic commits (the analysis reports, the change itself, then the validation reports):
Of the 867 lines added, only two files are code that runs. The remainder documents what was found and what was done.
What the remediation changed
1. It removed the x86-only dependency from the resolved classpath. The ngs-java artifact downloads linux-x86_64 native libraries at runtime and has no aarch64 search path. There is no aarch64-capable ngs-java 2.x to upgrade htsjdk to, so the remediation excluded the unused code path and recorded why:
It then verified the exclusion took effect:
2. It added an aarch64 native library path, ahead of the x86 payloads bundled in the JAR files. No aarch64 build of jhdf5 or cisd:base is published, and their C sources are not in the repository, so they cannot be recompiled there. The remediation added a resolution order for externally built binaries:
3. It applied Graviton JVM flags and wired the native path into the runtime. The test block previously set only -Xmx10g:
4. It made the state of the native libraries visible at build and run time. The build now warns on an Arm64 host when the aarch64 directory is missing, naming the libraries to supply. At the native load site, which previously logged the same message on every platform, the architecture is now included:
Together, these changes give the project a defined place for aarch64 binaries ahead of the bundled x86 ones, apply the Graviton JVM tuning, and report the state of those libraries at build and run time.
Validate the build on Arm64
In this step, you confirm the change compiles on the target architecture, which the remediation does for you on an Arm64 host.
To validate the build
- Check out the branch the remediation created.
- Enter
./gradlew clean build -x test --no-daemon. - Confirm the output reports a successful build and produces the JAR file.
The JAR file is produced and 61 dependency JAR files resolve.
Deploy to a Graviton instance and verify
This step is outside AWS Transform, as Figure 1 shows. Arm64 is not a single platform: macOS and Linux on aarch64 differ in exactly the dimension that matters here, which native binaries exist. The remediation ran locally, so the change is already on disk and ready to carry onto an instance.
To deploy and verify on Graviton
- Launch a
c7g.2xlargeinstance running Amazon Linux 2023. - Install Amazon Corretto 21, OpenBLAS, and LAPACK as aarch64 packages.
- Copy the remediated repository to the instance.
- Build it on the instance with
./gradlew classes copyDependencies. - Compile the native BLAS bridge for aarch64. Its C source includes a macOS-only header, so first change
#include <vecLib/cblas.h>to#include <cblas.h>, then run: - Run the application and confirm the native library loads.
The build resolves 62 dependency JAR files on the instance. The file command confirms the native library is built for the target architecture:
Running the application on the instance:
The native library loads, the BLAS backend is selected, and the matrix algebra runs. The application works on Graviton: the same application and the same JVM, now on Arm64.
It is also faster. In our testing on this c7g.2xlarge instance, the same operation took 60.36 ms on the pure-Java path and 12.47 ms with the native library, roughly five times the throughput. Those two numbers compare the native and pure-Java paths on Graviton rather than Graviton against x86. They are the reason to rebuild the native libraries rather than work around them.
Scale across your portfolio
In this step, you extend the same analysis across a source and put it on a cadence, using AWS Transform-managed infrastructure.
To analyze a portfolio on a recurring schedule
- Analyze every repository in a source:
- Create a schedule so the analysis repeats:
A single submission can include up to 5,000 repositories. Schedules that run on AWS Transform-managed infrastructure need an execution role that AWS Transform assumes on each run. For how to configure it, refer to Execution role for AWS Transform-managed schedules. For how analysis and remediation are billed, refer to AWS Transform pricing.
Clean up
The Graviton-based instance incurs ongoing charges while it runs, and a recurring schedule incurs charges on every run. To avoid them, terminate the instance when you are finished:
If you created a recurring schedule, delete it with atx ct schedule delete. The source connection and the analysis and remediation records carry no ongoing cost. To remove them, use atx ct remediation delete, atx ct analysis delete, and atx ct source remove.
Conclusion
In this post, you learned how to get a Java application ready for AWS Graviton with AWS Transform continuous modernization. The readiness assessment surfaced Arm64-incompatible native libraries that were not declared anywhere in the project. The remediation skill resolved them in code, in three atomic commits touching two files, and validated the build on Arm64. You then deployed the result to a Graviton instance yourself, where the application ran using its native BLAS library.
The readiness assessment is read-only, so you can point it at all the repositories within your source and see where your estate stands before changing anything. To get started, open the AWS Transform console and run a Graviton readiness analysis, or install the CLI and run the commands in this post.
For more information about the command surface, refer to Working with continuous modernization in the AWS Transform User Guide. For instructions on getting started with AWS Transform, refer to Setting up AWS Transform. For pricing details, refer to AWS Transform pricing.
For a related walkthrough using the interactive transformation, refer to Migrating your Java applications to AWS Graviton using AWS Transform custom. For guidance on tuning workloads after you migrate, refer to the AWS Graviton Technical Guide.


