This guided lab walks you through migrating a small payments app, with a React UI and Express API running on a single AWS EC2 instance, while PostgreSQL stays on AWS.
You’ll move the UI and API to Google Kubernetes Engine without changing the public URL customers already use, gradually shifting traffic from AWS to GKE a few percent at a time.
By the end, you’ll have run the app locally, stood up AWS, built GKE in eight Terraform stages, tested the new environment, shifted production traffic to GKE, completed the cutover, and torn down what you no longer need.
The image below shows the middle of the migration, with both clouds live, customers still using one URL, and the database remaining on AWS.
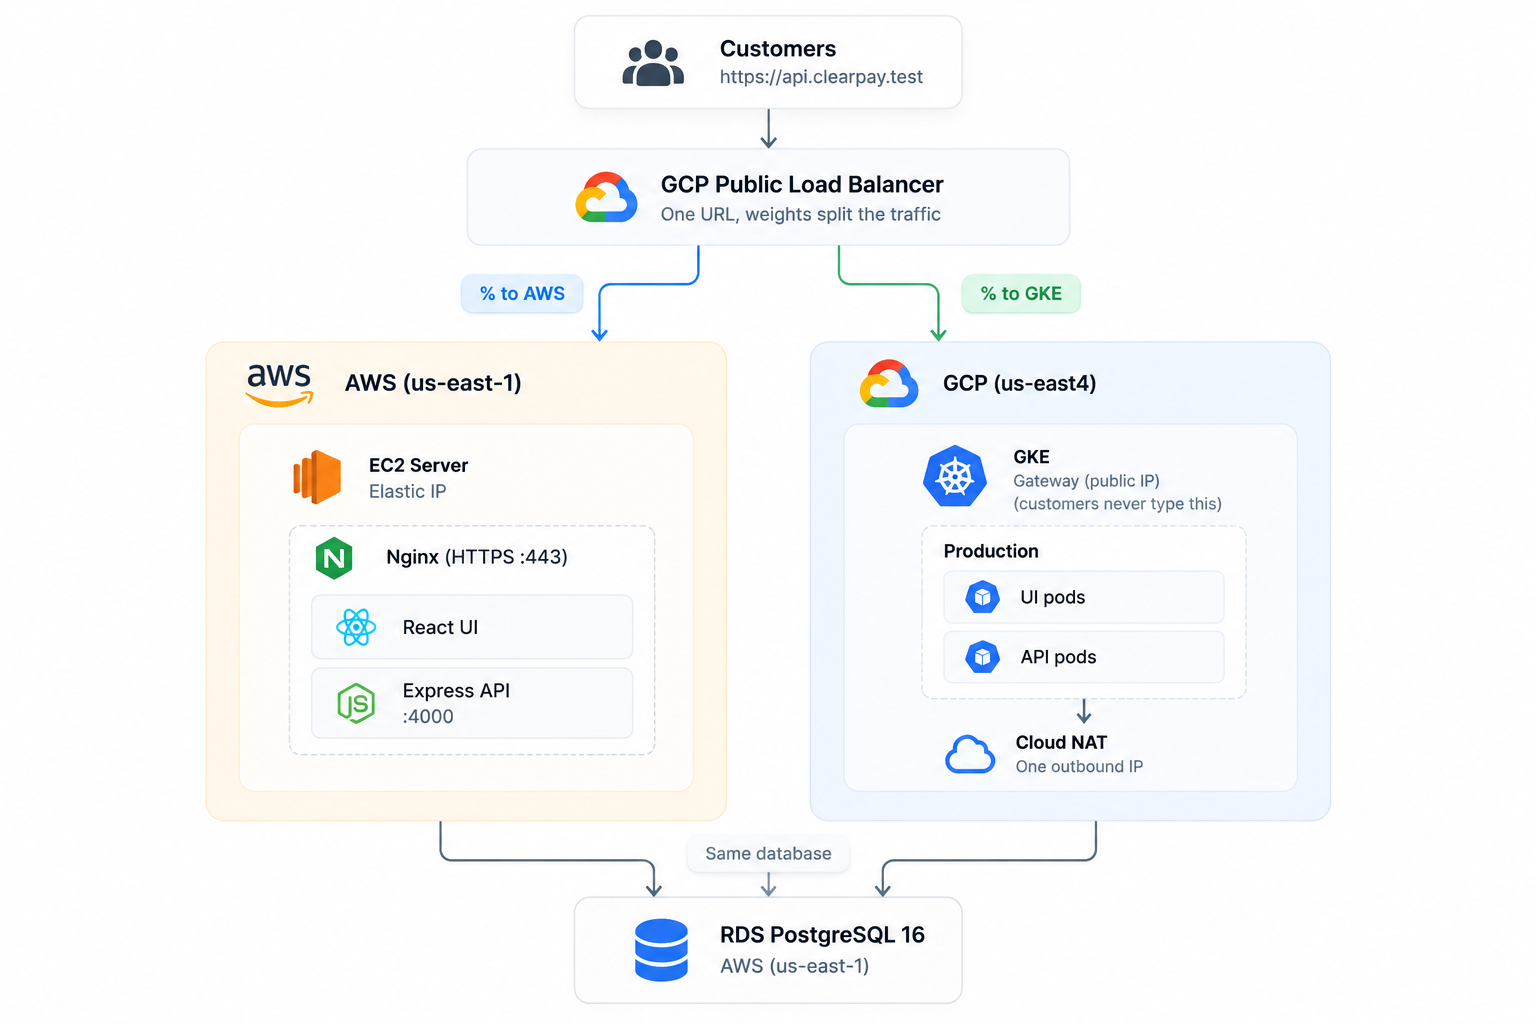
Around that request path, three more systems do their jobs:
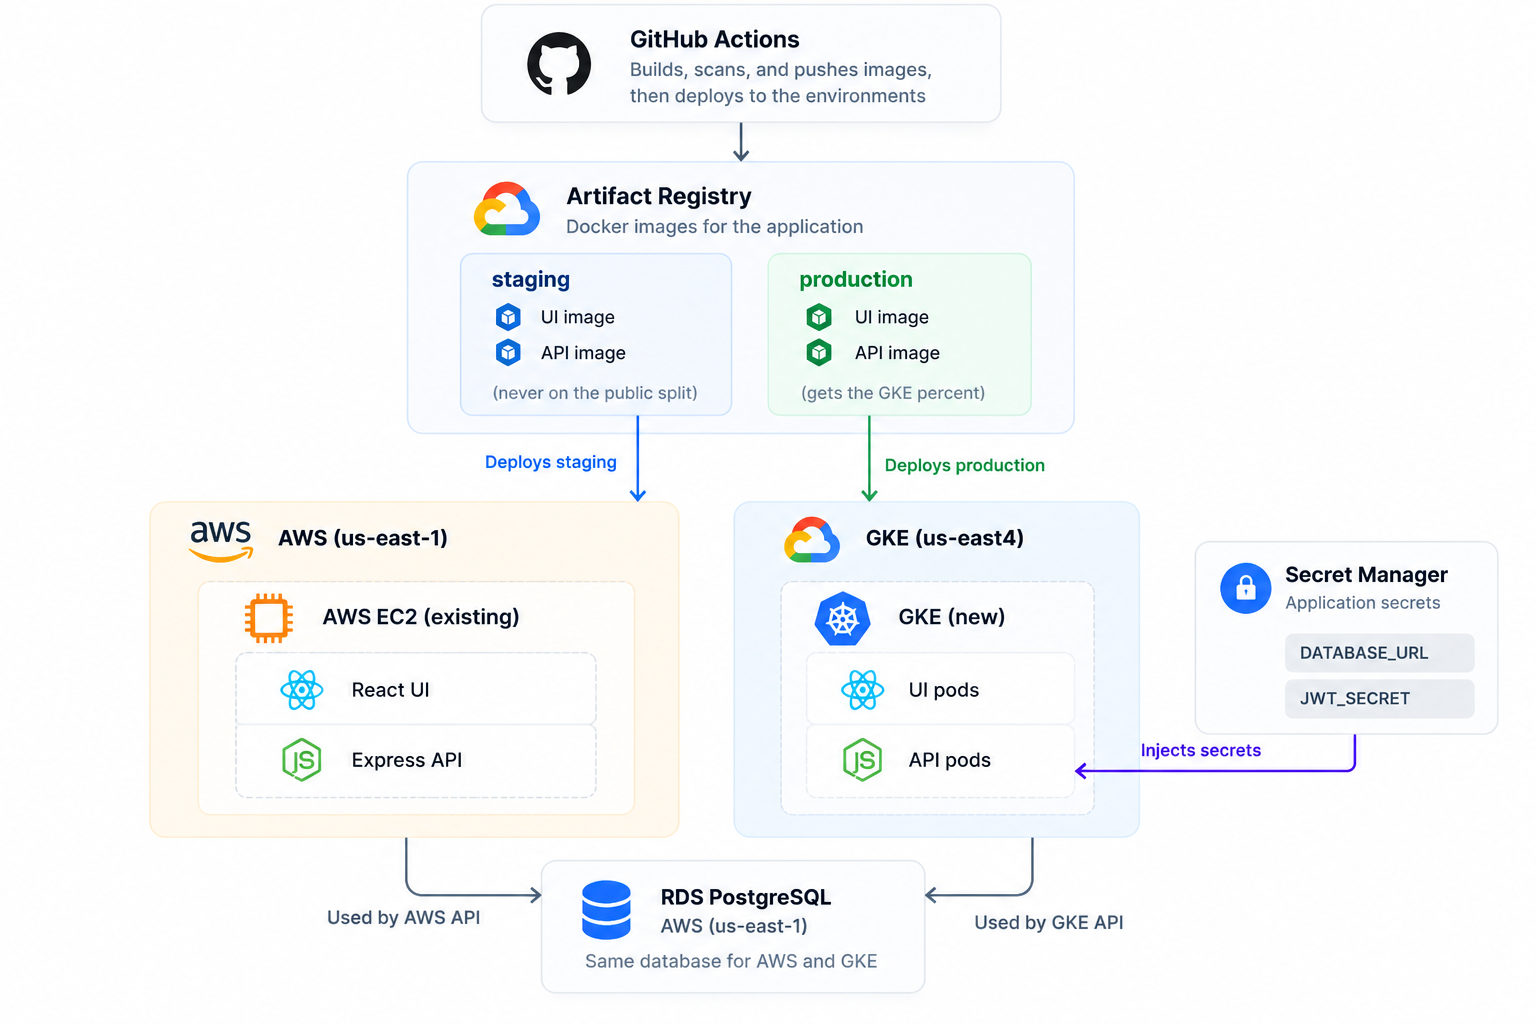
Table of Contents
Before You Start
What You Need Installed
Install each tool when its chapter needs it. You don't need everything on day one.
| Chapter | Tools |
|---|---|
| 1 | Docker Desktop (or Docker Engine with Compose on Linux), Git, and python3 |
| 4 | An AWS account, the AWS CLI (run aws configure once), Terraform 1.5 or newer, rsync, and an SSH key |
| 6 | Node.js 20 or newer on your laptop. The check scripts in scripts/ use node to read JSON |
| 10 | A GCP project with billing turned on, the gcloud CLI, and kubectl |
| 14 | A GitHub account and your own copy of this repository on GitHub |
| 19 | kustomize (install with brew install kustomize on a Mac, or see kubectl.docs.kubernetes.io) |
On Windows, use Git Bash or WSL for every command in this book. The commands are written for a Bash shell.
Skills You Need
Prior Kubernetes, Terraform, GCP, or load-balancer experience isn't required. Don't buy a domain. On AWS, you open https:// plus the Elastic IP. The browser warns about a self-signed certificate. Click through it and you get the same ClearPay login as on your laptop. On GCP you add one /etc/hosts line so https://api.clearpay.test points at the load balancer, unless you turn on Cloud DNS.
What This Costs
AWS costs about $1.25 per day. GCP costs about $1.60 to $3 per day once it's up. A weekend run of the whole book costs a few dollars.
Neither environment should run for a month. If you stop for more than a couple of days, tear both down:
./scripts/teardown-gcp.sh cd infra/aws/terraform && terraform destroy Two files hold the detailed numbers: infra/aws/COST.md and infra/gcp/COST.md. The book sends you to those two files and no other documents.
How This Book Works
Clone the repository and run every command from its root folder unless a step says cd somewhere else:
git clone https://github.com/Osomudeya/migrate-api-aws-gke-devops.git cd migrate-api-aws-gke-devops The repository already holds the app, the Terraform, the Kubernetes files, the pipeline, and the scripts.
You won't write new code. Your work is to run each step, read what the system prints, and decide whether to continue.
This book reads like a story where you join a small payments company in week one, and every chapter is a task someone on the team hands you.
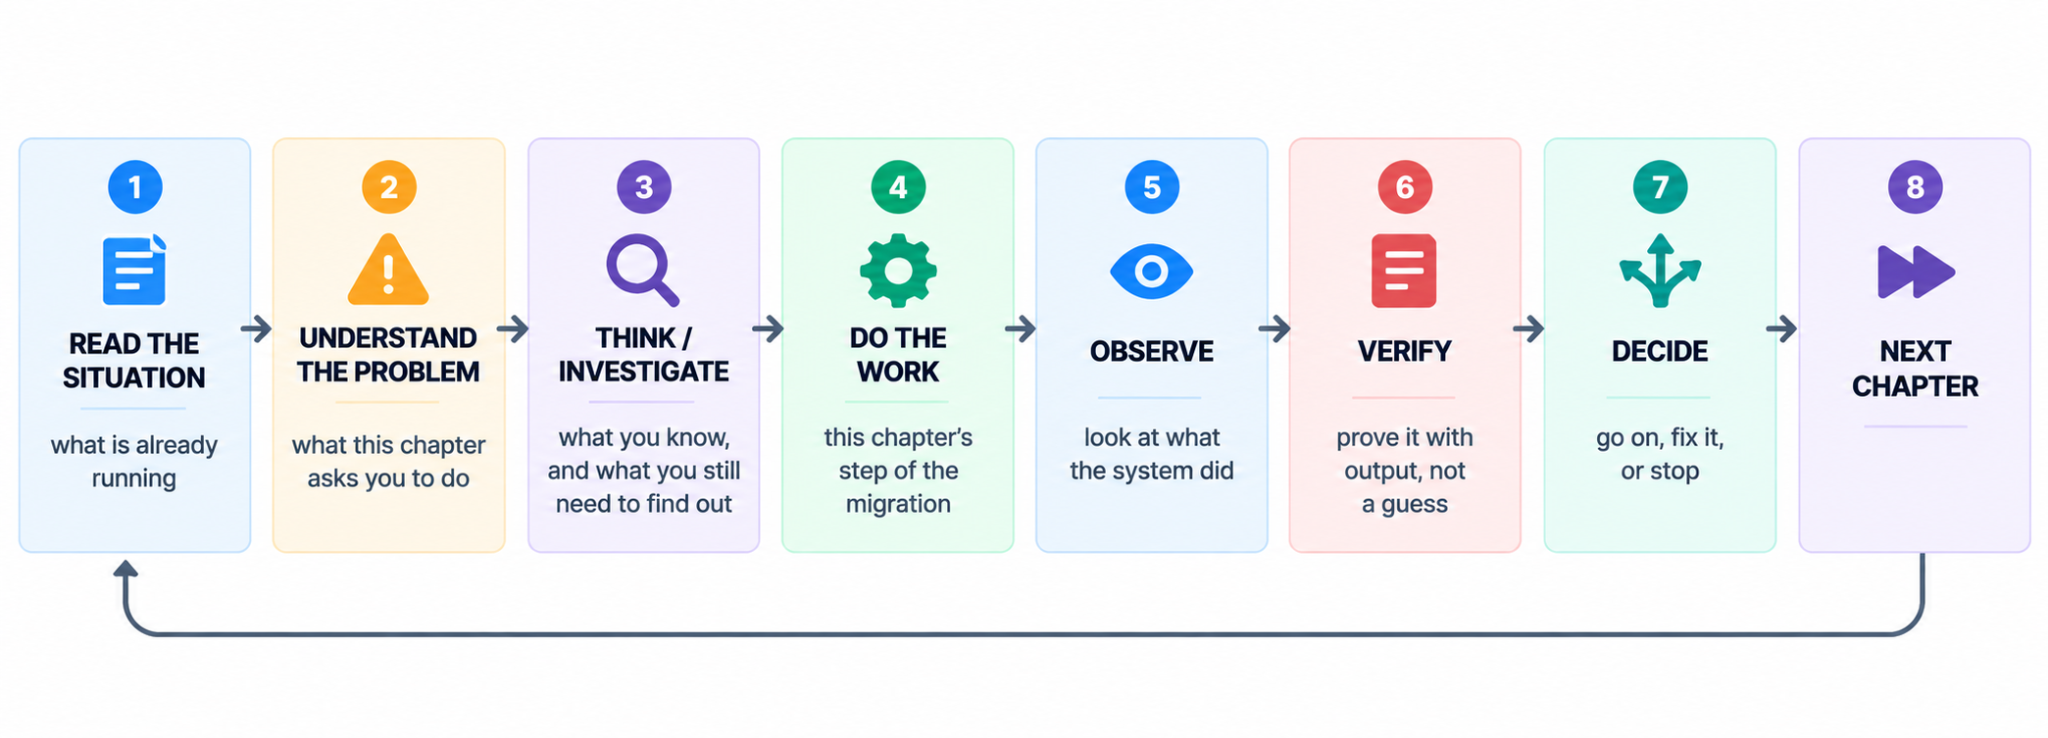
Each chapter opens with a time stamp and a scene, then follows the same loop:
Most Important Rule
Don't run a command you don't understand. If the book hasn't told you why yet, keep reading, because the "why" is the point.
This book has two kinds of steps.
The first simply asks whether the step worked, such as whether the file copied or the container started. If it did, continue.
The second asks you to think about what happened. Once the command finishes, read the output and understand what it means before moving to the next chapter.
The Chapters
Read the chapters in order and skip none. Chapter 1 doesn't ask you to install Kubernetes or open GCP. Those come later.
| Part | Chapters | What happens |
|---|---|---|
| 1. Run ClearPay and Put It on AWS | 1–6 | You run the app on your laptop, deploy it to one AWS server, and write down how fast it is |
| 2. Plan the Move | 7–9 | You read the assignment, map what the app depends on, and read the GCP design |
| 3. Build Google Cloud With Terraform | 10–11 | You build GCP in eight Terraform stages, one at a time |
| 4. Get ClearPay Onto GKE Staging | 12–15 | The pipeline puts ClearPay on GKE staging, and the promotion gate checks it |
| 5. Make GKE Production-Ready | 16–18 | You review security, set up a dashboard, and break staging on purpose |
| 6. Move Customers to GKE | 19–23 | You deploy production and move traffic from 1 percent to 100 percent |
| 7. Finish the Migration | 24–28 | You prove the cutover, retire AWS, tear everything down, and write it up |
If Something Doesn't Work
Stay in that chapter. Use its "If it fails" steps. Don't skip ahead. A problem you carry forward gets harder to find, because the next chapter adds another cloud on top of it.
The job isn't to memorize Kubernetes or Terraform. It's to learn how to work through a real migration: understand what's running, make decisions based on what you find, verify the result, and know what to do when something breaks.
How Long This Takes
This might take more than one day. If you'll be away for more than a day or two, destroy the AWS and GCP resources so you're not billed for them while it's idle. The commands are in "What this costs" above.
The Team
This lab starts as Zee, a junior DevOps engineer on the ClearPay team, week one. You play Zee.
Maya is the engineering manager. She asks for evidence.
Daniel is a senior engineer. He pairs with you on servers, Kubernetes, and capacity.
Amara maintains the payments API. She cares about one thing: no customer is charged twice.
Chris handles customer support. He hears first when transfers fail.
Your job is to move the payments API from one AWS EC2 server to GKE without a customer-visible outage, while PostgreSQL stays on AWS.
Part 1. How to Run ClearPay and Put It on AWS
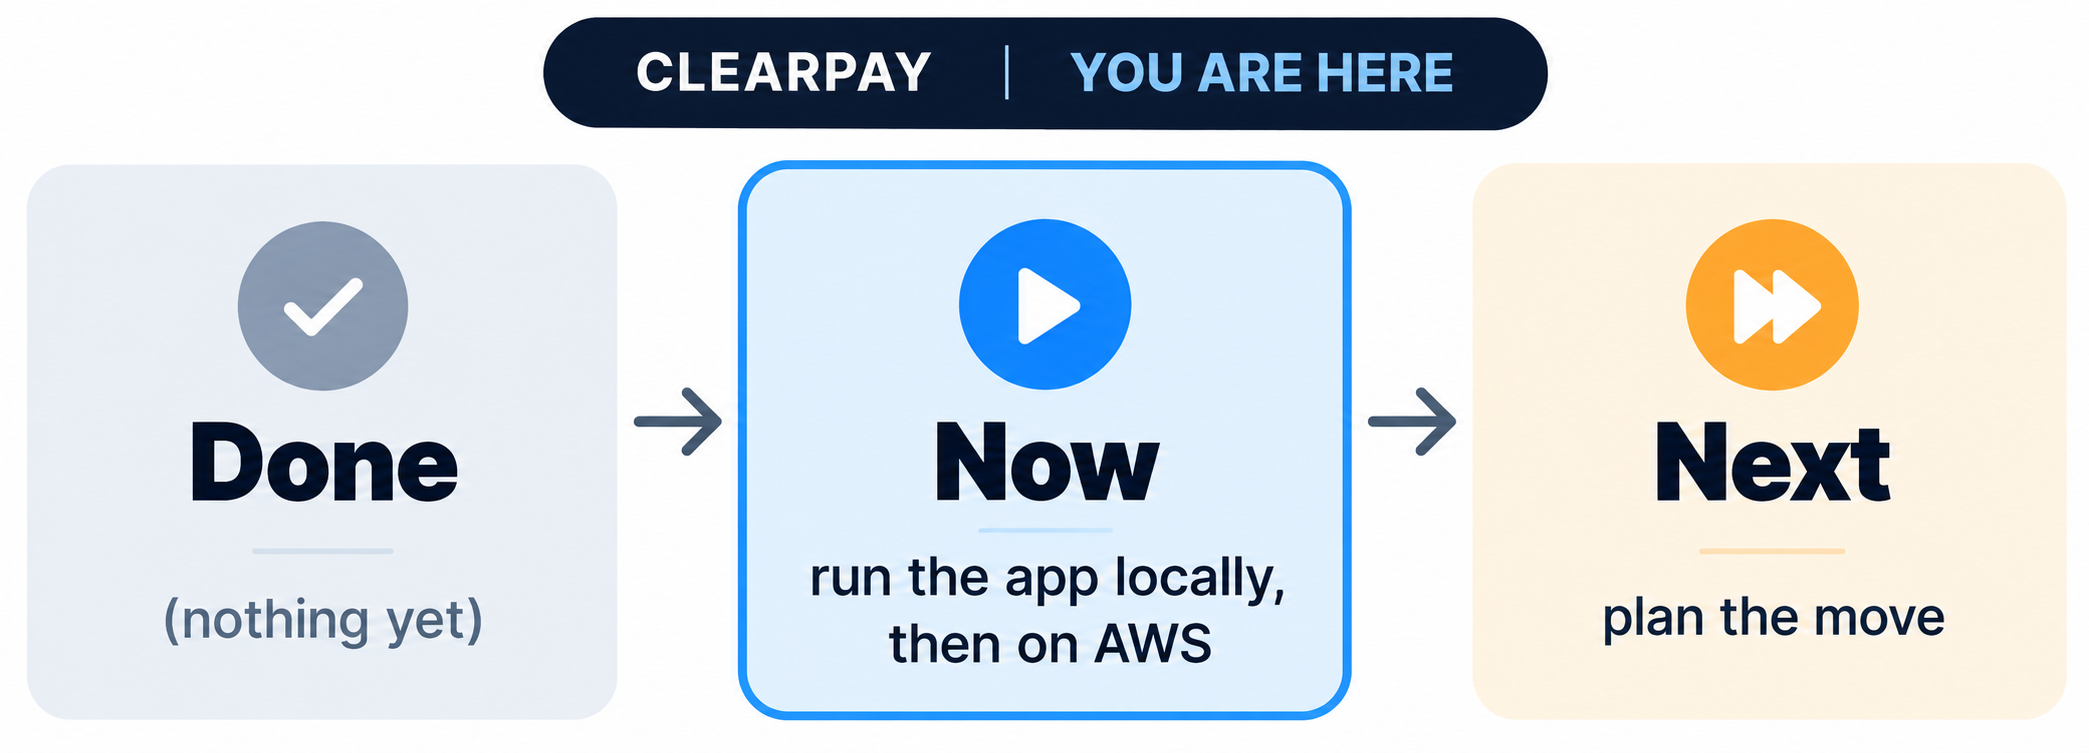
A migration needs a starting point you trust. In this part, you run ClearPay on your laptop, deploy it to AWS the way the company runs it today, and write down how fast it is. Every later chapter compares GKE against those numbers.
Chapter 1. Run ClearPay on Your Laptop
Week one, Monday, 9:05 a.m.
Your laptop is new. The Wi-Fi password is on a sticky note. The first message in your inbox is from Maya, the engineering manager, and it's short.
Maya: "Get ClearPay running on your laptop first. Log in, send $20, and then we'll talk about moving the API to GKE."
The code is in the repository: api/, ui/, and db/. Nothing is running yet.
Why This Matters
Later chapters need a picture of a good login and a good $20 send. When something fails on AWS or GKE, you compare it with this.
What You're About to Run
ClearPay has three parts, and each part has one job.
The UI is what a customer sees and taps: the login page, the balance, and the Send button. UI stands for user interface.
The API is the part that does the work. It has no screen. The UI sends it a message, such as "send $20 to Bob". The API checks the message, does the work, and sends back a reply, such as "done". API stands for application programming interface. Think of it as a door with rules. The UI asks in a fixed way, and the API answers in a fixed way.
The database is where ClearPay writes everything down: every account, balance, and payment. PostgreSQL is the database program ClearPay uses.
A server is a computer that stays on all day and waits for requests. The API runs on one.
A café works the same way. The menu is the UI. The waiter is the API. The kitchen and its records are the database. A customer never walks into the kitchen. The customer tells the waiter what they want.
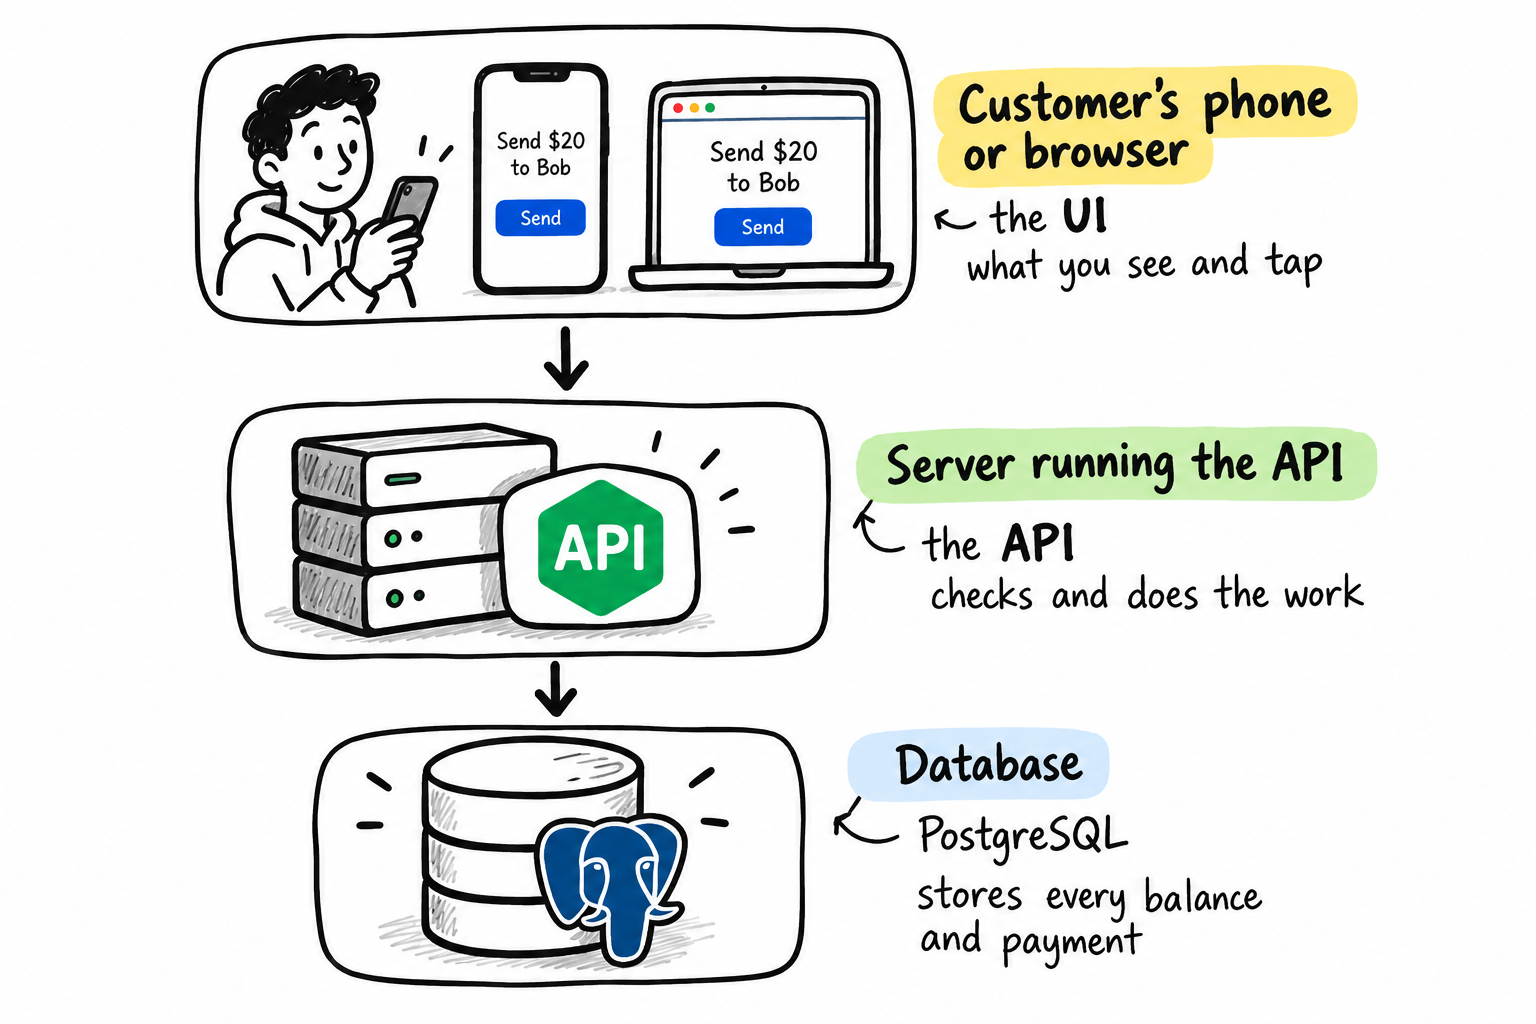
This chapter runs all three on your laptop. Later chapters move the UI and the API to Google Cloud. The database stays on AWS.
Steps
Start Docker Desktop. Don't install Node or PostgreSQL for this chapter. They run inside the containers.
From the folder that holds docker-compose.yml:
docker compose up --build The first build takes a couple of minutes. This terminal keeps printing logs and doesn't give you a prompt back until you press Ctrl+C. Leave it running.
Wait until all three of these lines appear. The names on the left may start with your folder name:
Container <folder>-postgres-1 Healthy api-1 | {"message":"api_started", ...} ui-1 | ➜ Local: http://localhost:5173/ Healthy means Postgres is up. api_started means the API is up. The localhost:5173 line means the UI is up.
Open a second terminal in the same folder. Create two demo accounts:
docker compose exec api node db/seed.js This runs the seed script directly. The API image has no npm, on purpose, because the security scan in Chapter 14 flags it.
Expected output:
seeded: alice@clearpay.dev (password: password123) seeded: bob@clearpay.dev (password: password123) If you see skip (already exists): alice@clearpay.dev, the accounts exist from an earlier run. That's fine.
This is what's now running:
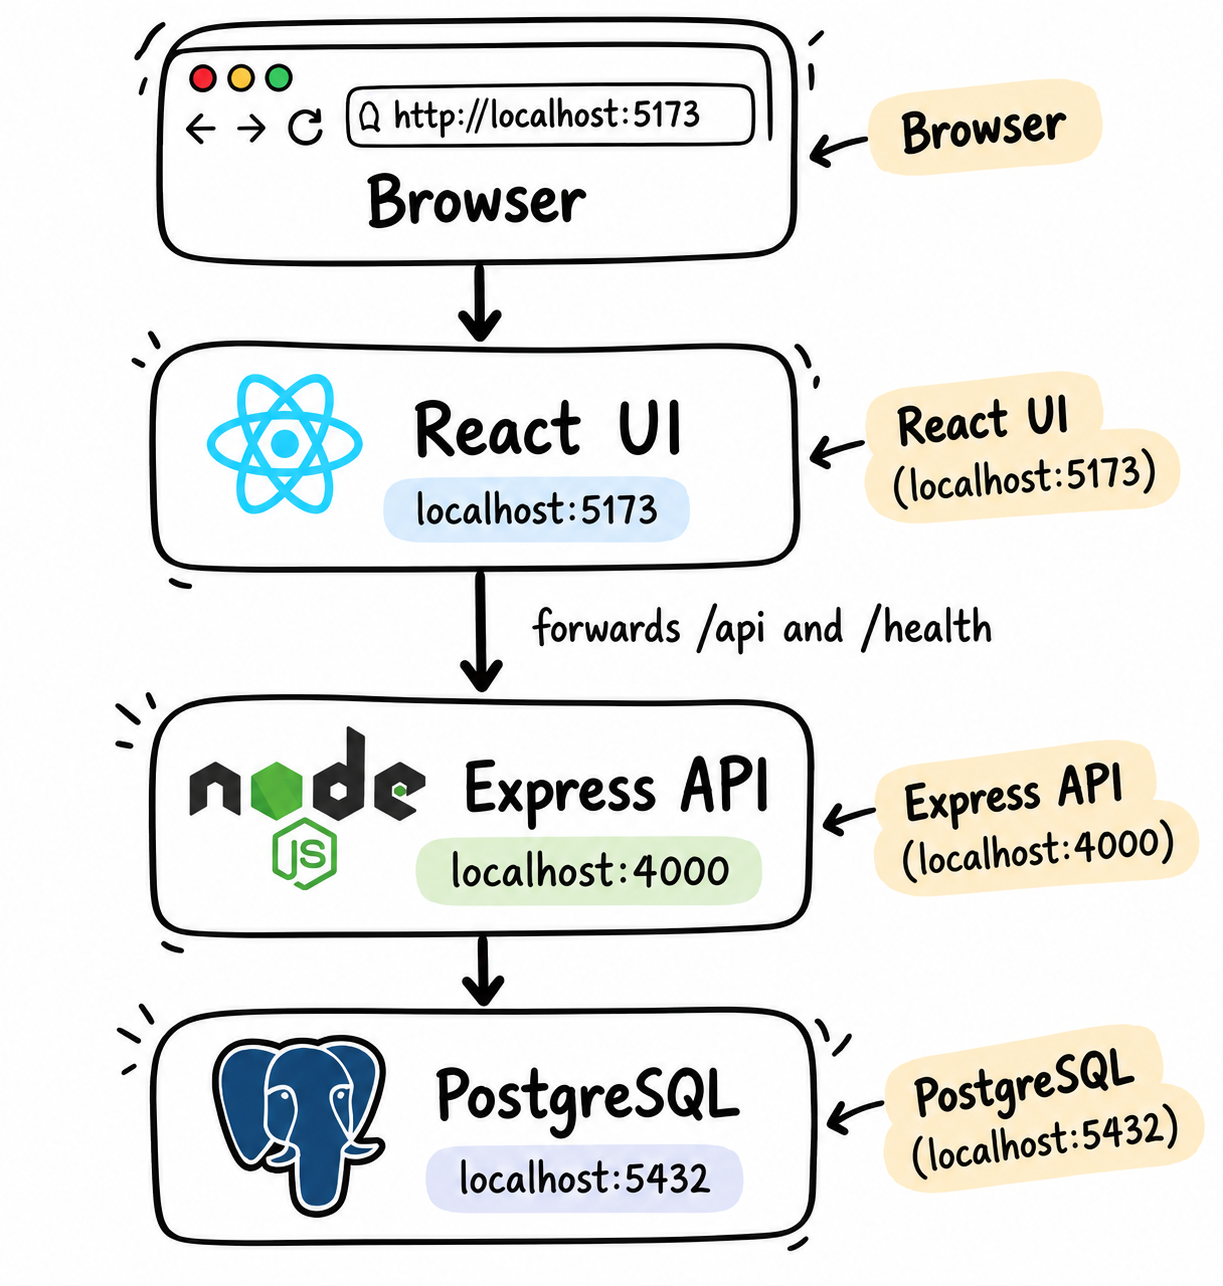
Check
In the second terminal:
curl localhost:4000/health Here's the expected output. Your instance value will be a container ID:
{"status":"ok","served_by":{"platform":"aws","version":"1.0.0","instance":"14b8d5d767ea","commit":"local","rollback_active":false}} "status":"ok" is the check. served_by names the platform that answered the request. It says aws on your laptop because docker-compose.yml sets PLATFORM: aws. Later, GKE answers with gke, and that one field tells you which cloud handled each request.
Now open http://localhost:5173 and sign in. Seed already created Alice, so don't register her:
Email:
alice@clearpay.devPassword:
password123
Send $20 to bob@clearpay.dev. The transfer appears under Recent activity as Sent with a short ID, for example Sent · a1b2c3d4.
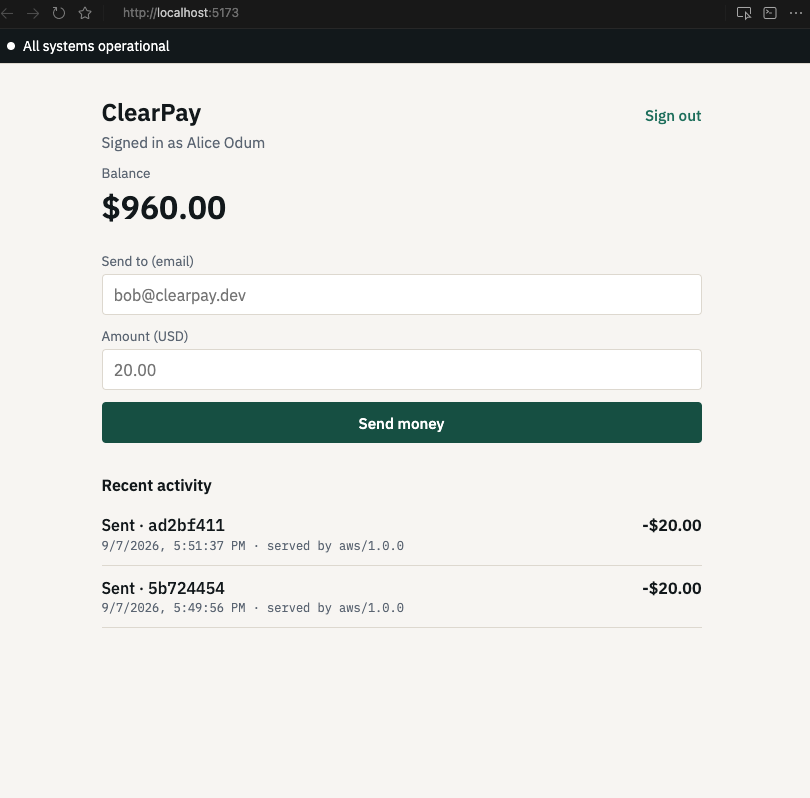
Look at two places on this dashboard. You'll watch them for the rest of the book:
Each line under Recent activity ends with
served by aws/1.0.0. That's the platform and version of the API process that wrote the transfer. It's stored with the transfer in the database.The black bar at the top says
All systems operationalwhen/health/readysucceeds. That means the API process is up and can reach Postgres. It says nothing about logins. A wrong password shows a red error on the form, while the bar keeps sayingAll systems operational.
After Chapter 5, you open the same dashboard on the AWS address. Same login, same two places.
If it Fails:
failed to connect to the docker APIordocker.sock: Docker Desktop isn't running. Start it, wait until it is ready, and rundocker compose up --buildagain.email already registeredon the Register page: Alice already exists. Go back to Sign in.invalid credentials: the password is the full stringpassword123. If that still fails, run the seed command again. Askip (already exists)line means the account is there.docker compose upexits right away: rundocker compose logs apiin the second terminal. On a slow first boot the API can start before Postgres accepts connections. Rundocker compose upagain.Port
4000or5173already in use: another program on your machine holds that port. Stop it, or change the port mapping indocker-compose.yml.
Decision
If the transfer went through, the application works. Continue.
If it didn't, fix it here, on the laptop. AWS and GKE are harder to debug. On this machine, the answer is one docker compose logs command away.
Done When:
docker compose upruns without errorsThe seed reports two accounts, created or skipped
You sent $20 in the UI and saw it under Recent activity
Chapter 2. Read the Code That Matters
Monday, 11:30 a.m.
The $20 went through. You're still looking at the transfer line when a chair rolls up next to yours. Daniel, the senior engineer at the next desk, has his coffee and no hurry.
Daniel looks over at your screen. "You don't need to memorize every line. Know which file does which job, so you can open it fast during the migration."
Why This Matters
Every later chapter touches one of these four files. Five minutes now saves you a search under pressure later.
Steps
Open these files in this order:
api/src/index.jsstarts the API and connects every route: health checks,/api/info, login, and transactions.api/src/servedBy.jsis 17 lines long. It readsPLATFORM,APP_VERSION, andROLLBACK_ACTIVEfrom environment variables. The dashboard uses it to printserved by aws/1.0.0.api/src/routes/transactions.jshandles sending money. Find theidempotency_keycheck near the top. It runs before anything else.api/src/db.jsconnects the API to Postgres. FindDB_POOL_SIZE || '10'.
Daniel stops you on the last file.
"A connection is an open line to the database. One API process can hold up to ten of those lines at the same time. Remember that number."
What You Now Know
index.js → starts the API and connects the routes servedBy.js → says which cloud answered (aws or gke) routes/transactions.js → sends money, checks the idempotency key first db.js → talks to Postgres, up to 10 connections per process servedBy.js fills the dashboard line served by aws/1.0.0. That's which cloud answered, not who logged in.
Today there's one API process, so ten connections is the whole pool. On GKE, several copies of the API run at once. Kubernetes calls each copy a pod. Each pod gets its own pool of ten, and every pod shares the same database. Chapter 22 comes back to that math.
Done When:
- You can say, without looking, which file sets the connection limit and which file names the platform
Chapter 3. Prove a Retry Never Charges Twice
Monday, 2:10 p.m.
After lunch, you get a message from someone you haven't met yet. Amara maintains the payments API. Maya told her you have ClearPay running on your laptop, so she skips the greeting.
Amara: "Send $20 twice with the same key. Alice's balance should drop by $20, not $40."
Why This Matters
Alice sends $20 to Bob. She taps Send, and the screen freezes. She doesn't know if the payment worked, so she taps Send again.
Without protection, the API sees two requests and takes $20 two times. Alice loses $40 for one payment.
The idempotency_key stops this. "Idempotent" means safe to repeat: doing it twice gives the same result as doing it once.
The key is a label the app puts on each payment, for example round-a.
The first request arrives with the label
round-a. The API takes $20 and saves the label.The second request arrives with the same label. The API sees
round-aagain. It knows this is the same payment, so it takes no money. It sends back the first result.
Same label means same payment.
This matters more during the migration. Sometimes the first tap goes to AWS and the retry goes to GKE. Those are two different servers, but they use one database. GKE looks in that database, finds round-a, and doesn't charge again. One shared database keeps the customer safe on both clouds.
Use curl for this chapter, not the Send money button. The UI gives every click a new key, so every click is a new transfer.
For a deeper walk-through of idempotency, see PayFlow: A Production-Grade Fintech System for Learning Real DevOps.
Steps
Stay in the second terminal, in the folder with docker-compose.yml. Run one command at a time and read the output before the next one.
Log in as Alice. This stores her login token in a shell variable called TOKEN. A token is proof that Alice signed in. Later commands send it with $TOKEN.
TOKEN=$(curl -s -X POST localhost:4000/api/auth/login \ -H "Content-Type: application/json" \ -d '{"email":"alice@clearpay.dev","password":"password123"}' \ | python3 -c "import sys, json; print(json.load(sys.stdin)['token'])") This prints nothing when it works. Run echo $TOKEN to confirm. You should see a long string.
Then read Alice's account. Write down the balance_cents number.
curl -s localhost:4000/api/accounts/me -H "Authorization: Bearer $TOKEN" This is the expected shape. Your numbers and id will differ:
{"account":{"id":"...","balance_cents":"94000","currency":"USD"},"served_by":{"platform":"aws","version":"1.0.0","instance":"...","commit":"local","rollback_active":false}} 94000 means $940.00. If you haven't sent anything yet, you'll see 100000 ($1,000.00). If the command says missing_token or invalid_token, run step 1 again.
Now pick a label you haven't used yet:
LABEL=round-a Send $20 to Bob. 2000 is $20.00 in cents.
curl -s -X POST localhost:4000/api/transactions \ -H "Authorization: Bearer $TOKEN" -H "Content-Type: application/json" \ -d "{\"to_email\":\"bob@clearpay.dev\",\"amount_cents\":2000,\"idempotency_key\":\"$LABEL\"}" Look for "replayed" in the reply:
"replayed":falsemeans this send took $20. Continue."replayed":truemeans this label was used before, probably in an earlier run. No money moved. SetLABEL=round-band send again until you see"replayed":false.
Send the exact same request again. Don't change LABEL.
curl -s -X POST localhost:4000/api/transactions \ -H "Authorization: Bearer $TOKEN" -H "Content-Type: application/json" \ -d "{\"to_email\":\"bob@clearpay.dev\",\"amount_cents\":2000,\"idempotency_key\":\"$LABEL\"}" Now you should see "replayed":true, and the transaction id matches the first send.
Read the account again:
curl -s localhost:4000/api/accounts/me -H "Authorization: Bearer $TOKEN" Check
balance_cents is 2000 lower than the number you wrote down, not 4000 lower. If you started at 94000, you now see 92000.
If it Fails:
echo $TOKENis empty: run the login command again.The second send still shows
"replayed":false:LABELchanged between the two sends. Runecho $LABEL, then send again.Both sends showed
"replayed":true: the balance won't change. Pick a newLABELand repeat steps 3 and 4.
Done When:
One send returned
"replayed":falseand the next returned"replayed":truefor the same labelbalance_centsfell by 2000, not 4000
Chapter 4. Build the AWS Server With Terraform
Tuesday, 9:15 a.m.
Maya stops at your desk on her way to a meeting. Yesterday you told her that ClearPay runs on your laptop and that a retried payment charges only once.
Maya: "Good. Now, localhost isn't a baseline. Get ClearPay onto AWS and prove a customer can complete a transaction there. Then we can talk about leaving AWS. Daniel will work with you on this one."
Daniel rolls his chair over from the next desk.
Daniel: "One rule before you start. Don't skip terraform plan."
Why This Matters
This book starts from the setup many small companies run: one Linux server with no Docker on it.
systemd, the Linux service manager, starts the Node API when the server boots. nginx sits in front of it and handles HTTPS on port 443. PostgreSQL runs on Amazon RDS, the managed database service.
There's no AWS load balancer. A load balancer spreads traffic across several servers, and this setup has one. Adding one would add an hourly bill for no gain. The numbers are in infra/aws/COST.md.
The file api/Dockerfile exists, but only your laptop uses it. The AWS server never runs Docker.
Daniel: "The EC2 server won't have Docker. systemd starts Node on boot, next to nginx. That's the server you're inheriting."
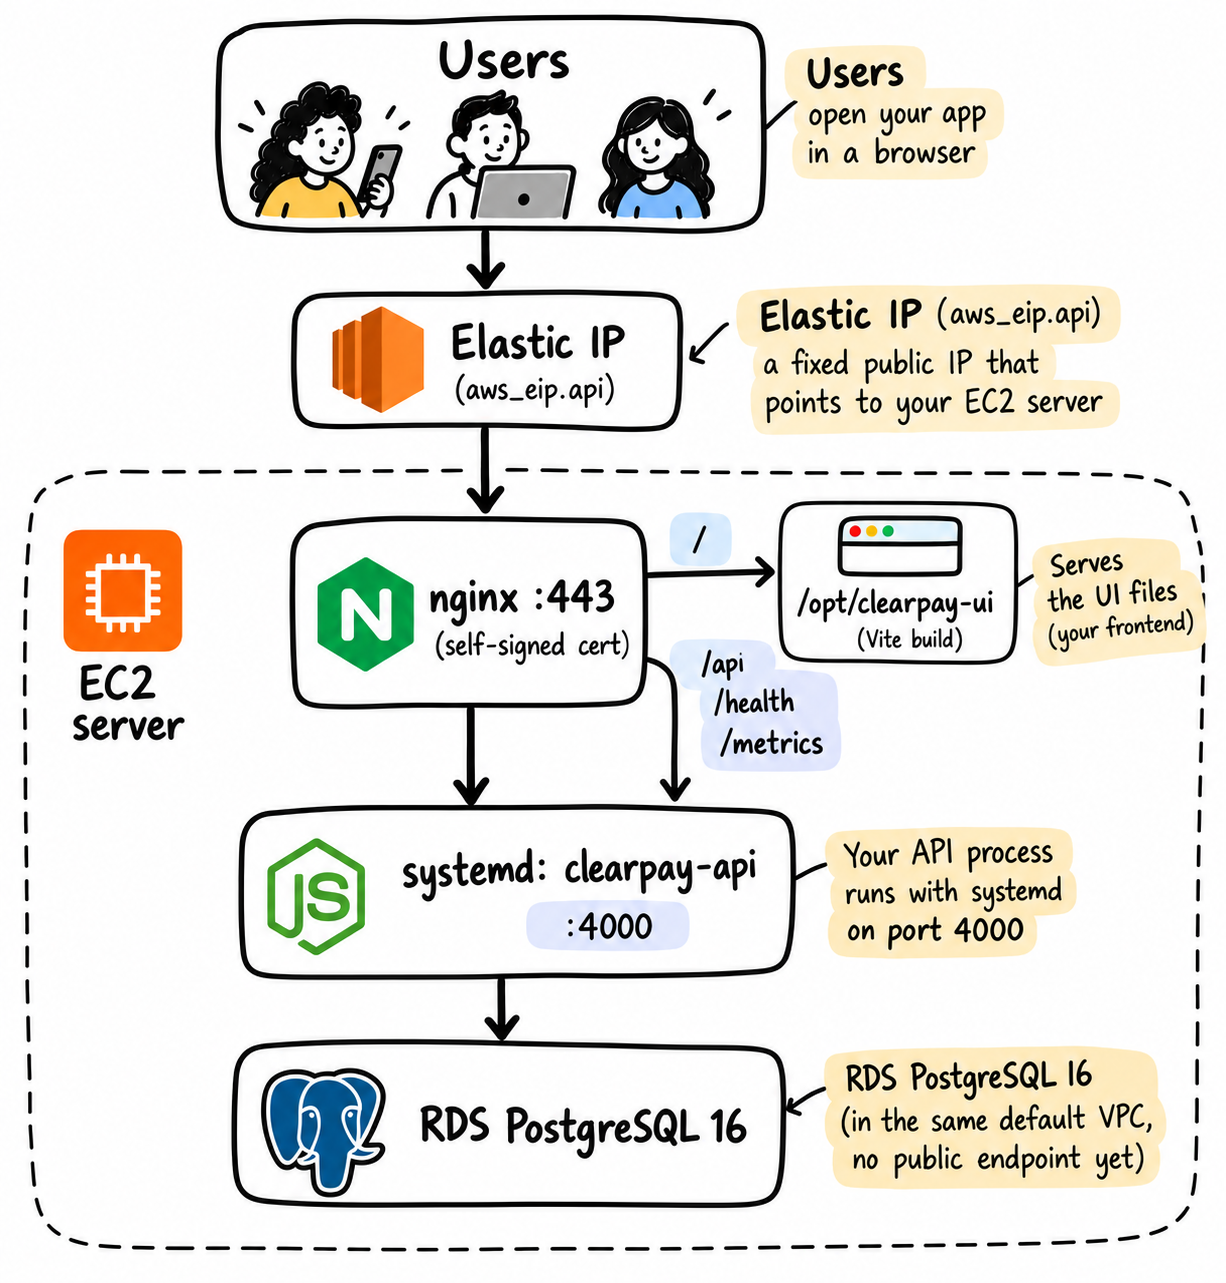
The diagram above shows how a customer request reaches ClearPay on AWS. The Elastic IP provides a fixed public address for the EC2 server. Nginx handles HTTPS traffic on port 443, serves the frontend files, and forwards API requests to the Node.js process managed by systemd on port 4000. The API reads and writes payment data in PostgreSQL on Amazon RDS, which has no public endpoint at this stage.
Two AWS terms appear in this chapter:
A VPC is the private network your servers sit in. AWS gives every account a default one. This lab uses it instead of building its own.
A security group is AWS's firewall. It lists which ports may reach a server. This lab allows SSH from your IP only, HTTPS from anywhere, and Postgres only from the API server.
Steps
First confirm your laptop is ready. Each of these must work:
docker --version # still needed later aws sts get-caller-identity terraform version # 1.5 or newer ssh-keygen -t ed25519 -f ~/.ssh/clearpay-deployer -N "" aws sts get-caller-identity prints your AWS account. If it errors, run aws configure with an access key from an IAM user that can create EC2, RDS, VPCs, and CloudWatch alarms. An admin user on a throwaway account also works.
From the repository root:
cd infra/aws/terraform cp terraform.tfvars.example terraform.tfvars Open terraform.tfvars and change two values:
ssh_allowed_cidr: your public IP address followed by/32. Find your IP withcurl ifconfig.me.ssh_public_key_path: the path to your key's.pubfile.
Then:
terraform init terraform plan terraform apply Read the plan before you type yes. This first run should only create things: EC2, RDS, and security groups. If the plan says it will destroy anything, stop and don't apply.
This is what Terraform builds. The server is empty until Chapter 5:
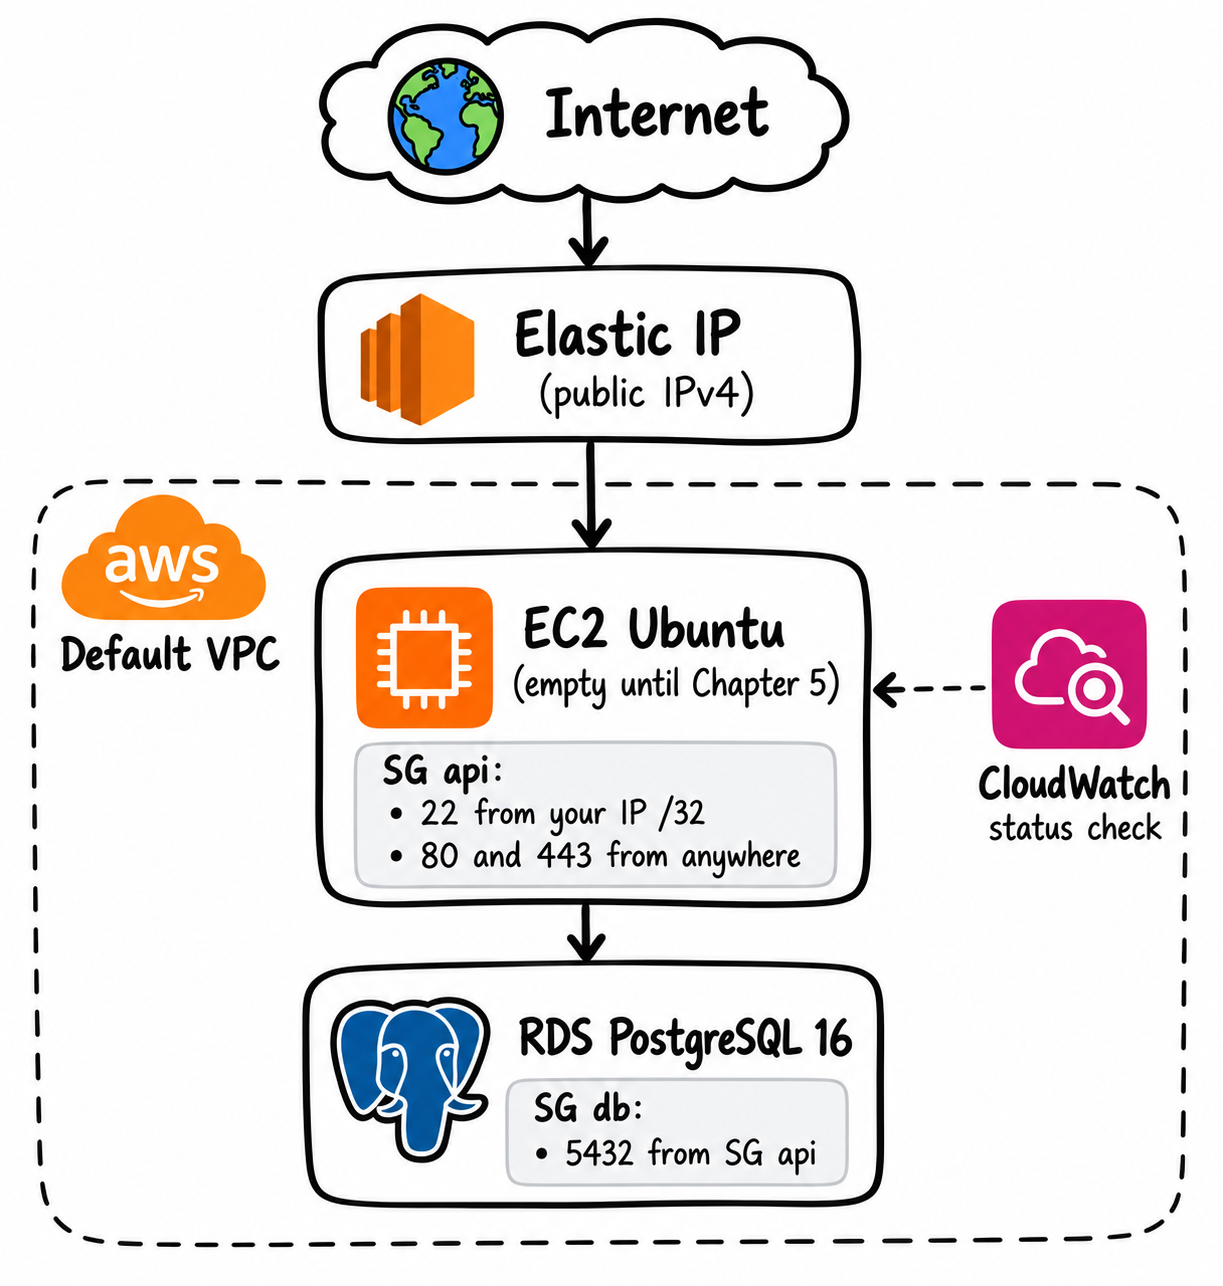
The diagram shows the AWS infrastructure Terraform creates: an EC2 Ubuntu server with an Elastic IP, security groups controlling SSH and HTTPS access, an RDS PostgreSQL database accessible only from the API server, and a CloudWatch status check. Both resources sit inside the default VPC. The EC2 server is still empty. Chapter 5 deploys ClearPay to it.
A note on cost: the Elastic IP costs about $0.12 per day even while the server runs, because AWS bills every public IPv4 address (AWS public IPv4 charge).
Check
terraform output instance_public_ip This prints a public IPv4 address. That is how you reach the server. You do not need a domain, so Route 53 stays off (manage_dns = false).
If it Fails:
Error: InvalidKeyPair.Duplicate: a key pair namedclearpay-deployeralready exists in this AWS region from an earlier attempt. Delete it in the AWS console, or rename it ininfra/aws/terraform/ec2.tf.Error: UnauthorizedOperation: your AWS user lacks permission for one resource type. The error names the operation. Add that one permission instead of reaching for full admin.
Decision
The infrastructure exists. A server with nothing running on it isn't done yet. Continue to Chapter 5.
Done When:
terraform applyfinished with no errorsterraform output instance_public_ipprints a real IP
Chapter 5. Deploy ClearPay to the AWS Server
Tuesday, 1:40 p.m.
Terraform apply finished before lunch. AWS now shows a server and a database, but nothing is serving customers yet.
Terraform built an empty server and a database. Nothing serves customers yet.
You open a terminal to start the deploy. Daniel pulls his chair over and sits down next to you.
Daniel: "Terraform finishing only tells us the server exists. Let's get the app on it and send a real request."
Why This Matters
An empty server isn't a migration source. Chapter 6 asks whether a real customer request works on AWS. That question has no answer until the login page and the API are up.
Steps
Start from the repository root. If you're still in infra/aws/terraform, run cd ../../.. first.
Start by installing Node, nginx, and certbot on the server:
cd infra/aws/deploy INSTANCE_IP=$(terraform -chdir=../terraform output -raw instance_public_ip) echo "$INSTANCE_IP" # Write that IP down. A new terminal will not have INSTANCE_IP. ssh -o StrictHostKeyChecking=accept-new \ -i ~/.ssh/clearpay-deployer ubuntu@$INSTANCE_IP 'bash -s' < bootstrap.sh You should see == ClearPay AWS bootstrap ==, then a few minutes of apt-get output. bootstrap.sh is short. Read it.
The step worked when the output ends with these lines:
== Bootstrap complete == Node: v20.20.2 Self-signed TLS is in /etc/letsencrypt/live/clearpay, use curl -k. Your Node version may differ. Lines that start with debconf: unable to initialize frontend are harmless. They appear because the SSH session has no interactive screen. The rows of + and * come from OpenSSL creating the self-signed certificate.
If you see no output at all, SSH didn't connect. Your home IP may have changed since Chapter 4, so the security group still allows the old one. Check your IP with curl -s ifconfig.me; echo, put it plus /32 in terraform.tfvars as ssh_allowed_cidr, run terraform apply in infra/aws/terraform, and retry.
Next, write the .env file the API needs and deploy the app. The database URL comes from Terraform. The JWT secret signs login tokens and is generated fresh:
DATABASE_URL=$(terraform -chdir=../terraform output -raw database_url) cat > /tmp/clearpay.env <<EOF DATABASE_URL=$DATABASE_URL JWT_SECRET=$(openssl rand -hex 32) PLATFORM=aws APP_VERSION=1.0.0 GIT_COMMIT=$(git rev-parse --short HEAD 2>/dev/null || echo local) ROLLBACK_ACTIVE=false PORT=4000 EOF ./deploy.sh "$INSTANCE_IP" ~/.ssh/clearpay-deployer /tmp/clearpay.env rm /tmp/clearpay.env deploy.sh builds the React UI and copies it to /opt/clearpay-ui. It copies the API to /opt/clearpay-api, installs its packages, writes .env, installs the systemd service and the nginx config from infra/aws/deploy/, and restarts both.
Now load the database schema and seed Alice and Bob. These commands run on the server, not your laptop. RDS has no public endpoint yet (publicly_accessible = false in infra/aws/terraform/rds.tf), so your laptop can't reach it.
Your laptop can't reach the database directly. It uses the EC2 server as a middleman:
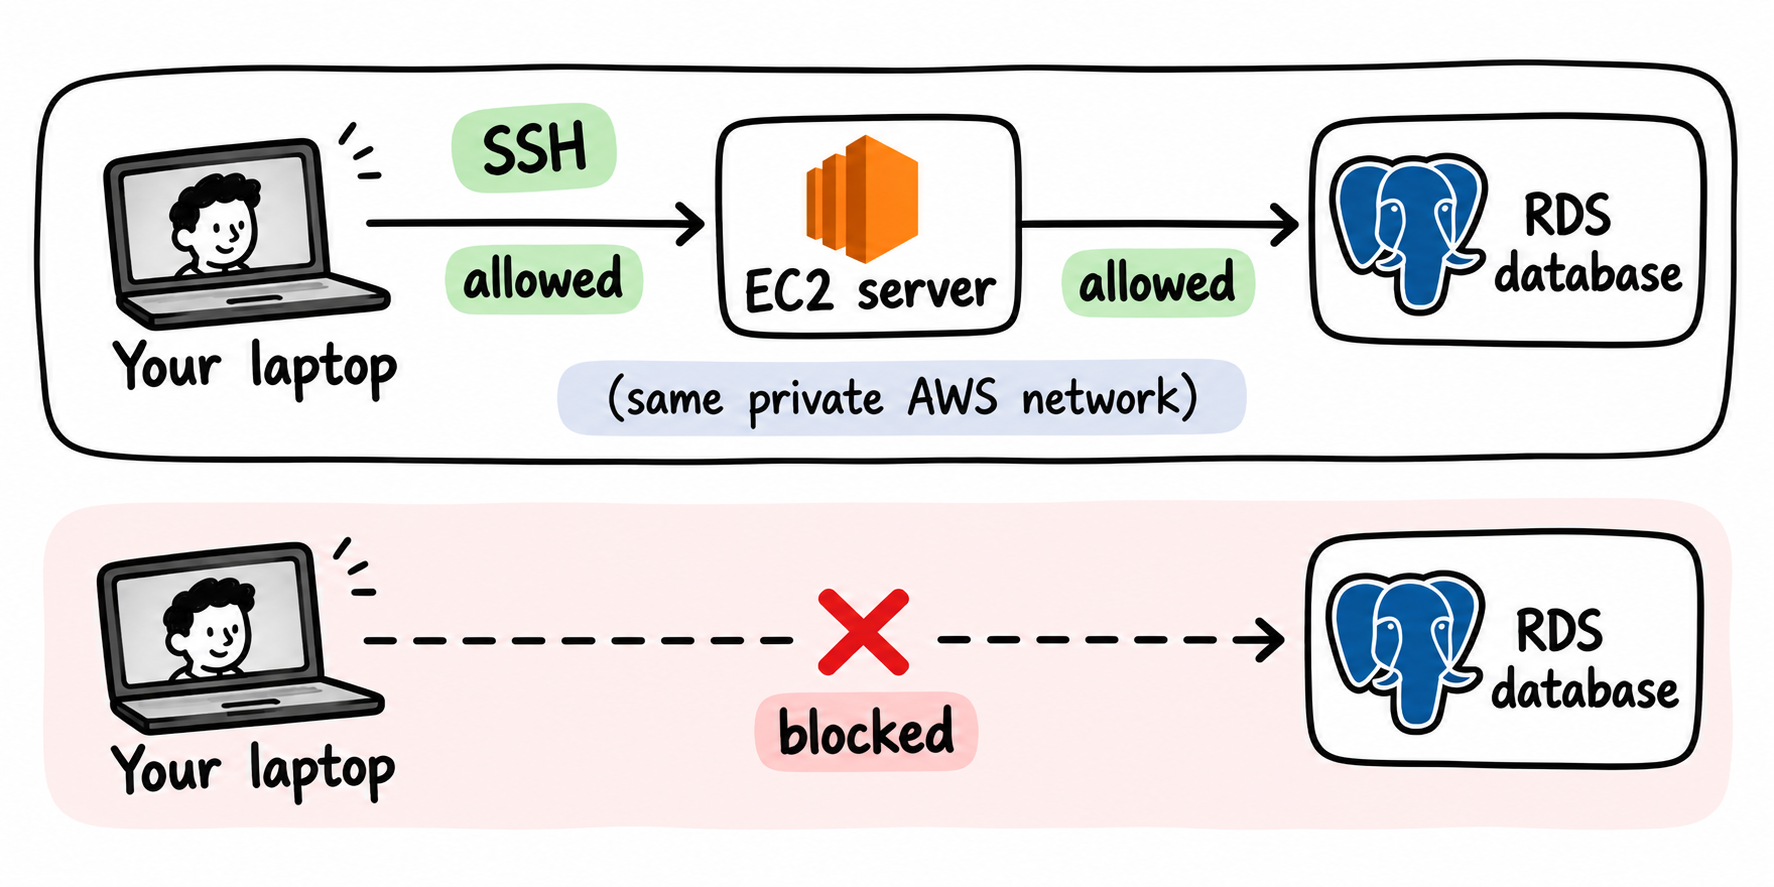
The diagram above shows why your laptop can't connect directly to the private RDS database. SSH access to the EC2 server is allowed, and the server is allowed to connect to RDS within the AWS network. Direct access from your laptop to the database is blocked. You use the EC2 server as the entry point for database access.
Each command below starts with ssh ... ubuntu@$INSTANCE_IP "...". That means: log in to the EC2 server and run the part in quotes there. So psql and the seed run on EC2, and EC2 talks to RDS for you. You see the result later in the browser: you log in as Alice, and EC2 reads her account from RDS.
scp -i ~/.ssh/clearpay-deployer ../../../db/schema.sql \ ubuntu@$INSTANCE_IP:/tmp/schema.sql ssh -i ~/.ssh/clearpay-deployer ubuntu@$INSTANCE_IP \ "sudo apt-get install -y postgresql-client -qq && psql '$DATABASE_URL' -f /tmp/schema.sql" ssh -i ~/.ssh/clearpay-deployer ubuntu@$INSTANCE_IP \ "cd /opt/clearpay-api && sudo -u clearpay npm run seed" The seed is the same script from Chapter 1. This time it writes to RDS.
Check
ssh -i ~/.ssh/clearpay-deployer ubuntu@$INSTANCE_IP 'sudo systemctl is-active clearpay-api' Expected output: active.
Then from your laptop:
curl -k https://$INSTANCE_IP/health Look for "status":"ok" and "platform":"aws". The -k flag tells curl to accept the self-signed certificate that bootstrap.sh created.
Open https://<your instance IP> in a browser. Click through the "Not Secure" warning. That warning comes from the self-signed certificate. You should see the same ClearPay login as on your laptop. Sign in as Alice with password123. The dashboard shows her balance and served by aws/1.0.0.
Daniel: "The health check only tells us the app is running. Before we write down a baseline, I want to see a transfer go through on this IP."
Send $20 to Bob in the browser.
If it Fails:
systemctl is-activereturnsfailed: SSH in and runsudo journalctl -u clearpay-api -n 50. The usual cause is aDATABASE_URLthat doesn't match RDS. Compare it withterraform output database_url, character by character.seed_failedwithSELF_SIGNED_CERT_IN_CHAIN:psqlalready worked, so the database is fine. Newer versions of the Nodepglibrary treatsslmode=requireas full certificate checking. Copy the currentapi/src/pgConfig.js,api/src/db.js, andapi/db/seed.jsonto the server, restartclearpay-api, and run only the seed command again. Don't runschema.sqlagain.nginx returns
502 Bad Gateway: nginx is running but the API behind it is not. Check the systemd status above first.The browser shows
Cannot GET /: nginx still has an old API-only config. Run./deploy.sh "$INSTANCE_IP" ~/.ssh/clearpay-deployerwith no third argument. That keeps the.envalready on the server. Don't seed again.invalid credentialsfor Alice: the browser probably filled in a saved password. Clear the box, typepassword123, and try again.
Done When:
systemctl is-active clearpay-apiprintsactivecurl -k https://$INSTANCE_IP/healthreturns"status":"ok"You sent $20 in the browser on the AWS address
Chapter 6. Record the AWS Baseline
Wednesday, 10:00 a.m.
You message Maya: "health is ok, and Alice signed in on the Elastic IP." Her reply comes back in under a minute.
Maya: "Good. Now run the five checks against that IP. Send me the terminal output, not a screenshot."
A second message follows: "Then load-test it and send me the p95. I can't compare GKE against 'it works'."
Why This Matters
This chapter gives you two things. You'll use both for the rest of the book.
1. A pass from the promotion gate. The promotion gate is a short script. It tests five things every payment app must do: the app is running, it can reach the database, a user can log in, a repeated payment charges only once, and the balance drops by the right amount. If all five pass, the app works.
In Chapter 15 you run the same script on GKE. If GKE passes the same test AWS passed, GKE does the job, too.
2. A scorecard. The load test sends many requests at the same time, like many customers using the app at once. Then it writes down how fast the app answered and how many requests failed. That's how fast AWS is today. Later you run the same test on GKE and compare the two.
Think of timing a runner before they change shoes. Without the first time, the second time means nothing. This chapter records the first time.
The scripts in this chapter use Node on your laptop to read JSON. Install Node.js 20 or newer now if you haven't already.
Steps
Start from the repository root. If you're still in infra/aws/deploy, run cd ../../.. first.
Run the promotion gate against AWS:
export INSTANCE_IP=$(terraform -chdir=infra/aws/terraform output -raw instance_public_ip) ./scripts/promotion-gate.sh https://$INSTANCE_IP \ alice@clearpay.dev password123 bob@clearpay.dev Use https://. With http://, nginx redirects and the script looks like it hung.
The gate checks five things, in order:
The process is up (
/health).It can reach the database (
/health/ready).Alice can log in.
A replayed payment key returns
replayed=true.Alice's balance drops once.
Expected output:
PASS: health endpoint returns ok PASS: readiness endpoint confirms DB connectivity PASS: login succeeds and returns a token PASS: replaying an idempotency key returns replayed=true PASS: balance debited exactly once (100 cents), not twice 5 passed, 0 failed GATE PASSED: safe to promote to production. The last line talks about production. There's no production to promote to yet. It's the same script you run on GKE later, where that line means what it says.
Now load-test AWS. The script logs in and hits /api/accounts/me and /api/transactions, which both query Postgres. Don't load-test /health. The API answers /health by itself, straight away. It never asks the database anything. A real customer request has to ask the database and wait for the answer, and that wait is most of the time:
/health laptop → API → reply (fast, no database) /api/accounts/me laptop → API → database → API → reply (the real work) Load-testing /health times only the fast half. Think of asking a shop worker "are you open?" versus "do you have this shoe in size 42?" Only the second question makes them walk to the storeroom.
./scripts/load-test.sh https://$INSTANCE_IP \ alice@clearpay.dev password123 10 30 The last two numbers are concurrency (10 requests at once) and duration (30 seconds).
Check
The script prints a scorecard. This is the one this lab printed:
== DB load test: https://184.194.120.157 concurrency=10 duration=30s == Endpoints: GET /api/accounts/me GET /api/transactions ok=372 failed=0 Migration Scorecard, this run p50 latency: 673 ms p95 latency: 745 ms p99 latency: 1326 ms Throughput: 12.4 req/s 4xx rate: 0.0 % 5xx rate: 0.0 % Transaction success: 100.0 % Your scorecard will differ. Your IP address, request counts, and milliseconds depend on where you are. The load test runs on your laptop, so every request travels from your home to AWS in us-east-1 and back.
A reader close to that region sees much lower numbers than a reader on another continent. Neither is wrong. What matters is that you compare GKE against your own scorecard, mea...


