Multi-tenant software as a service (SaaS) applications regularly need to copy one tenant’s data from production into a lower environment. Teams do this to reproduce a defect, validate a schema change, or give quality assurance (QA) a representative dataset. When production and non-production run in separate AWS accounts, their virtual private clouds (VPCs) often have no route to each other. That turns the copy into a networking problem as much as a data problem, and security teams are rightly reluctant to open a path between the two.
In this post, we show how to move a single tenant’s data between Amazon Aurora MySQL-Compatible Edition clusters in two separate AWS accounts, using Aurora cloning, SELECT INTO OUTFILE S3, and LOAD DATA FROM S3. The databases don’t connect directly. Each account reaches Amazon Simple Storage Service (Amazon S3) independently through its own gateway VPC endpoint, and the accounts share only one staging bucket as their touchpoint.
This post builds on two others. Managed database backup and recovery in a multi-tenant SaaS application covers segregating a tenant across the silo, bridge, and pool models. In its terms, what follows is extraction-phase segregation in a pool model. Best practices for exporting and importing data from Amazon Aurora MySQL to Amazon S3 covers the export and import mechanics. What’s new here is moving a tenant-scoped extract between accounts with no network path, plus the access and encryption model that keeps the staging bucket safe.
Many SaaS teams handle this with a logical dump-and-load pipeline that runs for hours per tenant and can’t resume after a failure. This pattern replaces that single long-running job with independent per-table steps: tables export and import in parallel, and a failed table is retried on its own instead of restarting the whole refresh.
Why not cross-account cloning?
If you’re moving data between accounts, cross-account cloning through AWS Resource Access Manager (AWS RAM) is the AWS-recommended approach, and it’s worth evaluating first. It’s the right tool for copying a whole cluster into another account, such as a migration or a full-environment refresh. It doesn’t fit the job in this post, for three reasons. We’re moving a single tenant’s data, not the entire cluster volume with every tenant on it. We’re loading an existing non-production cluster that QA already points at, not standing up a new one. And our source cluster is encrypted with the default RDS key, which cross-account cloning can’t share. So the rest of this post builds a different pattern.
Solution overview
The pattern has four phases. The central idea is that Amazon S3 is a Regional service reachable from inside a VPC through a gateway endpoint without traversing the internet, so two VPCs with no route between them can both reach the same bucket.
The following diagram shows the data flow. The two clusters have no direct connection. Every interaction between the accounts happens through the staging bucket.
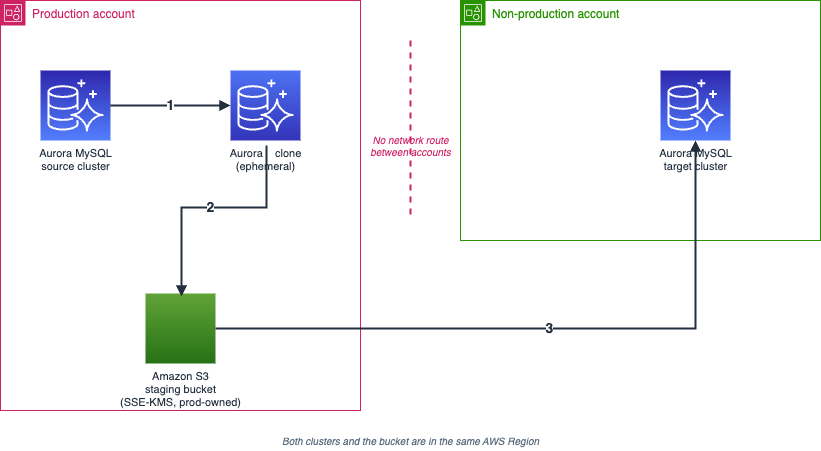
Figure 1: Data flow for a cross-account tenant refresh through a shared Amazon S3 staging bucket
- Clone the production cluster – Aurora cloning is copy-on-write at the storage layer, so creation takes minutes largely independent of database size. The clone is a separate cluster in the production account that you can drive hard without affecting production.
- Export the tenant’s rows to Amazon S3 – On the clone, run
SELECT INTO OUTFILE S3with a predicate on the tenant ID. Aurora writes delimited text files to the bucket, splitting into part files past a threshold (6 GB by default) and emitting a manifest. - Import into the non-production cluster –
LOAD DATA FROM S3reads the manifest from that same bucket and ingests the part files. - Clean up – Delete the clone and the exported objects.
Because each table exports and imports as an independent unit, both phases parallelize across tables, and a failure affects only that table.
This pattern changes the shape of the connectivity requirement rather than removing it. There is no VPC peering, transit gateway, or VPC-to-VPC path between the accounts. Each account needs only an S3 gateway VPC endpoint so its cluster can reach S3 privately. Access between the accounts lives in resource policy, not routing, so production doesn’t become reachable from the lower environment. That’s what makes the design straightforward to clear through security review.
Prerequisites
Have the following in place before you start, in roughly this setup order:
- Two AWS accounts (one production, one non-production), each with its own VPC and no network route between them. (A third shared account can own the staging bucket. This post keeps the bucket in the production account.)
- The AWS Command Line Interface (AWS CLI), configured with credentials in each account that can manage Amazon Relational Database Service (Amazon RDS), Amazon S3, AWS Identity and Access Management (IAM), and AWS Key Management Service (AWS KMS).
- Aurora MySQL-Compatible Edition, version 3 (MySQL 8.0-compatible) or later on both clusters. This post uses the Aurora MySQL statements SELECT INTO OUTFILE S3 and LOAD DATA FROM S3. (Aurora PostgreSQL offers an equivalent path through the aws_s3 extension. The cross-account bridge applies there too, but the SQL in this post is MySQL-specific.)
- An existing non-production cluster with a schema that already matches production.
LOAD DATAcarries rows, not data definition language (DDL), so the destination tables must exist with the same structure. Reconcile any schema drift before you load. - An index on the tenant ID column in every participating table. Without one, the
WHEREclause degrades to a full table scan. See Optimizing and tuning queries in Amazon Aurora MySQL. - An S3 gateway VPC endpoint in each VPC, so each cluster can reach Amazon S3 privately without a route between the two VPCs.
- Both clusters and the staging bucket in the same AWS Region. A clone can’t be created in an AWS Region different from its source, so the entire pattern operates within a single Region. See Cloning an Amazon Aurora DB cluster volume.
- A maintenance window for the first-time parameter change on the non-production cluster. Associating the IAM role uses the static DB cluster parameter
aws_default_s3_role, which takes effect only after the writer reboots. (The per-refresh clone avoids this reboot by associating the role before its writer starts. See Step 1.) See Working with DB cluster parameter groups.
Walkthrough
The walkthrough has five parts. First, configure the cross-account bridge once. Then run the four phases of each refresh: clone, export, import, and clean up. The bridge is the one-time setup. The four phases are what you repeat on every refresh.
Configure the cross-account bridge
Set this up once. The bridge is made of three things, and no network route is among them. The production account owns an encrypted S3 bucket and grants the non-production account’s import role read access to it. Each cluster has an IAM role that lets Aurora read from or write to S3 on its behalf. And a customer managed AWS KMS key, held in the production account, grants decrypt permission to both roles so the cross-account read can succeed. The following sections configure each piece in turn: the Aurora roles, the bucket ownership and policy, the encryption key, and the data-store controls on the bucket.
Wire up the Aurora roles
Each statement needs an IAM role associated with its cluster, that role named in a DB cluster parameter, and a database grant to the issuing user. The export/import best practices post covers the role’s permissions in detail.
In this one-time setup, wire up the non-production (import) cluster only. The clone is created fresh each refresh, so its export-role association belongs in Step 1:
Then set aws_default_s3_role in the cluster’s parameter group to the role’s Amazon Resource Name (ARN) and reboot the writer (it’s a static parameter). On Aurora MySQL version 3 and 8.4 this is the parameter to use. The statement-specific aurora_select_into_s3_role and aurora_load_from_s3_role aren’t available there.
Finally, grant the import user the right to issue the statement. On version 3 and 8.4 this is a role, not a privilege:
The matching GRANT AWS_SELECT_S3_ACCESS runs on the clone in Step 1. Because these are roles, you must activate them: set activate_all_roles_on_login or issue SET ROLE ALL per session. Otherwise a pipeline opening a fresh connection per table fails on permissions while SHOW GRANTS looks correct.
Two export-role permissions caused a misleading Access Denied in our testing. First, don’t put an s3:prefix condition on the export role’s s3:ListBucket. SELECT INTO OUTFILE S3 lists the bucket without a matching prefix, so the condition denies the export. Scope the object actions to the prefix, but leave ListBucket and GetBucketLocation unconditioned. (The import role is the exception: LOAD DATA FROM S3 MANIFEST reads a specific key, so its ListBucket can keep the prefix condition.) Second, with an S3 Bucket Key enabled, the export role also needs kms:Decrypt.
Decide which account owns the bucket
Put the staging bucket in the production account, the account that writes the objects. Because the writer is also the bucket owner, S3 Object Ownership doesn’t come into question. Ownership mismatch is a common failure with cross-account buckets. This bucket policy is the connectivity step for the pattern: it grants the non-production import role read access across the account boundary, scoped to the refresh prefix. Scope the grant to a role ARN and bound it with a condition key: aws:PrincipalOrgID (shown here), or aws:PrincipalAccount with the non-production account ID if you don’t use AWS Organizations. That way the grant can’t be exercised outside that boundary even if the role’s trust is later widened. Because this bucket holds production tenant data, the ARN alone isn’t a sufficient boundary:
If you instead put the bucket in the non-production account, check its S3 Object Ownership setting. Buckets created after April 2023 default to Bucket owner enforced, which disables ACLs and gives the owner every object, so the import works. On an older ACL-enabled bucket the reader gets AccessDenied, and because SELECT INTO OUTFILE S3 can’t set a bucket-owner-full-control ACL, the fix is to set Bucket owner enforced.
Encrypt with a customer managed key
Encrypt the bucket with SSE-KMS using a customer managed key. This is a requirement of the cross-account design, not a hardening step: the AWS managed aws/s3 key policy can’t be modified to grant a cross-account principal the kms:Decrypt the import needs. Keep the key in the production account. Its key policy must grant kms:GenerateDataKey and kms:Decrypt to the export role and kms:Decrypt to the import role. A missing grant here is the most common failure in cross-account variants of this pattern.
On Aurora MySQL 3.05 and later you can also name the key in the statement with an ENCRYPTION SSE_KMS 'cmk_id' clause, so the encryption is visible in the SQL rather than resting on a bucket setting.
Treat the staging bucket as a production data store
The bucket holds production tenant data as plain text, so it inherits production’s requirements:
- Block Public Access.
- A bucket policy
Denyonaws:SecureTransport: false. - AWS CloudTrail data events on the refresh prefix.
- A dedicated bucket for staging.
- Explicit deletion after a successful import, with a 24-hour Lifecycle rule as a backstop rather than the primary mechanism.
With the bridge configured, you run the four phases on each refresh. The following steps walk through each phase with the commands to run and the pitfalls to avoid.
Step 1: Create the clone
Cloning is a point-in-time restore with copy-on-write semantics. Pass the cluster parameter group that names aws_default_s3_role. Without --db-cluster-parameter-group-name, the clone comes up on the default parameter group, which has no role set, and the export fails:
This restores the cluster volume only. The clone doesn’t inherit the source’s IAM role association, so associate the export role before creating the writer. In our testing, this ordering let the writer read aws_default_s3_role at first start and the export ran without a reboot:
Confirm the association is active before exporting. describe-db-clusters should show "Status": "ACTIVE" under AssociatedRoles. If you associate the role after the writer is already running, the first export fails with Missing Credentials: Cannot instantiate S3 Client. Reboot the writer to clear it. Then grant the export role to the database user on the clone:
Step 2: Export the tenant’s data
Run one statement per table, concurrently:
On success, the statement returns a rows-affected count (Query OK, 4821233 rows affected). MANIFEST ON writes an orders.manifest JSON file listing every part file, which the import consumes directly:
OVERWRITE ON makes retries idempotent. In our testing, 8–20 concurrent exports saturated instance network bandwidth, but the ceiling depends on instance size and table width, so measure rather than assume. Output is uncompressed text split into part files at the 6 GB default threshold, and parallelism is across tables, not within a table. See Considerations and limitations for the large-single-table case.
Scope every export to exactly one tenant. This is the correctness property the whole pattern rests on, and looking for a tenant_id column isn’t sufficient to guarantee it. Classify every table into one of three buckets, and treat anything unclassified as a blocker:
- Tenant-scoped: carries the tenant ID. The preceding predicate applies directly.
- Tenant-derived: holds tenant-owned rows but has no tenant column, typically a child table keyed to its parent. Copy it wholesale and you export every tenant’s data. Skip it and the refresh is incomplete. Reach it through a join:
- Shared: reference data common to all tenants, safe to copy in full, but as a named allowlist rather than by omission.
Generate these statements from the classification rather than hand-authoring predicates, and make isolation a preventive control that runs before any S3 write. But check what can actually go wrong, not a tautology. Asserting COUNT(DISTINCT tenant_id) = 1 on a query already filtered by WHERE tenant_id = 4711 consistently passes and proves nothing. The real failure modes are an unclassified table, a tenant-derived table exported without its join (which leaks every tenant’s rows), and a wrong join path. Guard those:
- Classification coverage. Assert that every base table in
information_schema.tablesappears in your classification. Treat an unclassified table as a hard stop. It’s the most likely way to leak or ship an incomplete tenant. - Tenant-derived join correctness. For each tenant-derived table, compare the join’s row count against the count expected by walking from the parent (for example,
line_itemswhoseorder_idbelongs to the tenant’sorders). A mismatch means the join path is wrong.
A failing check aborts the export, so over-scoped data doesn’t reach the lower environment. Checking only after import is too late.
Step 3: Import into non-production
The non-production cluster is a long-lived environment that other tenants share, so you can’t load into it blind. Prepare the target first, then load.
Prepare the target: remove the tenant’s existing rows. Before loading, delete the tenant’s current rows from the non-production tables, in child-to-parent order so foreign keys stay satisfied. Use a tenant-scoped DELETE, never TRUNCATE. TRUNCATE empties the whole table and would wipe every other tenant’s rows:
Assume keys can’t collide. This load assumes the production primary keys for this tenant won’t collide with rows other tenants already own in non-production. That holds when non-production was originally seeded from production (so the key spaces line up), or when the schema uses UUIDs or non-overlapping auto-increment ranges per environment. If non-production auto-increment sequences have drifted independently from production’s, reconcile that before loading. Otherwise LOAD DATA can hit duplicate-key errors or, with unique_checks off, silently create duplicates.
Handle shared tables deliberately. Reference tables shared across all tenants aren’t tenant-scoped. Loading them “in full” overwrites data every other non-production tenant depends on. Treat shared tables as a separate decision: skip them if non-production already has the correct reference data, or reconcile them explicitly (for example, upsert only new reference rows) rather than overwriting.
With the tenant’s old rows removed, load one LOAD DATA FROM S3 statement per table, reading the manifests the export wrote. The following example loads the orders table:
This is one LOAD DATA FROM S3 MANIFEST per table, matching the per-table export. It’s a matrix of operations, not a single bulk load. Either load parent tables before children, or (as shown) disable foreign_key_checks and unique_checks for the load and re-enable them afterward.
Be precise about what re-enabling those checks does: it doesn’t re-validate the rows you just loaded. MySQL applies the checks only to new changes and doesn’t rescan existing rows. The load is safe here only because the data was consistent on the clone and parents load before children. Running with unique_checks = 0 against a table that already holds other tenants’ rows can also admit duplicates into a secondary unique index without error, so remove the tenant’s existing rows first (above) and make sure production key ranges can’t collide.
On success, LOAD DATA reports the rows loaded (Query OK, 4821233 rows affected). To speed up InnoDB bulk loads, drop secondary indexes before loading and rebuild them afterward (ALTER TABLE ... DISABLE KEYS is a no-op on InnoDB).
Validate the refresh
After loading, compare row counts for the tenant against the source clone (not the live primary, whose data might have changed since the clone was taken):
Do this for every table. Also confirm every manifest part file was consumed, and that other tenants’ row counts in the shared tables are unchanged. That is the check that proves you refreshed one tenant without disturbing the rest.
Step 4: Clean up
Delete the cloned cluster and its instance, then the exported objects. An orphaned clone bills for every storage page it diverges from the source, and an orphaned export leaves tenant data at rest.
Performance, cost, and failure handling
Refresh time depends on your data, so measure a representative tenant before you commit to a service level agreement (SLA). Four things drive it. Export runs in parallel across tables but not within one, so the largest table sets the wall-clock time. The export is uncompressed text, so the full data volume moves through Amazon S3. Import time includes both the load and any secondary index rebuilds. And the instance sizes of the clone writer and the target writer cap throughput on each side, so size both for the refresh window rather than steady-state workload.
Speed isn’t the main win, though. Under a monolithic dump-and-load, a failure discards all completed work. Here, a failed export affects one table while the rest sit durable in Amazon S3, and you retry a failed import one table at a time (delete the tenant’s rows, as in Step 3, then re-read the manifest). Because all export work runs against an ephemeral clone, a pathological job can’t degrade live workloads.
Considerations and limitations
Weigh these before adopting the pattern:
- Tenant shape matters. Export parallelizes across tables but not within one, so wall-clock time depends on the single largest table, not the aggregate size. A tenant spread across many tables refreshes far faster than one dominated by a single large table. If one table holds most of the volume, shard its export by primary-key range.
- Transient storage. The export is uncompressed text, so a large tenant lands a large volume in Amazon S3 for the life of the refresh. Plan for it, and delete on completion.
- Right-size the clone. Export throughput is often network-bound, so check DB instance networking figures rather than reusing the production class. The clone exists only for the refresh.
- Clone limit. A cluster supports up to 15 copy-on-write clones. The sixteenth becomes a full copy: slower, full storage, no error. Delete each clone after its refresh. See Limitations of Aurora cloning.
- Protect personal data. Encryption isn’t the whole story. Production tenant data might contain personal or regulated data, so confirm your customer agreements and compliance permit copying it into non-production, and mask or anonymize sensitive columns on the clone before
SELECT INTO OUTFILE S3runs. That keeps unmasked data out of the bucket. - When another approach fits better. AWS Database Migration Service (AWS DMS) is the choice for a one-time migration or change data capture, though cross-account it needs a cross-VPC path through AWS PrivateLink or AWS Transit Gateway. Cross-account cloning through AWS RAM fits copying a whole cluster rather than one tenant.
Conclusion
In this post, we showed how to refresh a single tenant’s data from a production account into an isolated non-production account with no connectivity between them. By chaining Aurora cloning, SELECT INTO OUTFILE S3, and LOAD DATA FROM S3, we turned a cross-account data movement problem into a Regional one: the clusters don’t connect, and one encrypted staging bucket is all they share. Because the pattern reads from an isolated clone and retries at the table level, it can help improve operational stability when failures occur.
To go deeper, see Cloning an Amazon Aurora DB cluster volume, Saving data into text files in Amazon S3, and Loading data from text files in an Amazon S3 bucket.
After you’ve run the refresh by hand a few times, the natural next step is to automate it. The manual steps map onto AWS Step Functions and AWS Lambda so a refresh runs on a schedule with nothing billed between runs. A design that keeps export and cleanup in the production account, runs the import in the non-production account, and coordinates the two with a cross-account Amazon EventBridge event keeps either account from needing a role to act on the other’s resources. But building that orchestration is a larger exercise than this post covers.


