This post is co-written with Ajay Gunasekaran, ML Platform Engineer at Samsung Ads.
Samsung Ads, the advertising division of Samsung Electronics, keeps its feature data in Snowflake as Apache Iceberg tables. Its machine learning (ML) team trains large-scale models on Amazon SageMaker AI, serving programmatic buyers who reach Samsung Smart TV and connected TV audiences. Connecting the two usually means copying the data into Amazon Simple Storage Service (Amazon S3) on a schedule. That adds a second pipeline to operate, a second copy to store, and two sets of permissions to keep in agreement.
Instead of copying the data, a team can write the final pipeline stage as Snowflake-managed Iceberg tables in Amazon S3 and federate them into AWS Lake Formation. Amazon Cognito supplies the OAuth2 tokens that Snowflake trusts. Both applications then read one copy of the data in Amazon S3, with Snowflake managing the tables and the team using Lake Formation to control which principals can read them. Model engineers can choose the query engine that fits each training job, without duplicating data or maintaining a second pipeline.
In this post, we show you how to build the pattern Samsung Ads used. You federate Snowflake Iceberg tables into AWS Lake Formation with Amazon Cognito, then query them from Amazon Athena.
Solution overview
This solution federates the Snowflake Horizon Catalog into AWS Lake Formation, using Amazon Cognito to issue OAuth2 tokens for machine-to-machine authentication. AWS Glue connection runs inside an Amazon Virtual Private Cloud (Amazon VPC), reaching Snowflake through AWS PrivateLink and the Cognito token endpoint through a NAT gateway. AWS analytics engines then query Snowflake-managed Iceberg tables under Lake Formation governance, with no second copy of the tables to maintain. The following diagram shows the query path, from Amazon Athena through AWS Lake Formation and the AWS Glue connection to Snowflake and Amazon S3.
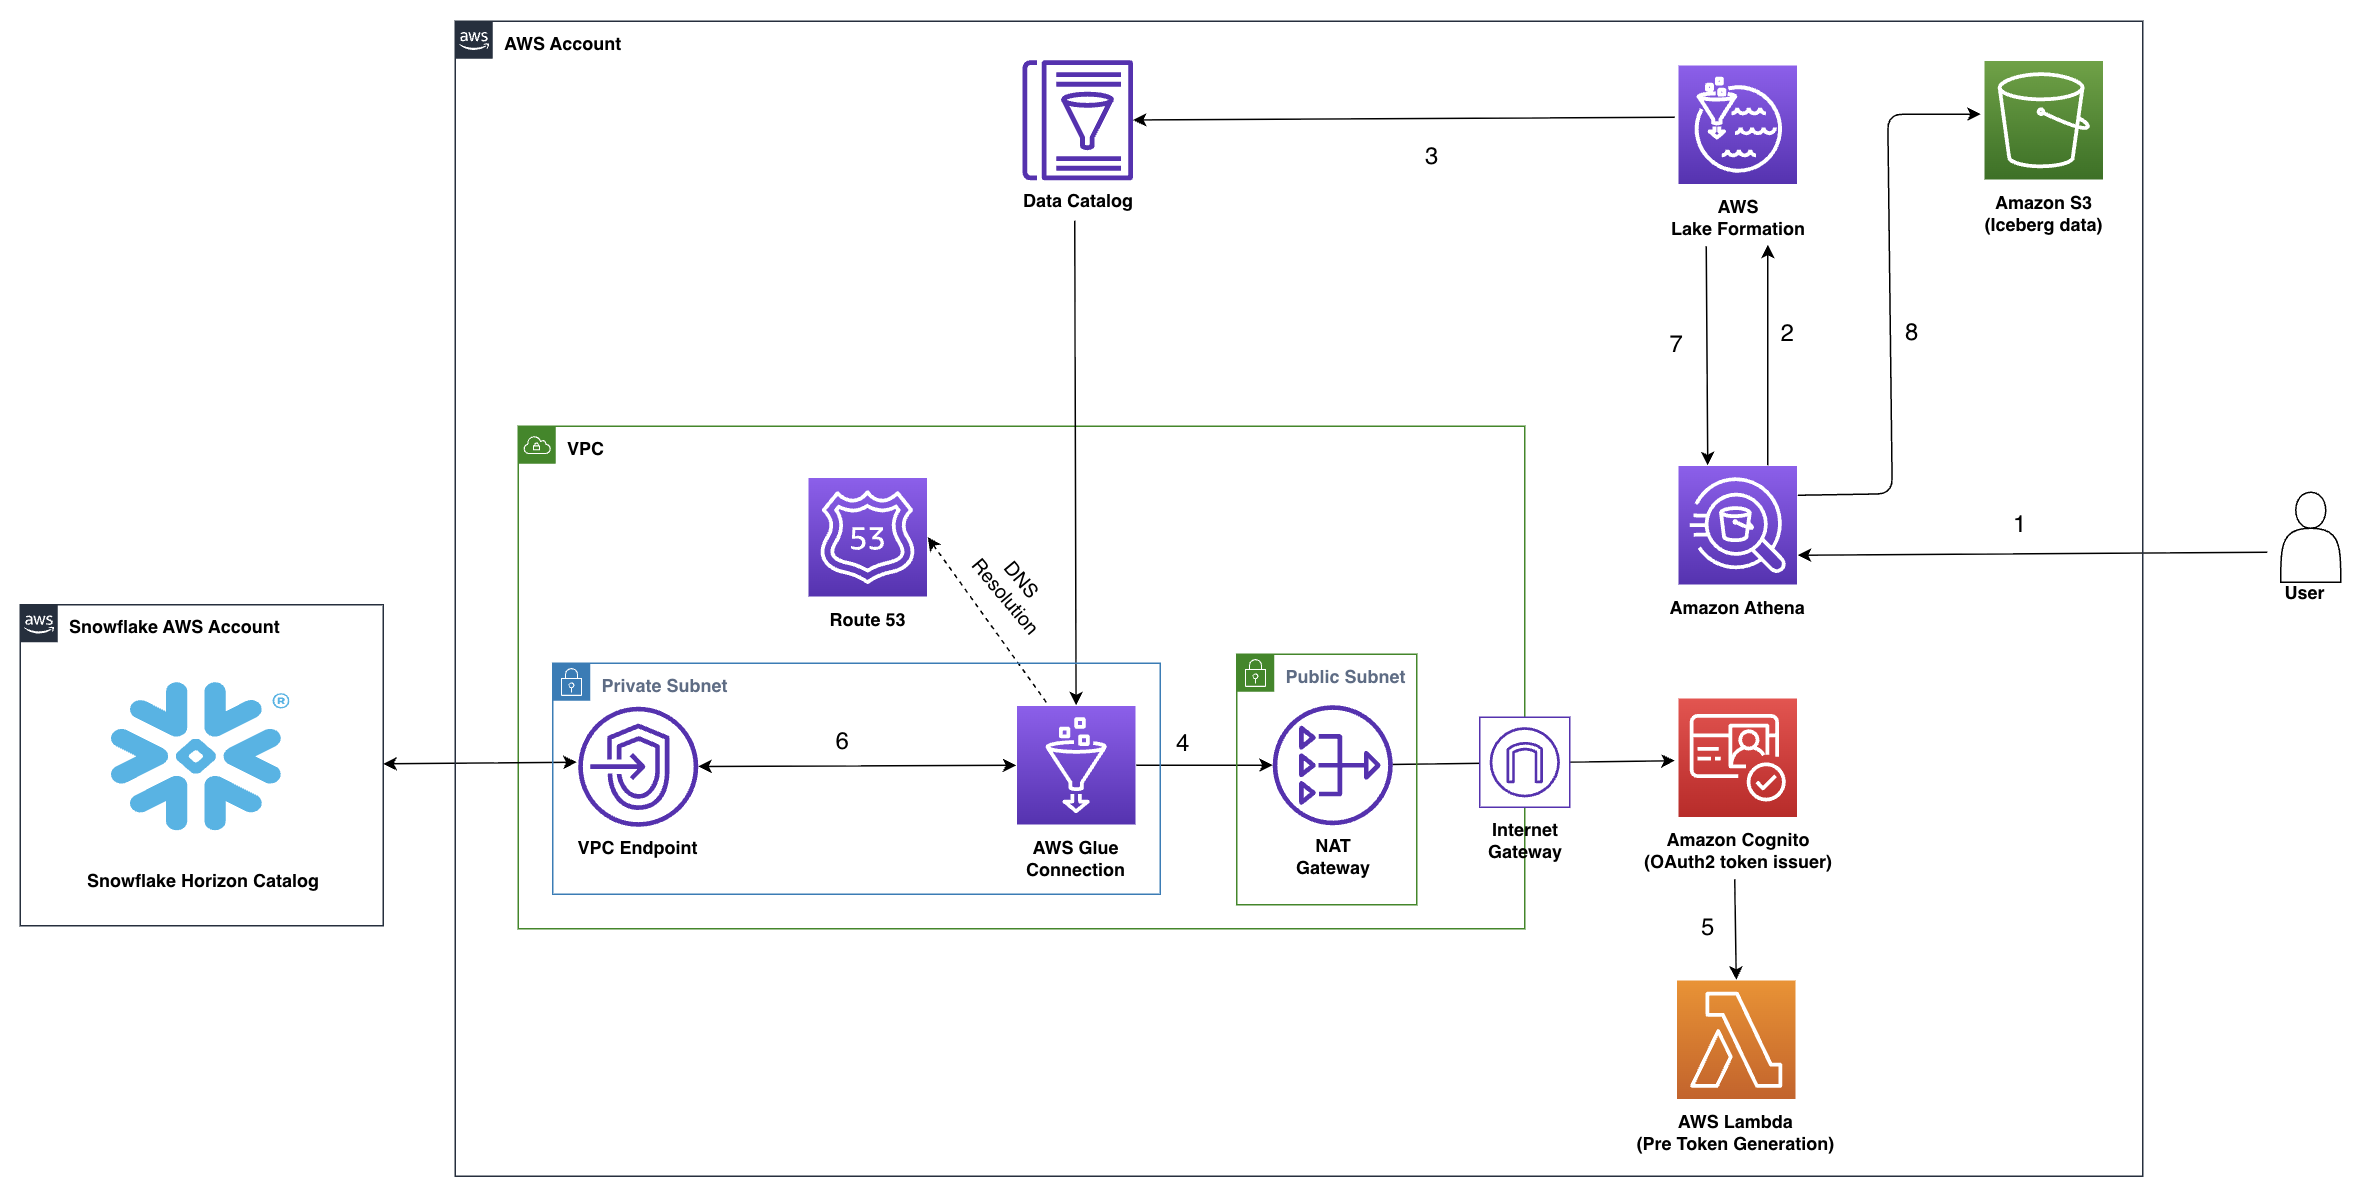
Figure 1: Architecture for Snowflake Horizon Catalog federation to AWS Lake Formation using Amazon Cognito
Here’s how the workflow runs:
- A user or application submits a SQL query in Amazon Athena that references a federated table in the Snowflake catalog.
- Athena delegates catalog resolution and permission checks to Lake Formation, which evaluates fine-grained access controls on the federated catalog entry.
- Lake Formation resolves the table reference through the AWS Glue Data Catalog, which holds the connection configuration for Snowflake and invokes the AWS Glue connection.
- AWS Glue connection runs in a private subnet. It sends a
client_credentialsrequest to the Amazon Cognito token endpoint with the client ID, client secret, andscope. The request leaves through the NAT gateway and internet gateway because the machine-to-machine token endpoint is public. - Amazon Cognito invokes the Pre Token Generation Lambda trigger (
V3_0), which adds theaudclaim that Snowflake External OAuth validation requires. Amazon Cognito returns the access token to the connection. - Using that token, AWS Glue connection calls the Snowflake Horizon Catalog Iceberg REST endpoint for table metadata. The response includes the schema and the location of the data files in Amazon S3. An Amazon Route 53 private hosted zone resolves the hostname, because the Snowflake endpoint service doesn’t provide private DNS. The request travels through the VPC endpoint over AWS PrivateLink.
- The connection returns the metadata to Lake Formation, which generates temporary, scoped Amazon S3 credentials and passes them to Athena.
- Athena uses those credentials to read the Iceberg metadata and Parquet data files from the registered Amazon S3 location, runs the query, and returns results.
Why Amazon Cognito
AWS Glue connection authenticates with the OAuth2 client_credentials grant, so providers Snowflake trusts that support that grant can issue the token. Samsung Ads chose Amazon Cognito for three reasons:
- Each table lookup against Snowflake depends on a token from the provider, so the team wanted to own it alongside the rest of the solution.
- An enterprise identity provider is typically administered by a central security team, so each new machine-to-machine client is a cross-team request. Owning the user pool makes it self-service.
- Each app client is a distinct machine identity, and the security integration trusts the user pool rather than an individual client. You can therefore serve several workloads from one integration, each with its own read-only Snowflake role.
Prerequisites
Before you begin, verify that you have the following:
- Snowflake account hosted on AWS in the same AWS Region where you create the AWS resources in this post, on the Business-Critical edition or higher, which AWS PrivateLink requires. Confirm the Region with
SELECT CURRENT_REGION();. You needACCOUNTADMINto create the security integration and to authorize PrivateLink.- Snowflake-managed Iceberg tables created in Snowflake Horizon Catalog using
CATALOG = 'SNOWFLAKE'with an external volume pointing to the S3 bucket. If you don’t have one, see Configure an external volume for Amazon S3 in the Snowflake documentation.
- Snowflake-managed Iceberg tables created in Snowflake Horizon Catalog using
- AWS account with an AWS Identity and Access Management (IAM) principal that has data lake administrator permissions in AWS Lake Formation. The principal also needs permissions to create IAM roles and policies, Amazon Cognito user pools, AWS Lambda functions, VPC resources, and AWS CloudShell. We use AWS Command Line Interface (AWS CLI) commands throughout this post.
- Amazon S3 bucket that holds your Snowflake-managed Iceberg data files.
- An AWS user with long-term access keys that you delete immediately after Step 4:
SYSTEM$AUTHORIZE_PRIVATELINKneeds a federation token from the long-term keys of an IAM user, becausests:GetFederationTokenrejects role-session credentials. Snowflake persists the authorization, so you can delete the key and the user afterwards and the federation keeps working.
Walkthrough
Two AWS CloudFormation stacks cover the setup that is identical in every deployment. The Snowflake and Lake Formation steps stay as explicit SQL and AWS CLI commands, so you can adapt them to your existing Snowflake account and VPC.
| Step | What you configure | How you run it |
| 1 & 2 | Cognito user pool, machine-to-machine app client, and the Lambda function that adds the aud claim | Launch Stack, snowflake-federation-oauth |
| 3 | Snowflake security integration, read-only role, service user, and table grants | Snowflake SQL worksheet |
| 4 | PrivateLink authorization for your AWS account | AWS CLI and Snowflake SQL worksheet |
| 5 | VPC, PrivateLink endpoint, Route 53 private hosted zone, and the Lake Formation data access role | Launch Stack, snowflake-federation-network |
| 6 | S3 location registration, AWS Glue connection, federated catalog, and Lake Formation permissions | AWS CLI |
| 7 | Query validation | Athena console |
Step 1: Deploy the Cognito user pool and token customization Lambda function
Snowflake External OAuth validation requires an aud claim in each access token. The OAuth2 client_credentials grant doesn’t define that claim, so the Pre Token Generation trigger adds it. This stack creates the user pool, the machine-to-machine app client, and a Pre Token Generation Lambda function that adds the claim. The stack also writes the app client secret to AWS Secrets Manager in the format the AWS Glue connection expects. It then generates the Snowflake SQL statements you run in Step 3.
- Choose Launch Stack.

- In the Region selector, confirm the Region matches your Snowflake account Region, then choose Next.
- For Stack name, keep
snowflake-federation-oauth. Leave all parameters at their default values, then choose Next. - On Configure stack options, keep the defaults and choose Next.
- On Review and create, select I acknowledge that AWS CloudFormation might create IAM resources with custom names, then choose Submit.
- When the stack status is
CREATE_COMPLETE, choose the Outputs tab.
You use six of the outputs in later steps.
| Output | Used in |
VerifyAudClaimCommand | Step 2 |
SnowflakeSecurityIntegrationSQL | Step 3 |
OAuthClientSecretArn | Step 5 and Step 6 |
CognitoTokenEndpoint, CognitoClientId and CognitoScope | Step 3 and Step 6 |
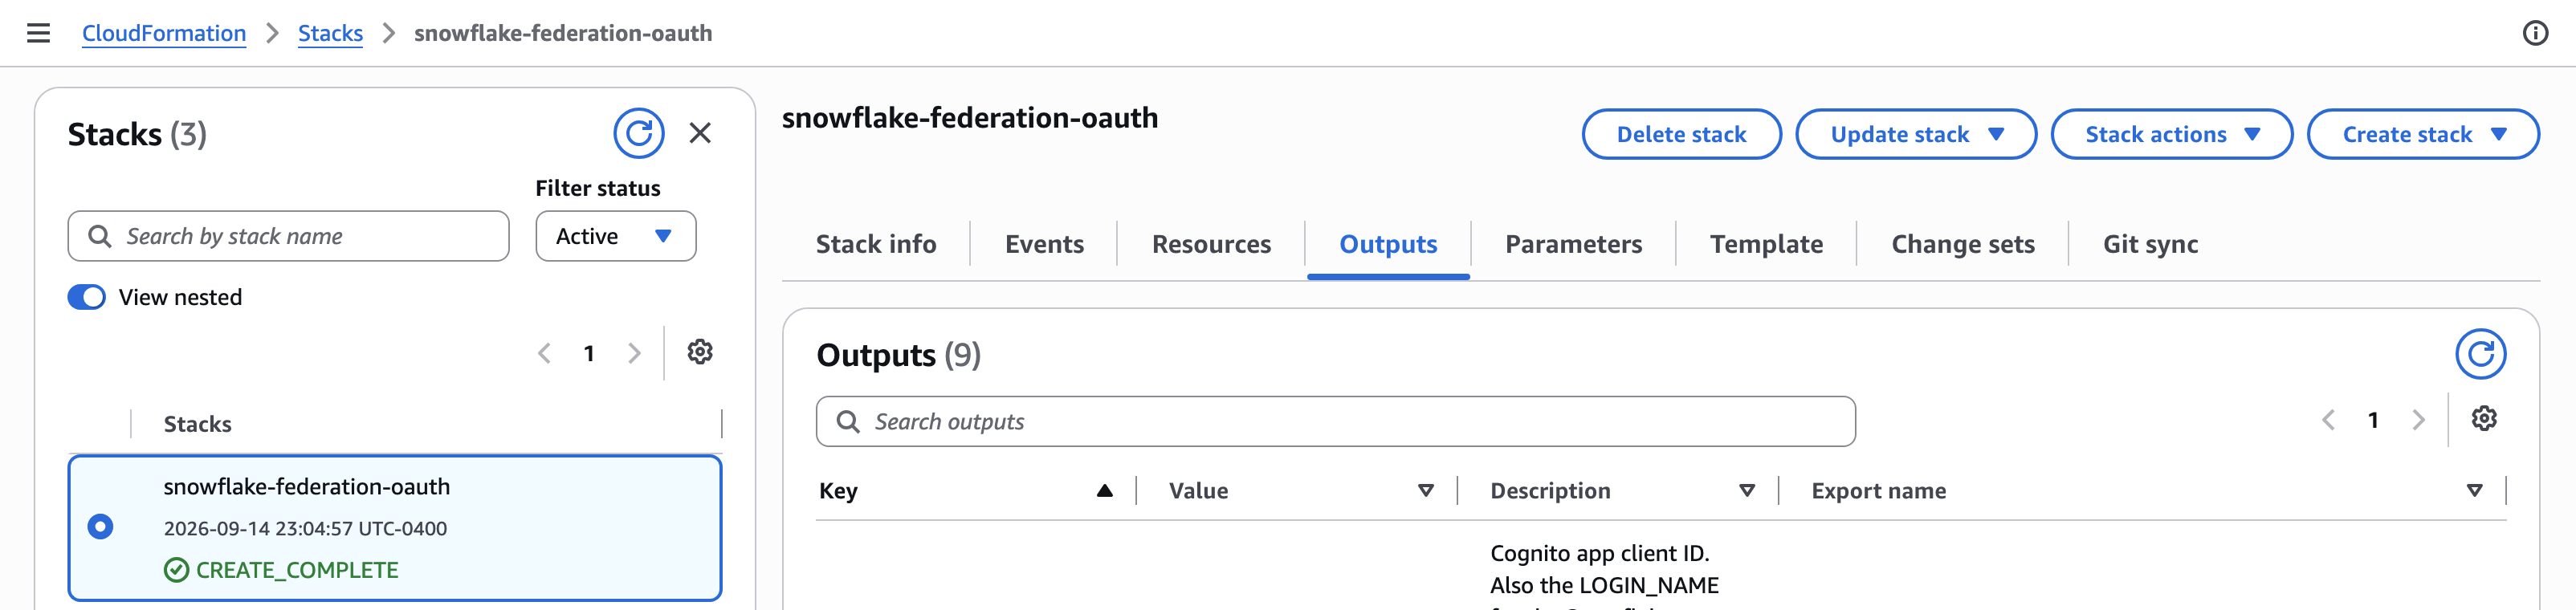
Figure 2: CloudFormation Outputs tab showing the values used in later steps
Note: After the connection validates in Step 6, AWS Glue caches the token it mints by writing it back into this secret. Treat read access to the secret as read access to the federated tables.
Step 2: Verify the access token
Confirm that the Lambda function is adding the claim before you configure Snowflake. A missing claim doesn’t fail here. It surfaces several steps later as an AWS Glue connection that can’t authenticate, which is harder to attribute.
- On the Outputs tab, copy the value of
VerifyAudClaimCommand. - Choose the AWS CloudShell icon on the console navigation bar, as shown in the following screenshot.
- Paste the command and run it. Confirm two values in the output. The
audclaim matches your Cognito client ID, andscopeissnowflake/catalog.read.
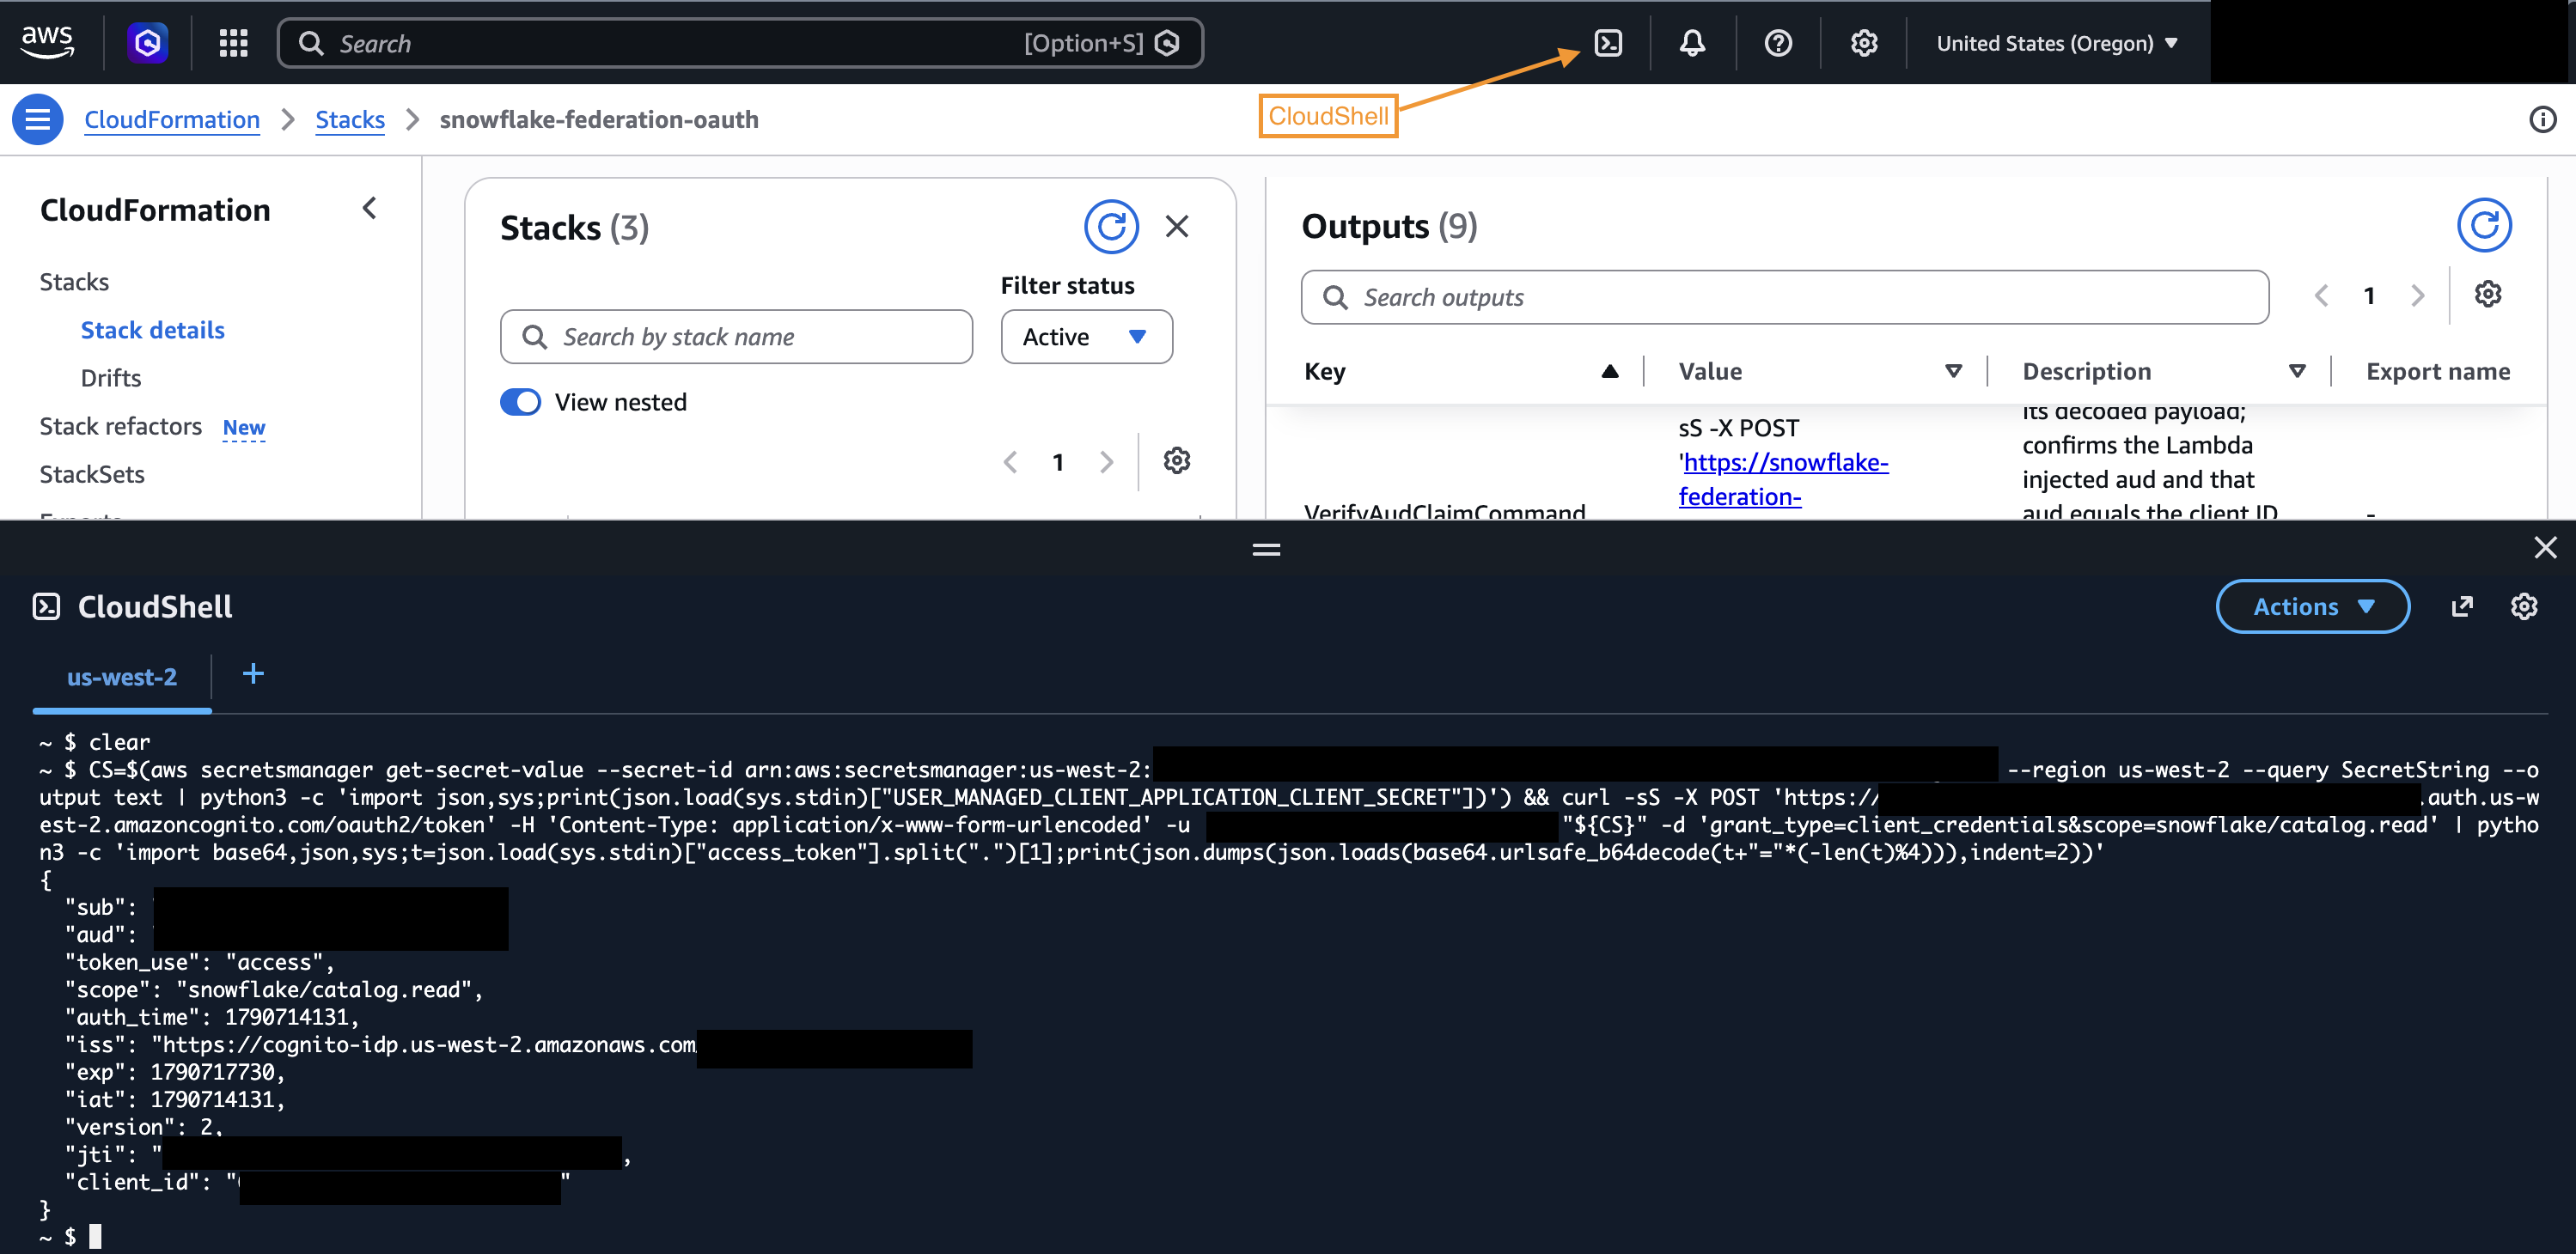
Figure 3: Decoded access token payload showing the injected aud claim and the catalog.read scope
Step 3: Configure Snowflake
In this step you configure Snowflake to trust Cognito tokens, create the service user that Lake Formation authenticates as, and grant it read access to your tables.
- Run the following statement in a Snowflake worksheet, replacing the three placeholders with the
CognitoIssuerUri,CognitoJwksUrl, andCognitoClientIdoutputs from Step 1. TheSnowflakeSecurityIntegrationSQLoutput contains the same statement with your values filled in. CREATE omits OR REPLACE, so it fails rather than overwriting an existing integration.
Snowflake normally takes the role from a session:role:<ROLE> scope, which Amazon Cognito custom scopes can’t carry because they use the form resourceServer/scope. The statement therefore sets EXTERNAL_OAUTH_ANY_ROLE_MODE to ENABLE, which lets the session use any role granted to the service user, so keep that user to a single role. The blocked roles list also covers SYSADMIN and USERADMIN, which the Snowflake default list doesn’t.
- Create the read-only role and the service user. Set LOGIN_NAME to the
CognitoClientIdoutput, because the token’ssubclaim carries the client ID and the integration mapssubtologin_name.
- Grant the role read access to the tables you want to federate. For the privileges the Iceberg REST Catalog API requires, see Configure access control in the Snowflake documentation.
Note: Federate a schema that contains only Snowflake-managed Iceberg tables. An externally managed table can fail the entire table listing. Converted tables, tables loaded from Iceberg-compatible Parquet files and clones whose source table the role can’t access aren’t supported. Tables with mixed-case quoted names aren’t federated, because the connection you create in Step 6 sets CATALOG_CASING_FILTER to UPPERCASE_ONLY.
Snowflake masking and row access policies don’t apply when Athena reads a federated table, because Lake Formation vends the Amazon S3 credentials and Athena reads the Parquet files directly. Keep tables that rely on them out of the federated schema or recreate the controls in Lake Formation and test them.
- Next, find the Amazon S3 bucket and prefix your external volume writes to. You need both in Step 5.
STORAGE_BASE_URL holds the bucket and an optional prefix. For s3://my-bucket/iceberg/, the bucket is my-bucket and the prefix is iceberg. If nothing follows the bucket name, leave the prefix blank in Step 5. A prefix is better, because it limits the data access role to that path. If ENCRYPTION_TYPE is AWS_SSE_KMS, note the key in ENCRYPTION_KMS_KEY_ID for Step 5. If it is NONE, check the bucket’s default encryption in the Amazon S3 console. The Snowflake role that owns the Iceberg tables must keep the USAGE privilege on the external volume, or operations that request vended credentials fail.
If the bucket uses a customer managed KMS key, set KMS_KEY_ID on the external volume to the full key ARN. Then add the following statement to the key policy, so the session Snowflake uses for the role in STORAGE_AWS_ROLE_ARN can read the encrypted files. Without it, the AWS Glue connection fails with an error that says no session policy allows kms:Decrypt.
Step 4: Authorize AWS PrivateLink in Snowflake
Snowflake requires proof that you own the AWS account before it accepts a PrivateLink connection. You provide that proof as an AWS Security Token Service (AWS STS) federation token. You must call get-federation-token with the long-term credentials of an IAM user, because AWS STS doesn’t support calling it with temporary credentials from an assumed role.
- Using an IAM user with long-term access keys, generate a federation token:
The token appears in the SQL statement, so Snowflake keeps it in query history. The 15-minute duration limits how long it stays valid.
- In your Snowflake worksheet, pass your AWS account ID and the full JSON output from the previous command:
The output confirms that Snowflake authorized PrivateLink for your account.

Figure 4: Snowflake output confirming PrivateLink authorization
- Retrieve the two values you need for the stack in Step 5:
Record both values. privatelink_hostname is the Snowflake PrivateLink hostname, and vpce_service_name is the endpoint service name.
After authorization succeeds, delete the temporary IAM user and its access key. Revoking PrivateLink access later requires a new federation token, so recreate a similar user at that point. For more information, see How to retrieve a Federation Token from AWS for PrivateLink Self-Service.
Step 5: Set up VPC and PrivateLink connectivity
This stack creates the interface VPC endpoint to the Snowflake PrivateLink service and the Amazon Route 53 private hosted zone that resolves your Snowflake hostname to it. It also creates the security group that the endpoint shares with the AWS Glue connection. Keep Existing VPC ID blank and it also builds a VPC with public and private subnets and a NAT gateway.
To use an existing VPC, supply Existing VPC ID and two or more private subnet IDs in different Availability Zones. The stack then creates no subnets and no NAT gateway, so confirm three things first:
- You have enabled DNS resolution and DNS hostnames on the VPC.
- The private subnets have a
0.0.0.0/0route to a NAT gateway, which the AWS Glue connection uses to reach the Amazon Cognito token endpoint. Amazon Cognito doesn’t support AWS PrivateLink, but the traffic stays on the AWS network because both sit in the same Region. Without this route, the stack still succeeds and the connection fails in Step 6. - No Amazon Route 53 private hosted zone for
privatelink.snowflakecomputing.comis already associated with the VPC. A second zone for the same domain makes name resolution unpredictable.
To deploy the stack, complete the following steps:
- Choose Launch Stack.
- Confirm the Region selector matches your Snowflake account Region, then choose Next.
- For Stack name, keep
snowflake-federation-network, then enter the following parameters.
| Parameter | Value |
| Snowflake PrivateLink hostname | privatelink_hostname from Step 4 |
| Snowflake PrivateLink service name | vpce_service_name from Step 4 |
| Iceberg S3 bucket name | The bucket in the STORAGE_BASE_URL output from Step 3 |
| Iceberg data key prefix | The prefix in the STORAGE_BASE_URL output from Step 3. Leave blank if you have none |
| Iceberg bucket KMS key ARN | KMS key ARN. Leave blank if the bucket does’t use KMS |
| OAuth client secret ARN | OAuthClientSecretArn from Step 1 |
If the bucket uses SSE-KMS, the stack grants the data access role kms:Decrypt on the key you enter. The default key policy already allows this. If your key policy doesn’t delegate access to IAM, add the role as a key user.
- Choose Next, keep the defaults on Configure stack options, and choose Next.
- On Review and create, select I acknowledge that AWS CloudFormation might create IAM resources with custom names, then choose Submit.
- When the stack status is
CREATE_COMPLETE, which takes about 5 minutes, choose the Outputs tab and recordPrivateSubnetIds,GlueConnectionSecurityGroupId,LakeFormationDataRoleArn, andRegisteredS3Location. You use all four values in Step 6.
NAT gateway and the interface VPC endpoint carry hourly and data processing charges. For more information, see Amazon VPC pricing.
Step 6: Register with Lake Formation and create the federated catalog
The remaining setup is a sequence of AWS CLI commands. Run them in AWS CloudShell in the same Region as both stacks.
- Set the values used by the commands that follow. Fill in the Region, and the stack outputs from Step 1 and Step 5.
- Register the Amazon S3 location that holds your Iceberg data. This is what lets Lake Formation vend scoped credentials to Athena for the underlying data files.
- Create the AWS Glue connection. This writes the definition to a file, then creates it.
- Check the connection status. AWS Glue validates asynchronously. It creates the network interface, completes the OAuth2 exchange with Amazon Cognito, and calls the Snowflake Iceberg REST API over AWS PrivateLink. Repeat this command until it returns
READY, which takes approximately 5–10 minutes.
If it returns FAILED, read the reason and correct the Snowflake configuration from Step 3. A missing security integration, service user, or grant is the usual cause.
Then delete the connection before you retry, because the name stays in use.
- Register the connection with Lake Formation using privileged access. A federated catalog can only use a connection registered this way.
- Create the federated catalog, then confirm the tables surface through it.
- Grant Lake Formation permissions to the data teams that will query the tables. The principal that created the catalog can already query it. Every other principal needs an explicit grant, including other Lake Formation administrators.
Note: The catalog ID for a federated catalog is :, not the bare account ID. Using the bare account ID grants permissions on the local AWS Glue Data Catalog instead, which succeeds and then leaves Athena returning an access denied error.
Step 7: Query the federated tables from Amazon Athena
- Open the Amazon Athena console and choose Query editor. If this is the first time you use Athena in this Region, choose Settings, then Manage, and set an Amazon S3 location for query results.
- In the left panel, select the following.
| Field | Value |
| Data source | AwsDataCatalog |
| Catalog | Your federated catalog, for example snowflake-federation-catalog |
| Database | Your Snowflake schema name, in lowercase |
- Run the following query:
Rows in the results pane confirm the federation works end to end, as shown in the following screenshot.
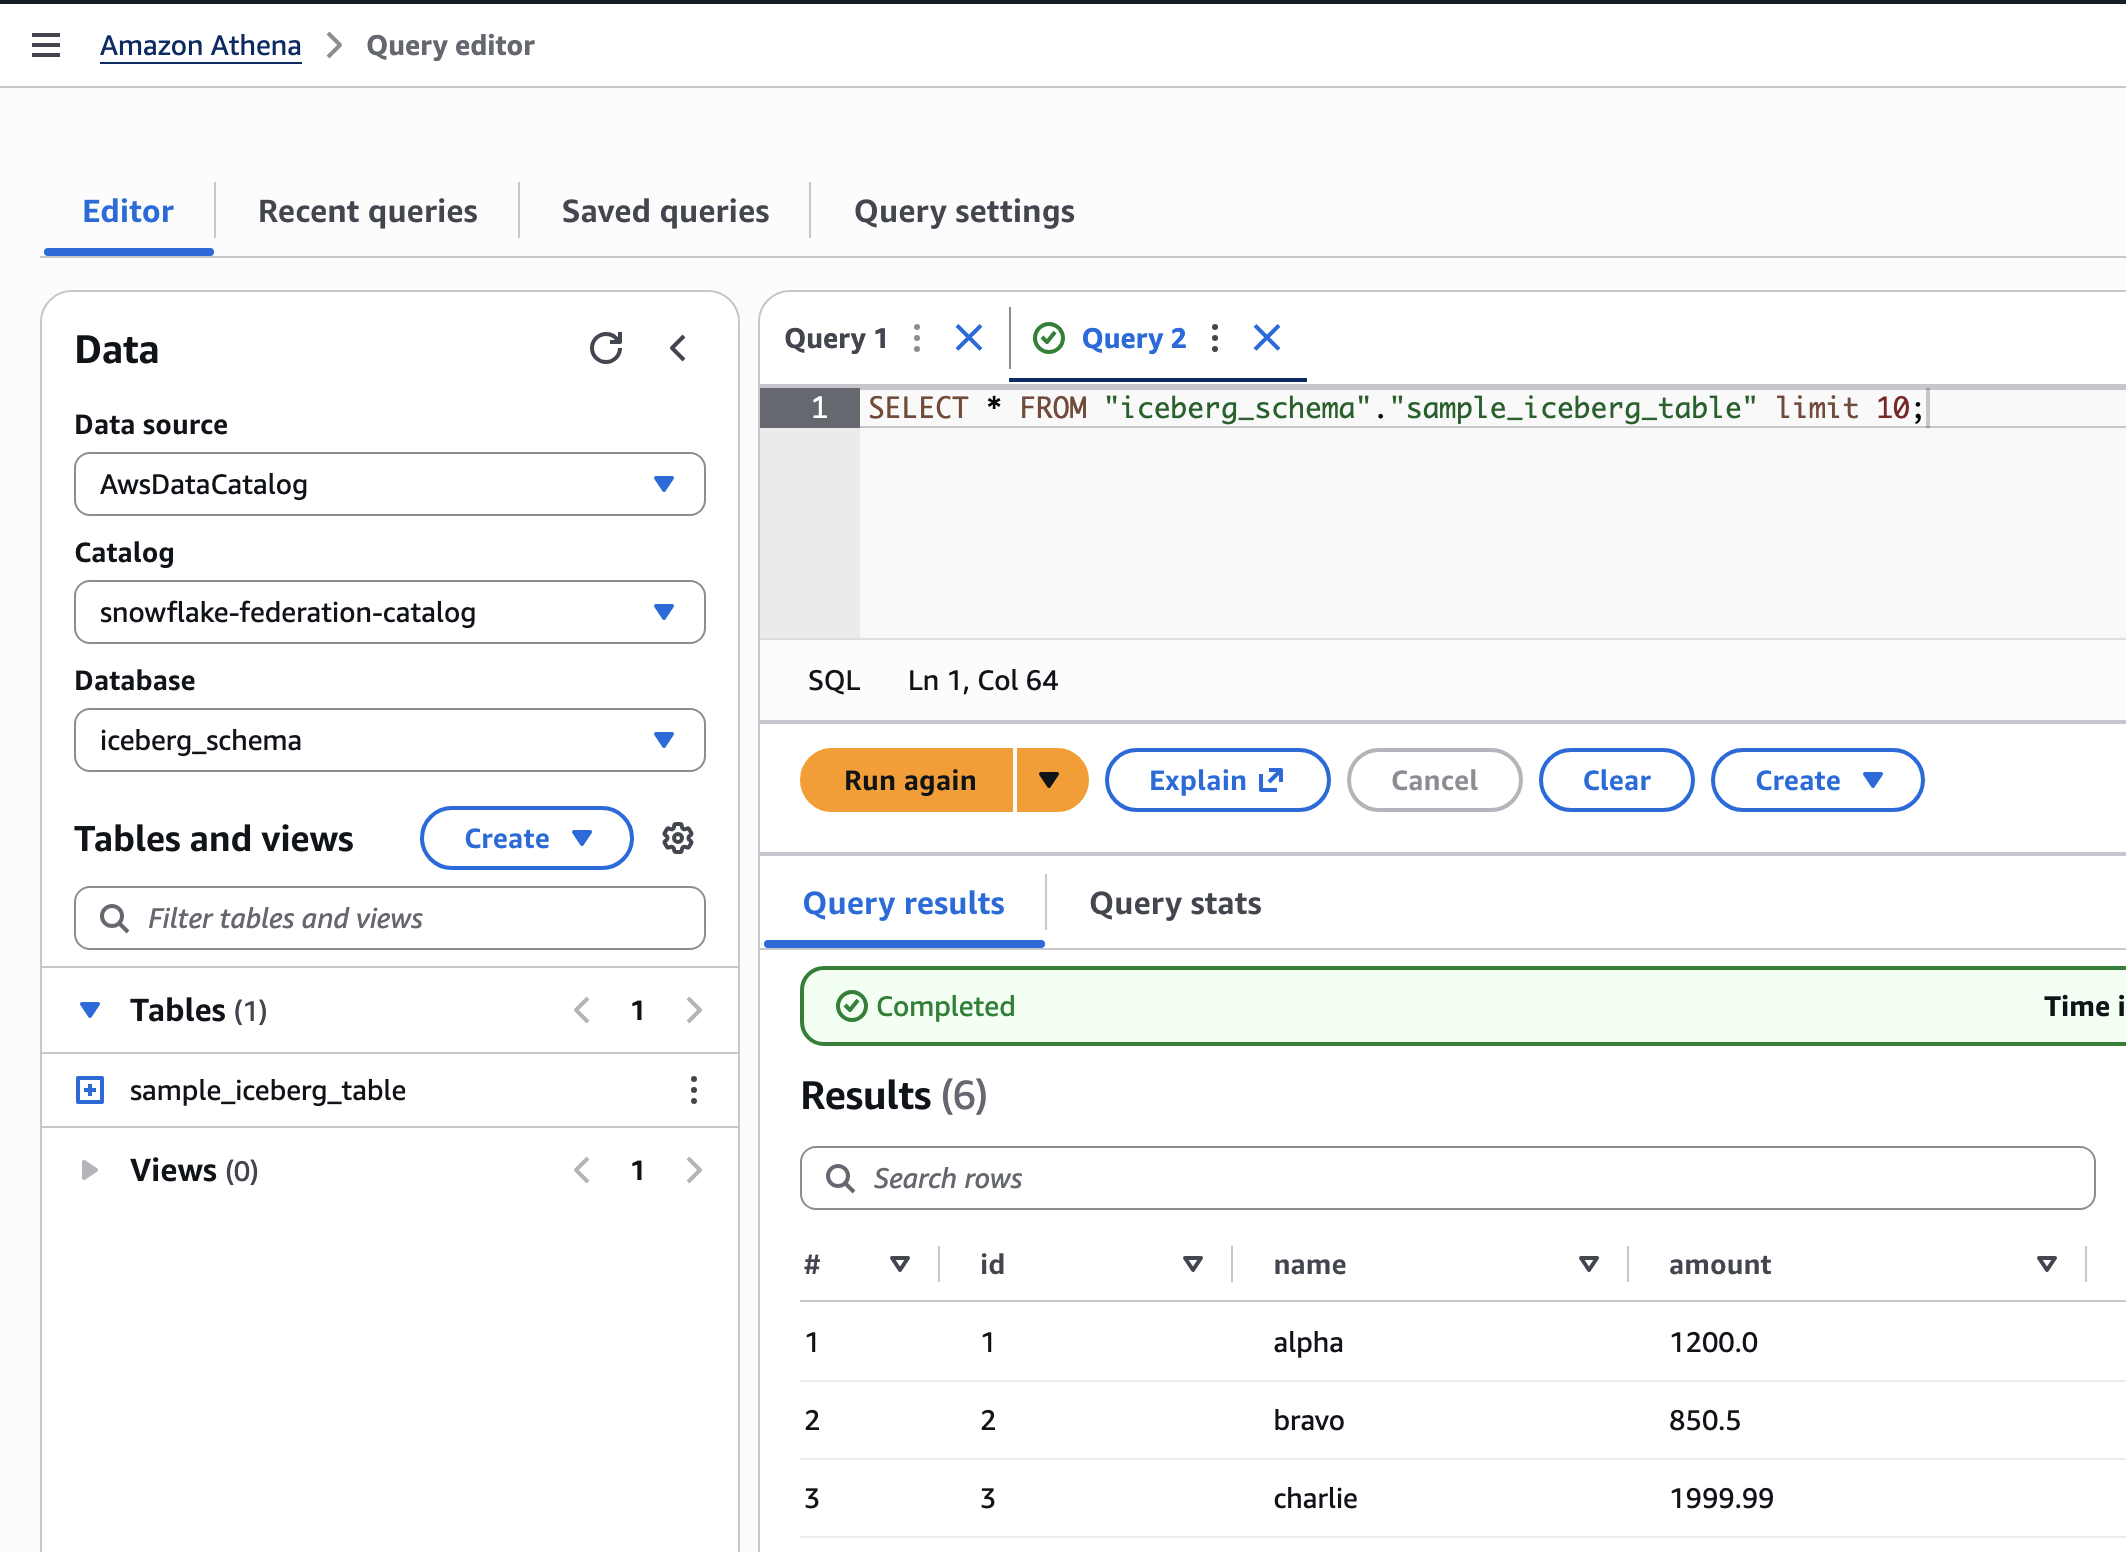
Figure 5: Query results in Amazon Athena from a Snowflake-managed Iceberg table
To confirm that Athena reads current Snowflake data rather than a copy, insert a row in Snowflake and run the query again. The new row appears with no additional data movement into your AWS account.
Dropping a table in Snowflake doesn’t revoke the Lake Formation permissions granted on it. Revoke those permissions explicitly when you remove a federated table.
Clean up
To avoid incurring future charges, delete the resources you created while following this post. Complete the following steps in both your AWS account and your Snowflake account.
AWS account
- On the AWS Lake Formation console, choose Catalogs, select your federated catalog, then choose Actions and Delete catalog.
- Record the network interfaces the AWS Glue connection created, while the connection still exists. Filtering on the Step 5 security group and the
ICEBERGRESTCATALOGdescription keeps the list to this deployment.
- Deregister and delete the AWS Glue connection. Do this before you delete the stacks, because the stack deletion fails while the connection’s network interfaces still hold the security group. Run the following in AWS CloudShell, replacing the Region, account ID, and connection name with your values.
- Deleting the connection releases its network interfaces, but they stay in the in-use state for several minutes and AWS Glue doesn’t remove them. Wait for each one to reach available, because the Amazon Elastic Compute Cloud (Amazon EC2) console Detach action fails even with Force detachment selected. The following script checks each interface you recorded and deletes it when ready.
- On the Lake Formation console, under Administration, choose Data lake locations, select the registered Amazon S3 location, then choose Actions and Remove.
- On the AWS CloudFormation console, delete
snowflake-federation-networkfirst, thensnowflake-federation-oauth. This removes the VPC endpoint, the Amazon Route 53 private hosted zone, the security group, and the IAM role. It also removes the Amazon Cognito user pool, the AWS Lambda function, and the client secret. If the stack created the VPC, subnets, and NAT gateway, it removes those too.
Snowflake account
- Open a SQL worksheet and run the following:
- Revoke the PrivateLink authorization for your AWS account. This requires a fresh federation token, generated the same way as during setup, from an IAM user with long-term access keys:
- Confirm the account is no longer authorized:
Deleting the federated catalog and connection doesn’t delete data in Snowflake or Amazon S3. It only removes the federation configuration in your AWS account.
Conclusion
In this post, you learned how to federate Snowflake Horizon Catalog Iceberg tables into AWS Lake Formation and query them from Amazon Athena. Amazon Cognito handled the OAuth2 tokens for machine-to-machine authentication. To extend this pattern to additional workloads, create a new app client in your Cognito user pool and a corresponding read-only Snowflake role.
To get started, see Catalog federation to remote Iceberg catalogs and Federate to Snowflake Iceberg Catalog in the AWS Lake Formation Developer Guide, and External OAuth overview in the Snowflake documentation.


